How to Draw Nick Wilde from Zootopia
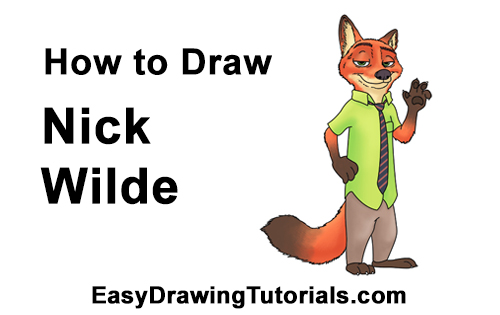
Use the videos and step-by-step drawing instructions below to learn how to draw Nick Wilde from Disney's Zootopia. A new cartoon drawing tutorial is uploaded every week, so stay tooned!
The speed drawing video:
The written step-by-step video tutorial:
Intro: Start off with a pencil sketch. In the beginning stages, don’t press down too hard. Use light, smooth strokes for sketching.
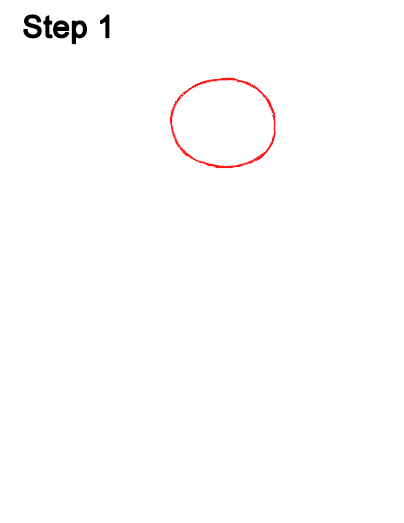
Step 1: Draw a small oval at the top of the page as a guide for Nick Wilde's head. First draw four marks for the height and width of the oval, then connect the marks using curved lines. As you place the initial marks, be sure that the ones for the width are farther apart than the ones for the height. Sketch lightly at first to get the shape right. The oval doesn't have to be perfect, as long as it's a bit wider than it is taller.
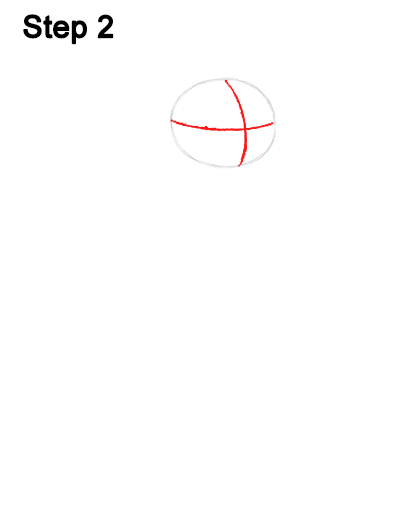
Step 2: Draw two curved intersecting lines inside the head, one horizontal and one vertical. These are construction lines that will help you place Nick Wilde's facial features later.

Step 3: Draw two triangle-like shapes on top of the head as guides for Nick's ears. The shape on the right should be smaller because of the perspective of his turned head.
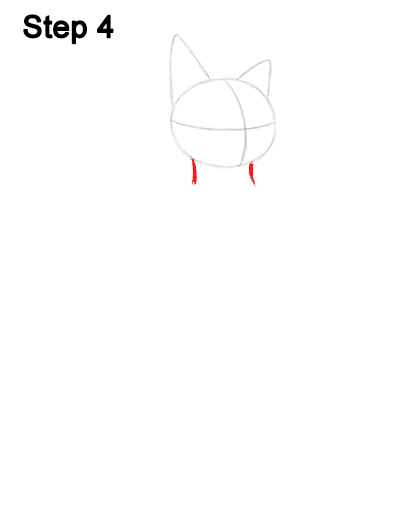
Step 4: Draw two short lines under the head as a guide for Nick's neck.
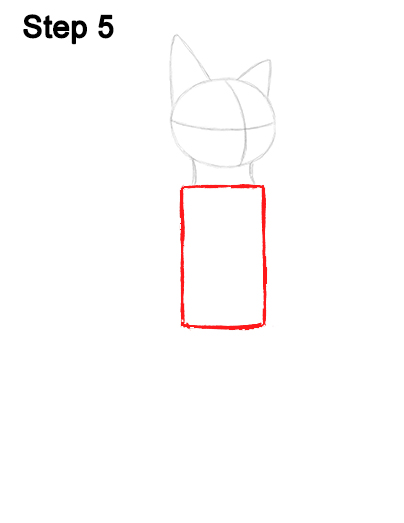
Step 5: Draw a long rectangle under the head as a guide for Nick Wilde's body. Draw a line under the neck, then mark the length of the rectangle far down below the head. Draw two long vertical lines for the sides and close up the rectangle with a smaller horizontal line at the bottom. The length of this rectangle should be a bit longer than the length of the neck, head and ears combined.
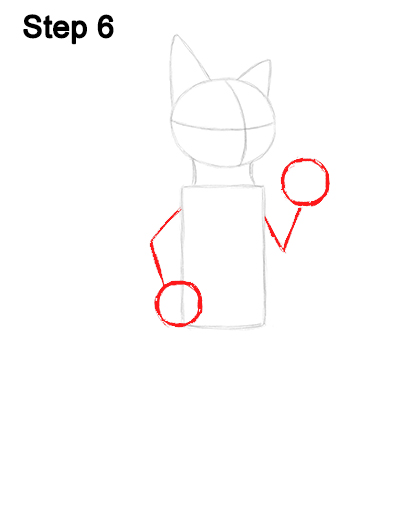
Step 6: Draw an angled line on the left side of Nick's body as a guide for the first arm. On the bottom end of that line, draw a small circle as a guide for the hand. On the top, right side of the body, draw a V-shaped line as a guide for the second arm. At the end of that line, draw another small circle as a guide for Nick Wilde's other hand.
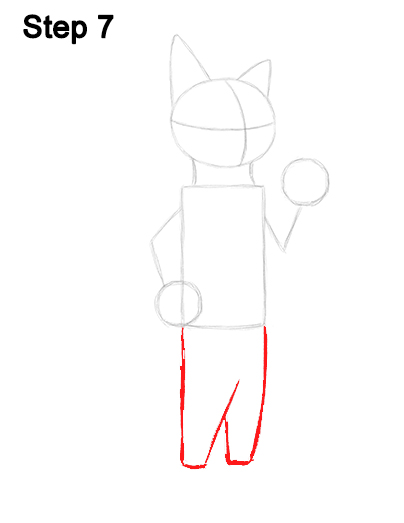
Step 7: Draw the guide for the legs under Nick's body by first drawing a long, vertical line on the left side. Then draw the middle section of the legs as a long diagonal line. Add the right leg as a long vertical line that connects to the middle section with a smaller vertical line.
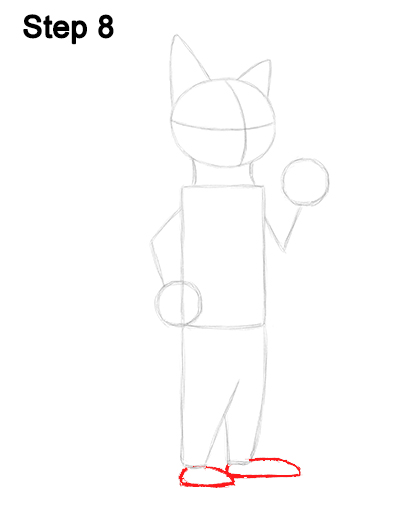
Step 8: Draw a curved shape under each leg as a guide for Nick Wilde's feet. The shape on the right will be longer, as that foot will be pointing outward.
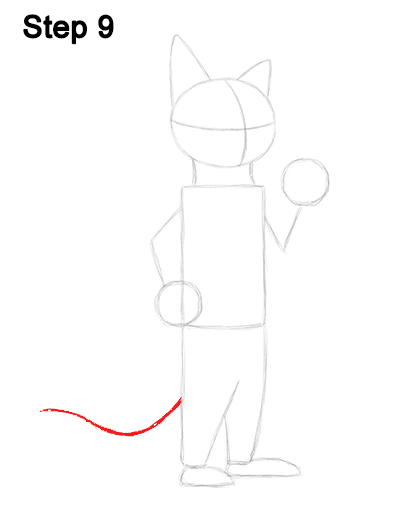
Step 9: Draw a long, wavy line on the left side of the legs as a guide for Nick Wilde's tail.
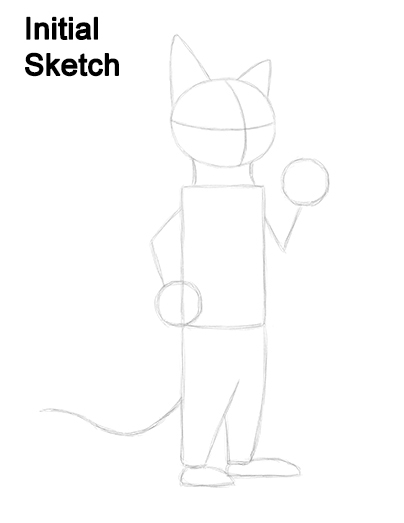
That's it for the guides! For the next steps, use darker lines for a more finished drawing.
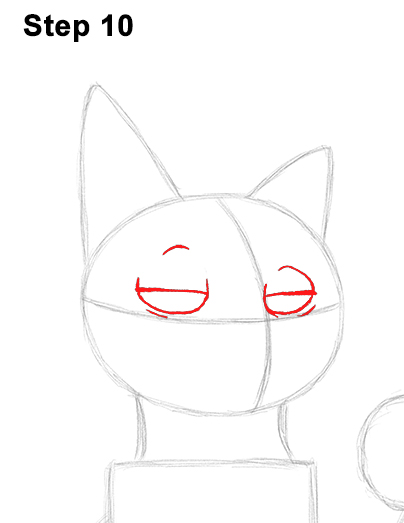
Step 10: Lightly sketch Nick Wilde's eyes inside the head by first drawing two U-shaped lines. The eyes should be sitting on top of the horizontal construction line and on either side of the vertical line. When you get the placement right, darken the eyes using a thicker line. The eye on the right should be smaller because of the perspective of the turned head. Draw a line on top of each U-shaped line for Nick's half- closed eyelids. Make these lines thick and dark too to represent the eyelashes. Add a few more curved lines around the eyes for extra detail. Draw a curved line high above each eye for the top part of the half-closed eyelid.
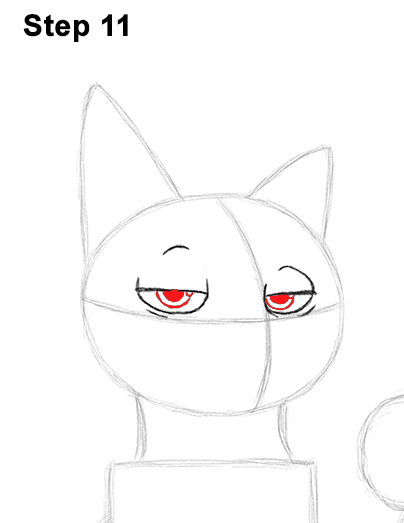
Step 11: Draw a half-circle directly below each eyelid for the irises. The iris on the left should be in the middle of the eye, while the iris on the right should be on the left side of the eye. Draw a tiny circle inside each iris, off to the side, to represent glare on Nick Wilde's eyes. In the middle of each iris, draw a small half-circle and shade them in for the pupils.
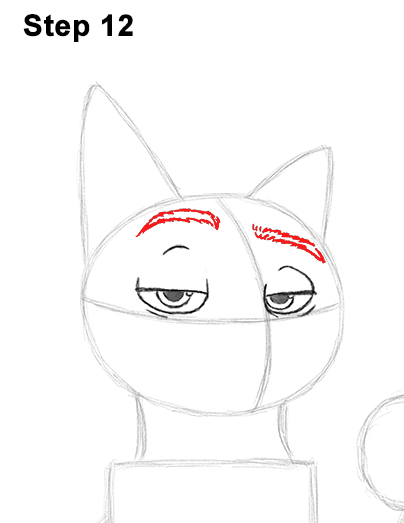
Step 12: Using a series of quick, short strokes, draw a long, thin shape above each eye for Nick Wilde's eyebrows. Place the eyebrow on the left high above the eye, close to the top edge of the initial oval. Using quick, short strokes, draw the other eyebrow the same way. Draw this eyebrow lower, closer to the eye, to give Nick a mischievous look.
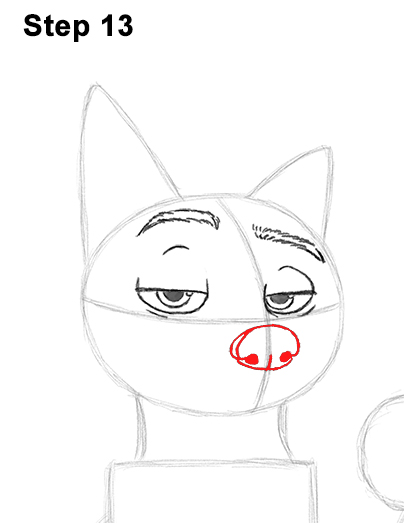
Step 13: Lightly sketch a small oval under the horizontal construction line for Nick Wilde's nose. The vertical construction line should split the small oval into almost equal halves. When you get the shape and placement right, darken the lines. Curve the sides of the nose inward and add a small dot on either side for Nick's nostrils. Darken the bottom part of the oval too and add a small vertical line at the bottom.
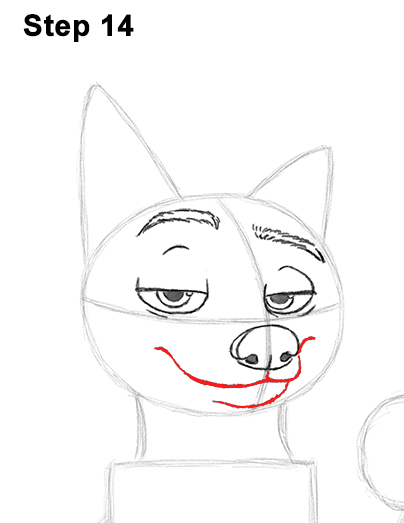
Step 14: Use a few long, curved lines under the nose to create Nick's mouth. First draw a line under the nose that curves to the left, then up under the eye on the left. Now draw the right side of the top lip as a couple of short, curved lines on the bottom, right side of the nose. Draw a curved line that's made up of quick, short strokes under the mouth and along the lower edge of the initial oval for the fuzzy chin.
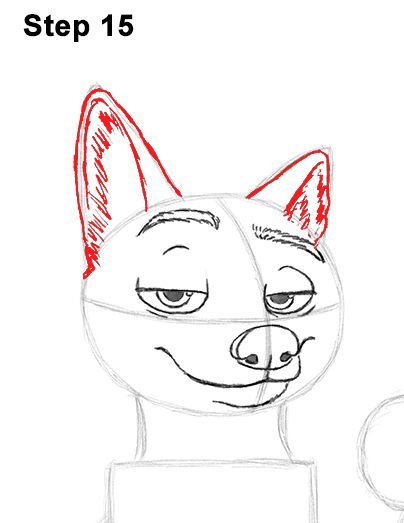
Step 15: Use the initial triangle-like shapes on top of the head as guides to draw Nick Wilde's fox ears. Follow the basic path of the guides but make the lines curve more on the sides and at the tips. Inside the ears, draw another curved line to indicate the inner ear structure. Add a series of quick, short strokes inside each ear to represent fur.
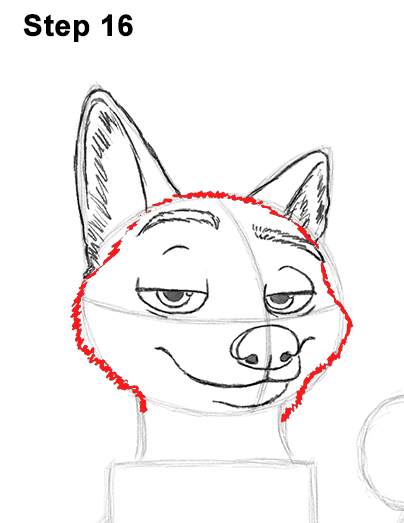
Step 16: Use the initial oval as a guide to draw the shape of Nick Wilde's head. Use quick, short strokes as you follow the basic path of the oval to create the fuzzy texture of the fur. Draw the line for the face on the right side closer to the eye than the edge of the initial oval. As you draw the left edge of the head, make the line wider than the initial oval to create the cheek. Make the side on the right a bit wider than the oval too to create the other cheek.
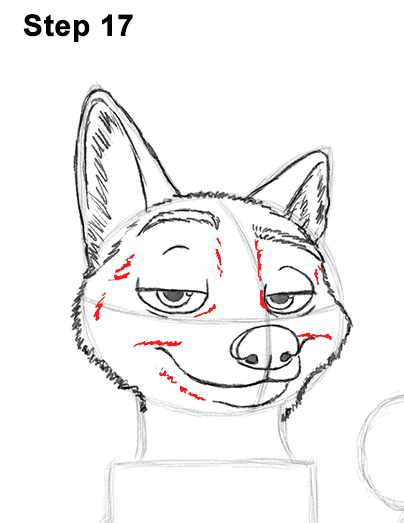
Step 17: Add a few more quick, short strokes inside Nick Wilde's head for more detail on the fur. Draw a few strokes around the eyes to emphasize his expression. Add some strokes around the mouth too for the smile lines.
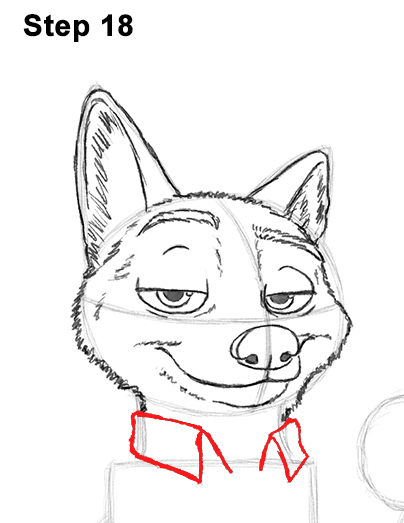
Step 18: Use a series of angled lines under the head to draw Nick Wilde's shirt collar. The middle of the shirt collar should be similar to the letter V, but the bottom corner shouldn't touch. The shape of the left side of the collar should be similar to a rectangle. The right side of the collar should be smaller because of the perspective.
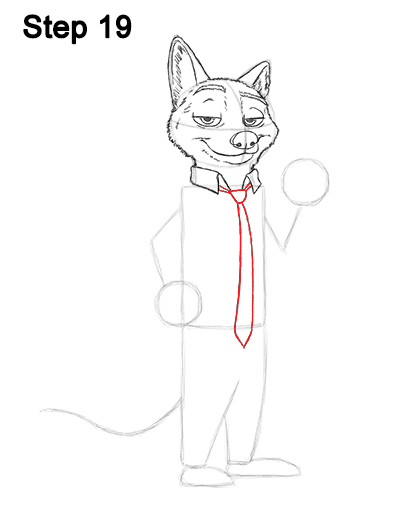
Step 19: In the middle of the shirt's collar, draw a shape similar to an upside-down triangle for the tie's knot. Add two short lines on the top corners of the knot toward the collar to indicate the part of the tie around Nick Wilde's neck. Under the knot, lightly sketch two long vertical lines for the rest of the tie. When you get the position of the lines right, darken them. The lines should end at the lower edge of the initial rectangle. The vertical lines should be closer together at the top and farther apart at the bottom. Draw a V-shaped line at the bottom for the tip of Nick's tie.
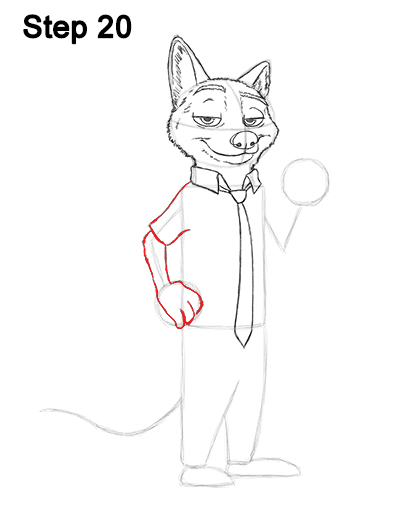
Step 20: Use the angled line on the left as a guide to draw Nick Wilde's arm. Lightly sketch the shape of the shirt's sleeve as you follow the path of the guide. The sleeve is made up of three curved lines. When you get the shape right, darken the lines. Draw the forearm by following the bottom portion of the angled guide line. As you follow the path of the guide, make the top part of the forearm wider and the bottom part thinner for the wrist. Now follow the path of the circle at the bottom to create the shape of the hand. Use a couple of curved lines near the lower edge of the initial circle to create the three fingers.
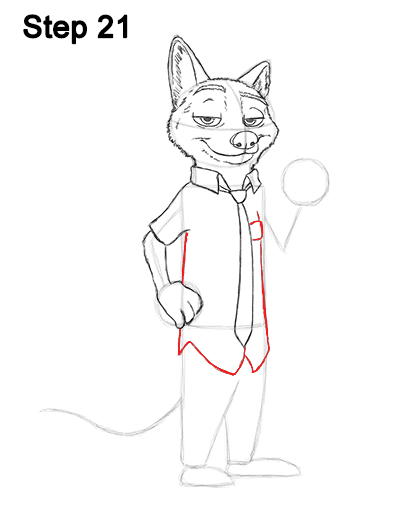
Step 21: Use the initial rectangle as a guide to draw Nick Wilde's torso and shirt. Darken the line on the left below the initial rectangle for the side of the shirt. Draw a zigzag line to the left of the tie for the bottom part of the shirt. Add a V-shaped line to the right of the tie for the other side of the bottom of the shirt. Darken the right edge of the initial rectangle to create the other side of the shirt and torso. Draw a small square on the top, right side of the shirt for the shirt's pocket.
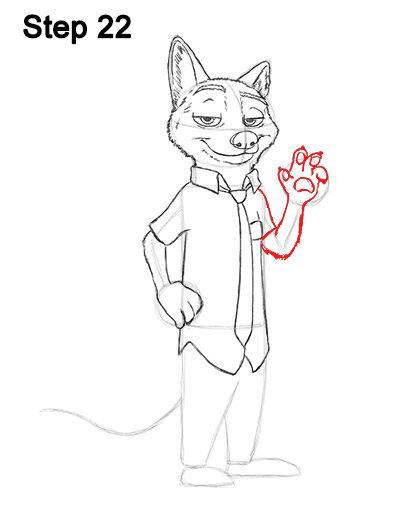
Step 22: Use the angled line on the right as a guide to draw Nick Wilde's other arm. First draw the sleeve at the top using a couple of curved lines. Follow the basic path of the angled line as you create the shape of the forearm. Use quick, short strokes at the bottom to indicate the fur there.
Now draw a small curved line on the left side of the small circle for the thumb. Draw Nick Wilde's other fingers as longer arcs. The height of the fingers should go outside the edge of the small circle. If you'd like, you can curve the third finger down. Follow the lower edge of the initial circle to create the rest of the hand. Add a small circle to the fingers for the padding and a tiny triangle-like shape at the tips for Nick's nails. Draw a curved shape on the palm of the hand for the padding found there.
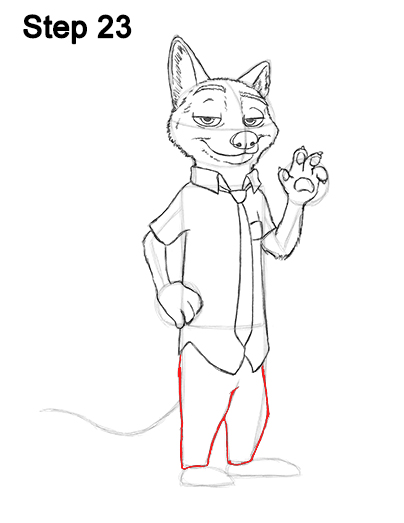
Step 23: Darken the initial guides under the shirt to create Nick Wilde's pants. Bend the line on the left outward more to create the knee.
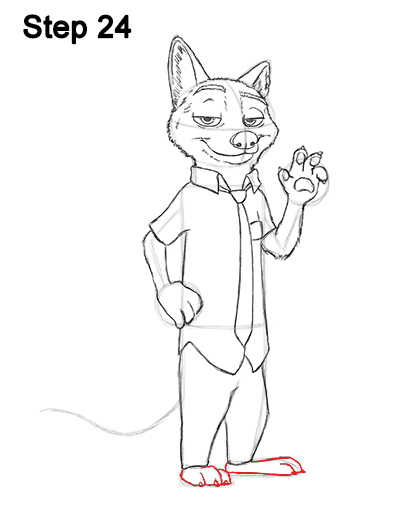
Step 24: Use the shapes under the pants as guides to draw Nick Wilde's feet. Divide the shape in to three sections using a couple curved lines to create the toes. Add a tiny triangle-like line on the tip of each toe for the nails. Draw the other foot the same way, except because it's pointing right, only two toes will be visible.
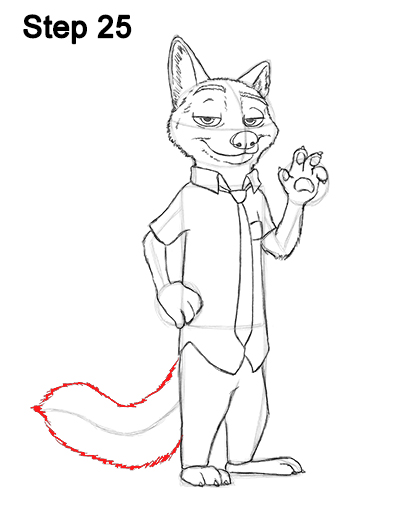
Step 25: Use quick, short strokes as you follow the basic path of the guide to create Nick Wilde's fluffy fox tail. Make the shape of the tail wide as you follow the guide. It should end at a point on the left side.
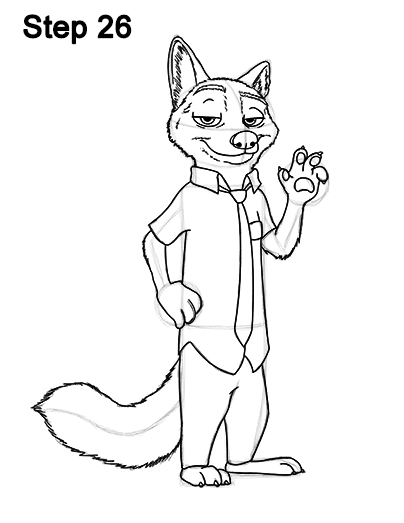
Step 26: For a more finished inked look, carefully go over the final sketch lines with a pen or marker.
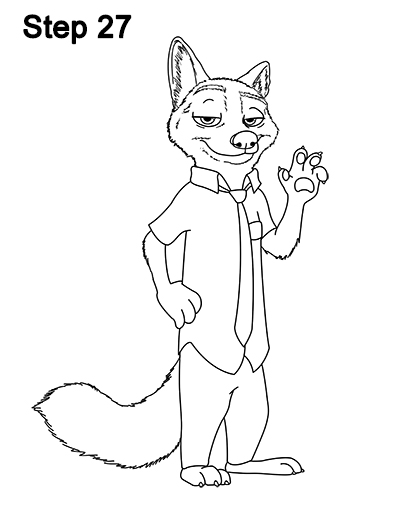
Step 27: After inking, get rid of every pencil mark with an eraser for a cleaner drawing.
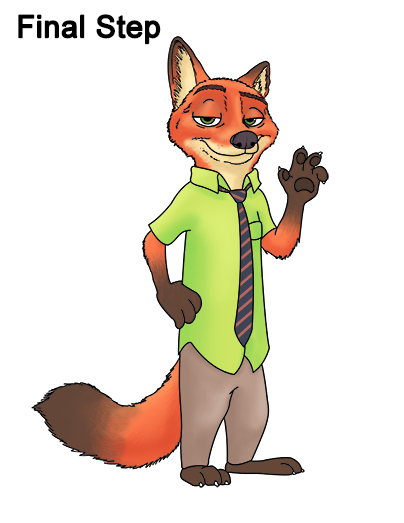
Final Step: Color your Nick Wilde drawing using color pencils, markers or even crayons! Use black lightly for the tips of the ears, the eyebrows, the nose, the hands, the feet and the tip of the tail. Use brown to create shadows on the body. Use short, strokes as you color for a furry texture.
Add orange to Nick Wilde's body right on top of the brown and black. Leave the sections inside the ears and around the mouth blank. Add the orange color lightly at first, then build up to the level that you like. Add red-orange and red to the fur and start pushing down harder with your color to blend in all the colors. Use a bit of gray and light yellow for the inside of the ears and the blank section around the mouth.
Color Nick's tie using alternating pink and blue diagonal stripes. Use green and yellow-green for the shirt. The shirt should have a pattern, but let's omit it for the sake of simplicity. Use gray to color the pants. Remember to pause the video after each step to draw at your own pace.
Thanks for visiting! Subscribe to the EasyDrawingTutorials YouTube Channel for a new tutorial every Sunday.
To learn how to draw animals, visit How2DrawAnimals.com.
RELATED TUTORIALS
 |
 |
 |
 |
 |


