How to Draw Ariel from The Little Mermaid (Full Body)
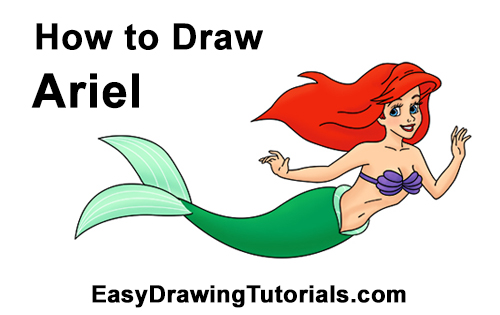
Use the video and step-by-step drawing instructions below to learn how to draw Ariel the Little Mermaid (full body). A new cartoon drawing tutorial is uploaded every week, so stay tooned!
The speed drawing video:
The written step-by-step video tutorial:
Intro: Start off with a pencil sketch. In the beginning stages, don’t press down too hard. Use light, smooth strokes for sketching.

Step 1: Draw a small circle on the right side of the page as a guide for Ariel's head. First draw four marks for the height and width of the circle, then connect the marks using curved lines. Don't worry if the circle isn't perfect. It's just a guide. If you would still like a perfect circle, you can just trace the edge of a coin or anything circular.
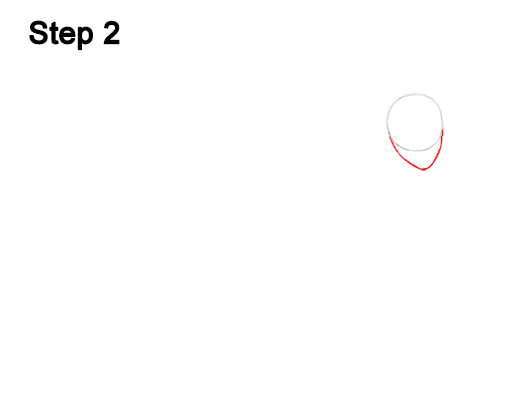
Step 2: Draw a small arc under the head as a guide for Ariel's jaw and chin. The arc should be pointy on the lower, right side. Sketch lightly first, then darken the line when you get the shape right. Don't make the arc too long, or Ariel will end up with a big chin.
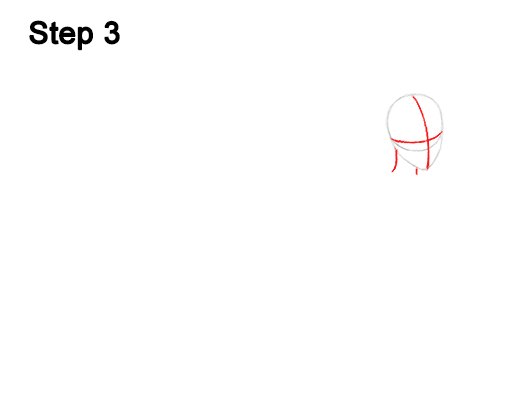
Step 3: Draw two intersecting lines inside the head, one horizontal and one vertical. The vertical line should be closer to the right side of the head, while the horizontal line should be near the middle. Curve the lines to contour to the head. These construction lines will help you place The Little Mermaid's facial features later. Add two short lines under the head as guide lines for the neck.
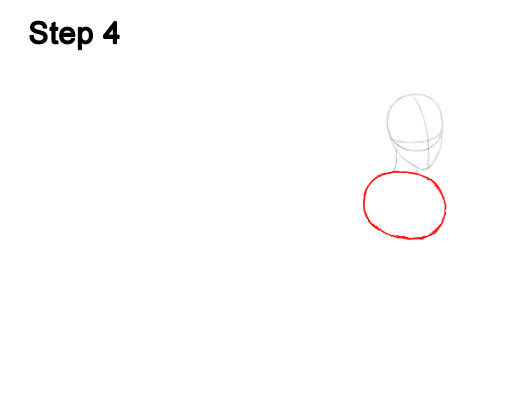
Step 4: Draw an oval under the head as a guide for the top part of Ariel's torso. First draw four marks to indicate the height and width of the oval, then connect the marks with curved lines. Pay close attention to the size of the oval relative to the size of the head.
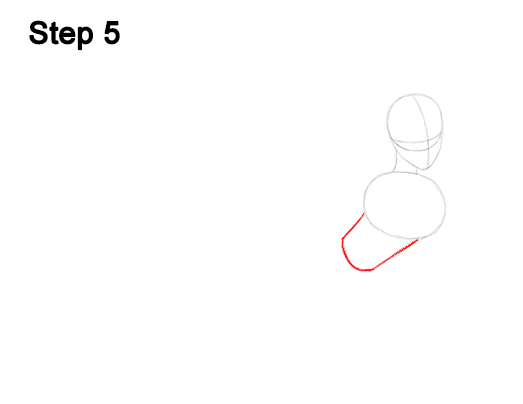
Step 5: Draw the guide for the lower part of Ariel's torso by first drawing two diagonal lines that slope toward the left side. Then close the bottom part of the lower torso by using a curved line on the left side.
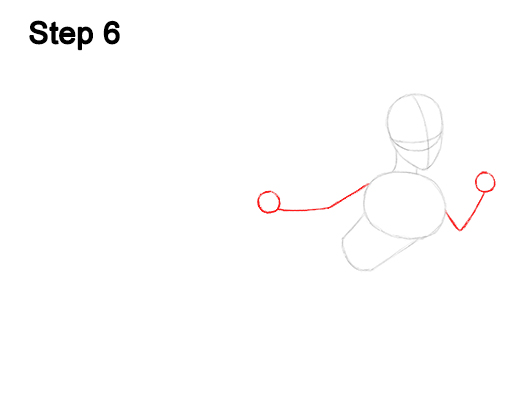
Step 6: Draw the guide for the arm on the left as a line that is a bit bent in the middle. Draw a small circle at the end of the line as a guide for Ariel's hand. The guide line for the arm on the right should be shaped sort of like the letter V. Add a small circle for the hand at the end too.
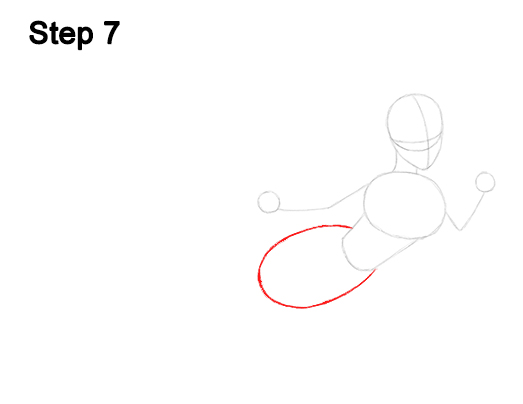
Step 7: Draw a curved line to the left of the torso for the top half of the guide for Ariel's tail. This line should be similar to an oval, only the left side of it should be behind the torso.
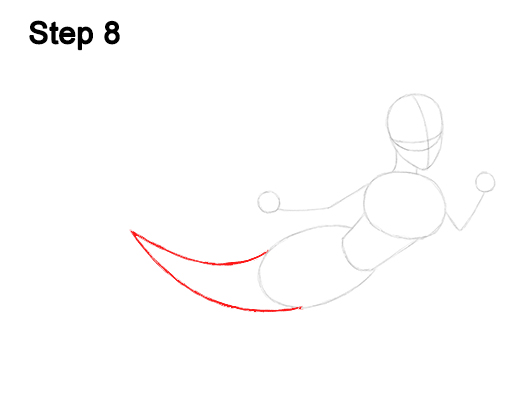
Step 8: Draw two curved lines on the left side as a guide for the bottom half of The Little Mermaid's tail. Pay attention to the length of these lines in relation to the rest of the body. If you make them too long, Ariel's tail will be too long as well. The two lines should curve up and come to a point on the left side.
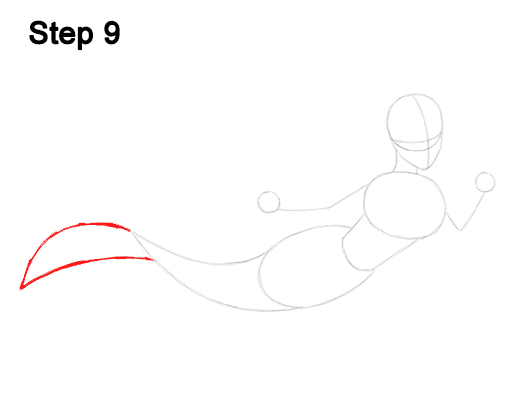
Step 9: Draw two more curved lines below the tip of the previous shape as a guide for the first fin. These lines should curve downward and come to a point. They should also be almost as long as the bottom half of Ariel's tail.
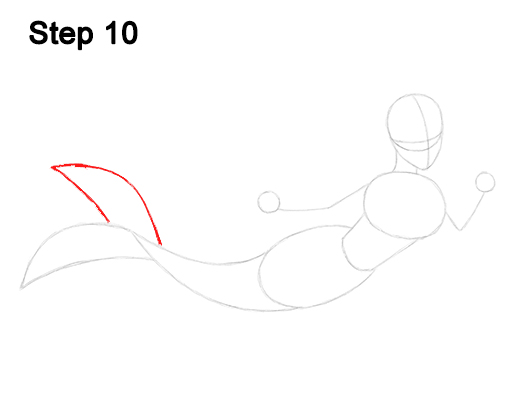
Step 10: Draw two more lines above the tip of the tail as a guide for Ariel's second fin. The shape of this fin should have more of a vertical orientation, whereas the previous one was more horizontal.
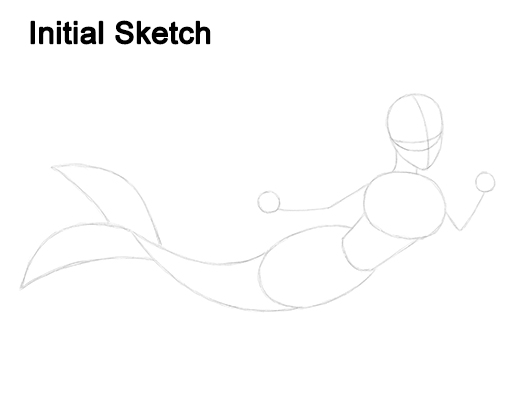
That's it for the guides! For the next steps, use darker lines for a more finished drawing.
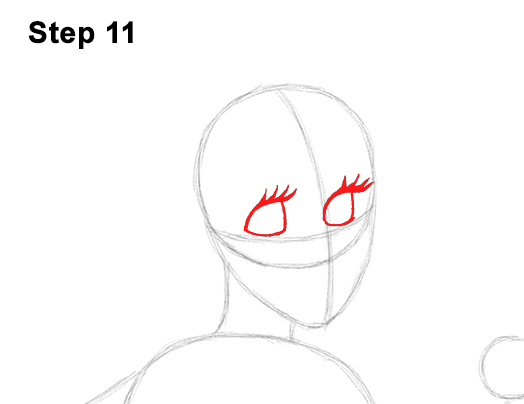
Step 11: Lightly sketch the shape of Ariel's eyes on top of the horizontal construction line and on either side of the vertical construction line. The shape of the eyes should consist of an angled line on the right side similar to a backward letter L and a curved line on the left side. When you get the shapes and placement of the eyes right, darken them. Use a thick line as you draw the outer edges of the eye shape.
The eye on the right should be a tiny bit smaller because of perspective. Draw a series of thick, curved, spiky lines above each eye for The Little Mermaid's eyelashes. Draw about four eyelashes per eye. Any more will start to look a bit crowded. Use thick, bold lines for the bottom of the eyelashes, and then end them at a point at the top.
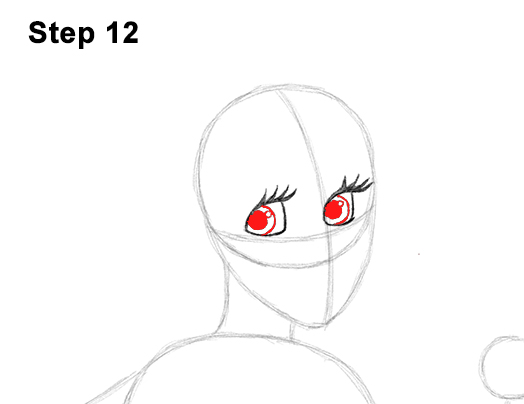
Step 12: Draw a curved line inside each eye, on the right side, for Ariel's irises. Sketch the lines lightly at first to get the placement right. Add a tiny circle at the top to represent glare. Inside each iris, in the middle, draw a small circle for the pupils. When you get the pupils right, shade them in using a dark value. When you shade the pupils, don't overlap the tiny circles with value.
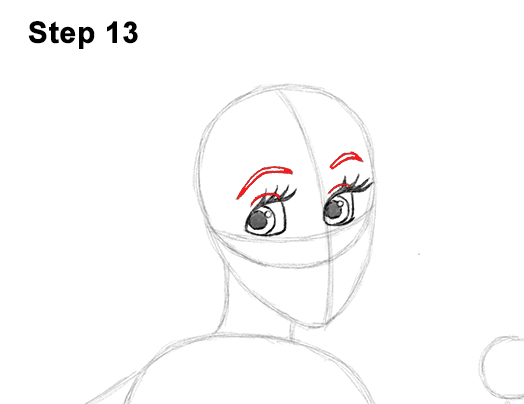
Step 13: Draw a small curved line above each eye for the eyelids. Draw another curved line, this time longer, high above each eye for Ariel's eyebrows. Each eyebrow is actually composed of two curved lines on top of each other to create thickness. Notice the spacing between the eyebrows and the top of the head, and between the eyebrows and the eyes.
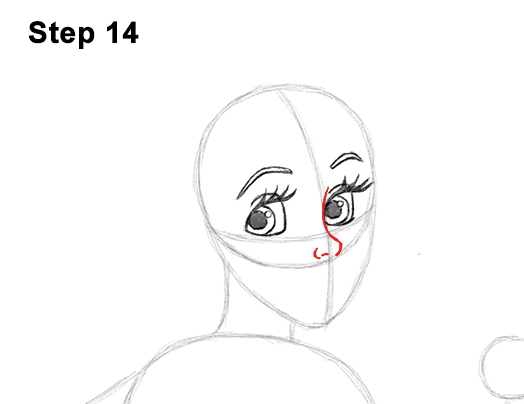
Step 14: Draw a curved line to the left of the vertical construction line for Ariel's nose. The line starts next to the eye on the right, then curves out at the bottom to create the nose's tip and ends at the horizontal construction line. Add two tiny lines to the left of the tip of the nose to represent the nostril.
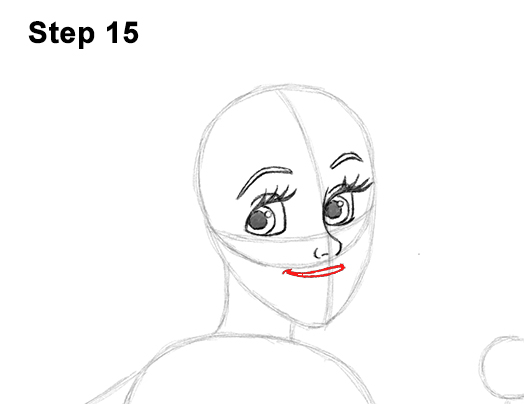
Step 15: Draw a curved line below the nose for Ariel's top lip. Like the eyebrows, the top lip consists of two lines on top of each other to make it thicker. The top lip should be thinner on the left side and should curve slightly on that side too.

Step 16: Draw a curved line below the top lip for the bottom part of the lower lip. First draw a mark to indicate how low Ariel's bottom lip will be, then close up the sides with curved lines. Add another curved line inside the mouth to indicate the top part of the bottom lip.
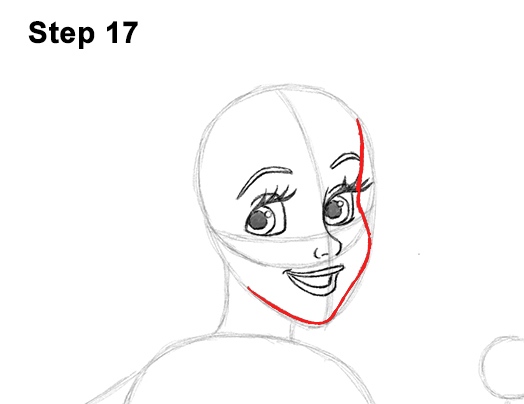
Step 17: Draw the side of The Little Mermaid's face using the initial circle and arc as guides. Follow the basic path of the guides as you darken the lines to create the shape of the face. The line for the face should come inward a bit near the eye to create the cheekbone. Make the bottom part of the arc rounder so that Ariel's chin doesn't end up being too pointy.
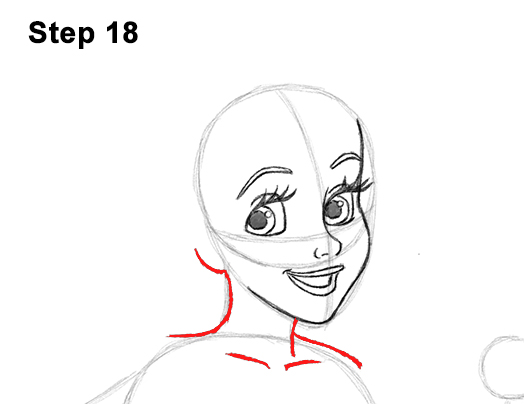
Step 18: Darken the lines under the head to create the neck. Extend the lines farther outward to create the top part of Ariel's shoulders. Add a couple of short lines under the neck for the collarbones. Draw a small curved line on the left side for the lower part of the ear.
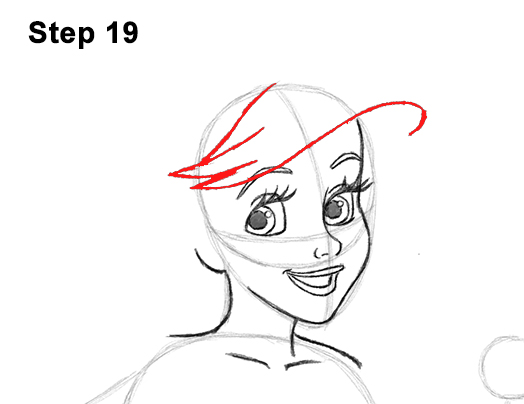
Step 19: Draw a long, wavy line above the eyebrows for the first part of Ariel's hair. The left side of the line should graze the eyebrow. The right side should come out of the head and curve down slightly. Draw three curved spikes on the left side to represent the tips of the long bangs.
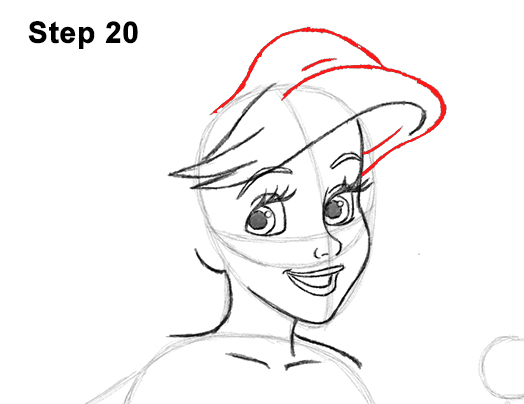
Step 20: Draw a series of lines above the head for the second part of the hair. The first curved line should be similar to a small hill high above Ariel's head. The second line should start below the first, and it should curve outward and end next to the eye on the right. Add a few short lines within the shape of the hair for extra detail.
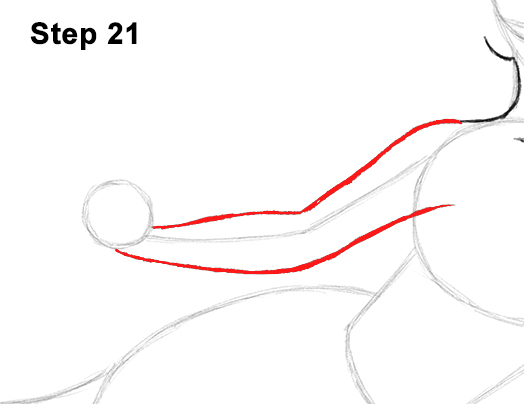
Step 21: Use the angled line on the left side of the body as a guide to draw Ariel's arm. Sketch lightly at first as you follow the basic path of the guide in order to get the shape right. The shape should be indented a bit near the middle to create the forearm, and the wrist should be thin.
When you get the shape of the arm right, darken the lines. Use light lines at first so they're easier to erase if you make a mistake. The line for the bottom part of the arm should continue toward the inside of The Little Mermaid's body just a little bit.
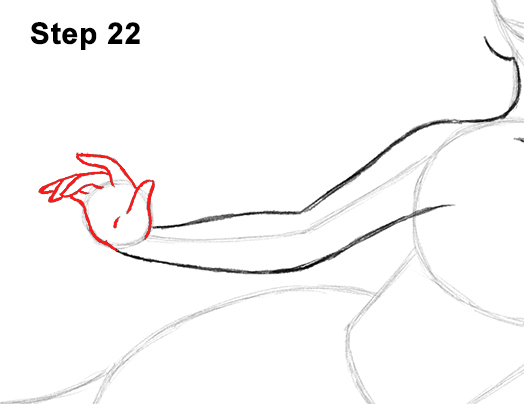
Step 22: Use the small circle as a basic guide to draw Ariel's hand and fingers. First draw a short, curved line on the top, right side of the circle for the thumb. The line should sort of be similar to a wavy upside-down letter U. To the left of that, lightly sketch a longer curved line for the index finger. Bend the shape a bit at the middle and make the tip pointy. When you get the shape of the finger right, darken the line. Hands can be a little tricky, so please pause the video to draw at your own pace.
Below the index finger, draw a similar shape for the middle finger but this time make it curve down a bit more. Ariel's ring finger is mostly behind the middle finger, so only draw the tip of it above the middle finger. Draw the the pinky the same way. Only draw the top part right above the ring finger. Now add a couple of short lines below the middle finger for the base of the ring finger and pinky. Extend the base of the pinky downward as you follow the shape of the initial circle to create the palm of the hand.
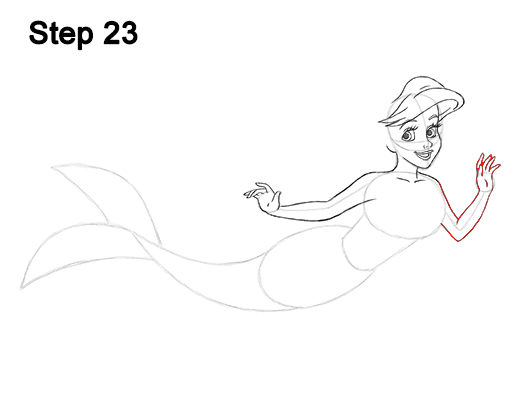
Step 23: Draw Ariel's arm and hand on the right side the same way. Sketch the shape of the arm lightly at first as you follow the basic path of the guide line. Make the arm thinner the closer it is to the hand to create the wrist. The forearm should be thicker. When you get the shape of the arm right, darken the line.
Use the small circle as a basic guide to draw Ariel's fingers. First draw the thumb as a small, curved line on the top, left side of the circle. Now draw the top part of the index finger above the thumb and make it curve slightly to the right. To the right of the index finger, draw two more similarly shaped lines for the middle and ring fingers. Draw a smaller, curved line on the top, right side of the initial circle for the pinky finger. Follow the basic path of the initial circle to finish drawing The Little Mermaid's hand and add a small line within the shape for extra detail.
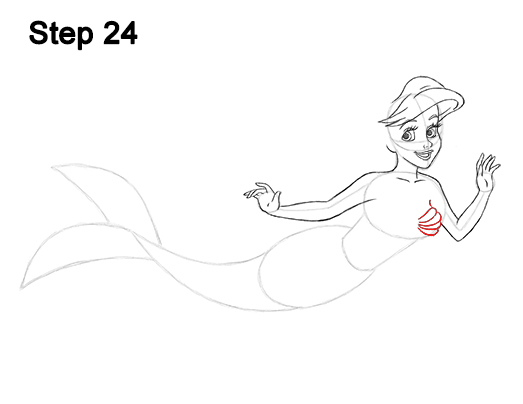
Step 24: Draw the right side of Ariel's seashell bra using a series of curved lines on the lower right side of the intial oval. This shape should start with a curved line at the top and then three more curved lines below it to form a scallop-like seashell. As you draw these lines, stay within the boundaries of the initial oval shape.
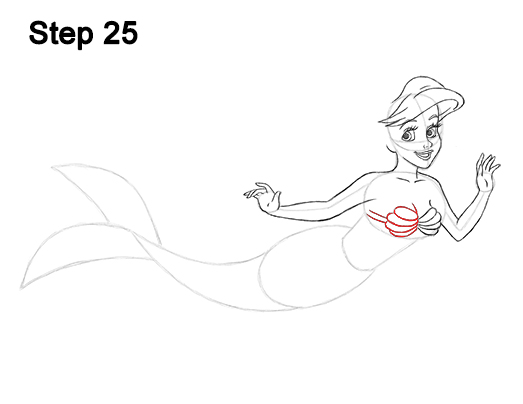
Step 25: Now draw the left side of Ariel's seashell bra using a series of curved lines near the bottom, middle section of the initial oval. The first section at the top should be a shape similar to a long, thin oval. Pay attention to the distance between this top shape and the arm on the left side. Don't draw them too close. Under this top shape, draw a series of curved lines that reach the bottom of the initial oval shape. The end result should be another shell shape that looks similar to a scallop seashell. Add two long, parallel lines on the left side for the straps.
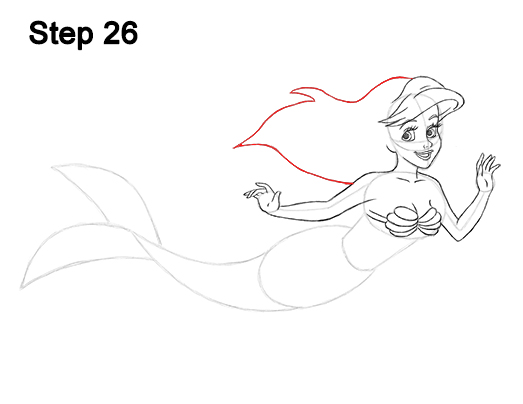
Step 26: Draw a series of wavy lines on the left side of the head for the back portion of Ariel's hair. Sketch the shape lightly at first as a single clump of hair that ends at a point on the left side. Don't draw every individual hair strand. Darken the lines when you're happy with the shape. Ariel is supposed to be under water, so her hair should flow freely. The bottom line for the hair should end above the shoulder on the left side.
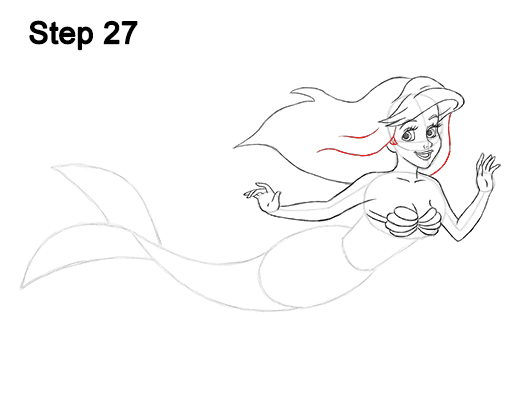
Step 27: Draw a curved line on the right side of Ariel's face for the rest of the hair. Draw another wavy line on the left side of the face, right above the ear, for the other side of the flowing hair. Add a smaller line above for extra detail and draw a small triangle-like clump of hair on the top, right side of the ear.
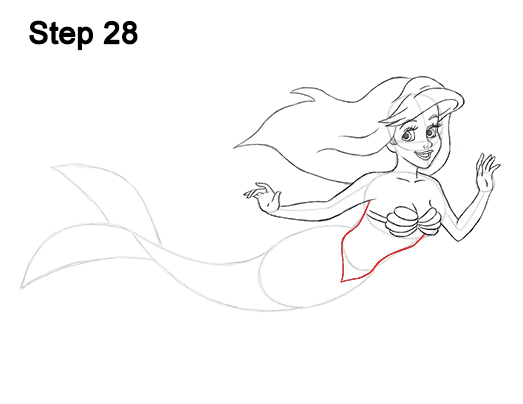
Step 28: Draw Ariel's torso using the initial lines under the seashell bra as guides. Follow the path of the guides and darken the lines to create the shape of the torso. The bottom part of the torso should extend toward the oval-like guide and end in a V-shaped point.
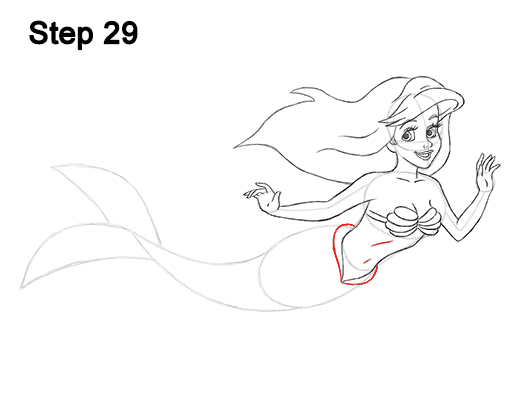
Step 29: Draw a diagonal line near the middle of the torso for detail on Ariel's ribcage and a smaller line under it for the belly button. Add a curved line on either side of the body for the fin-like sections on the base of The Little Mermaid's tail.
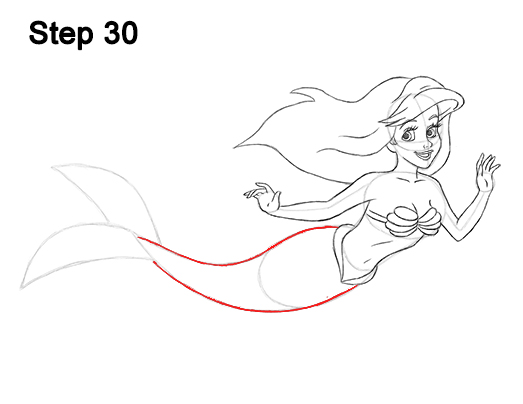
Step 30: Use the initial oval-like shape and lines as guides to draw the lower half of Ariel's body. Simply darken the outer section of the guide lines to create the shape of the lower part of the body.
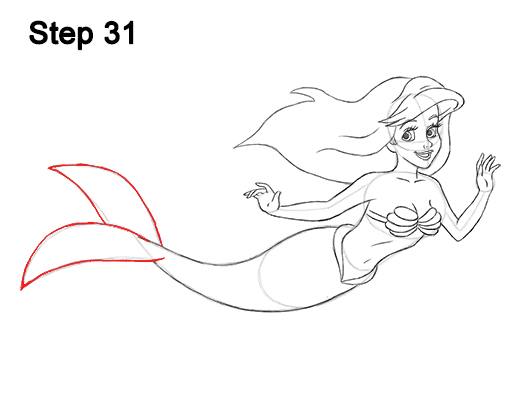
Step 31: Darken the guides on the left as well to create the shape of Ariel's fins. As you darken the lines, make the shapes a bit wavier to indicate that they're under water.
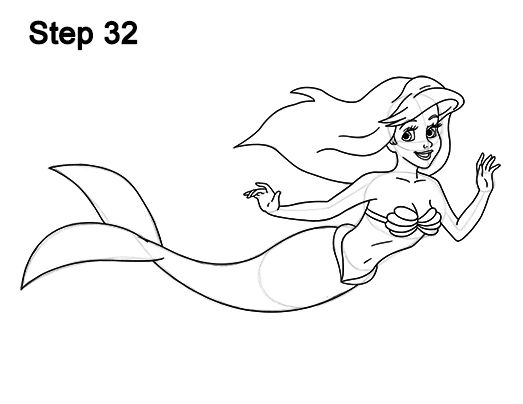
Step 32: For a more finished look, carefully go over the final sketch lines with a pen or marker.
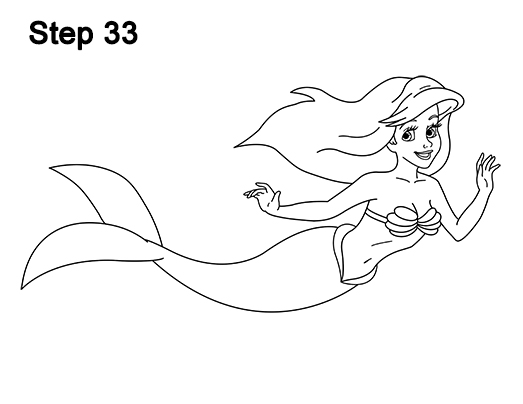
Step 33: After inking, get rid of every pencil mark with an eraser for a cleaner drawing of Ariel from Walt Disney's The Little Mermaid.
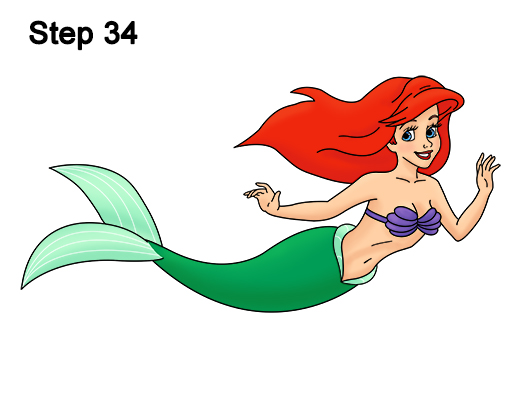
Final Step: Color your Ariel drawing using color pencils, markers or even crayons! First color Ariel's hair red. Start adding the color lightly, then add more color by pushing harder with your pencil to get to the level that you'd like. Use red for the lips and eyebrows too, and add a bit of brown to the hair to give it more volume. Use peach for the skin. If you don't have peach, improvise and use yellow-orange or light brown.
Use a bit of pink or light brown on the undersides of Ariel's body to give it more dimension. Use light blue for the eyes and give the cheeks a bit of pink too. Color her seashell bra purple or violet. Add some green as the base color of the tail. Start off lightly, then build up to the level that you want by pushing harder with your pencil. Using green, add a few stripes to Ariel's fins for extra detail. Use blue-green on top of the regular green to give the tail a richer color. You can use light blue if you don't have blue-green.
Thanks for visiting! Subscribe to the EasyDrawingTutorials YouTube Channel for a new tutorial every Sunday.
To learn how to draw animals, visit How2DrawAnimals.com.
RELATED TUTORIALS
 |
 |
 |


