How to Draw Mabel Pines

Use the video and step-by-step drawing instructions below to learn how to draw Mabel Pines from Disney Channel's Gravity Falls. A new cartoon drawing tutorial is uploaded every week, so stay tooned!
Intro: Start off with a pencil sketch. In the beginning stages, don’t press down too hard. Use light, smooth strokes for sketching.
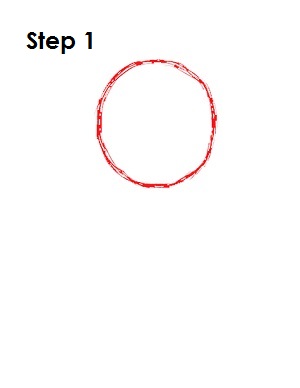
Step 1: Start with a circle near the top half of the page. It doesn’t have to be perfect. It’s just a guide for the Mabel Pines' head.
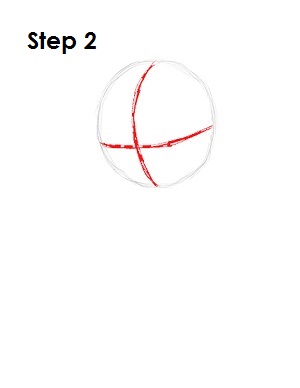
Step 2: Next, draw two intersecting lines across the circle, one vertical and one horizontal. Bend the lines so that they contour to the shape. The vertical line should be closer to the left side, and the horizontal line should be closer to the bottom. These will be construction lines that will help you place Mabel Pines' facial features later on.
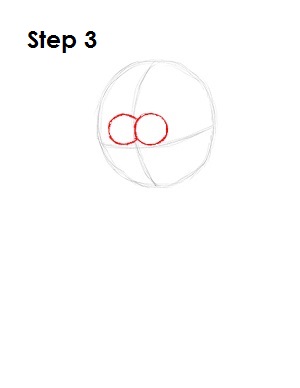
Step 3: Draw two small circles sitting on top of the horizontal construction line as guides for Mabel Pines' eyes. The circles should be on either side of the vertical construction line.
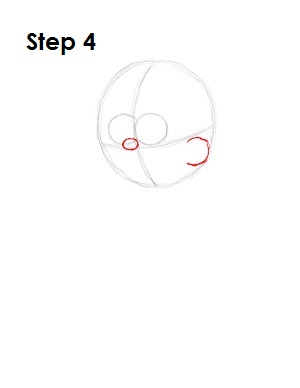
Step 4: Below the eyes, where the two construction lines intersect, draw a tiny oval as a guide for Mabel Pines' nose. On the right side of the head, at the end of the horizontal construction line, draw an arc similar to a backward letter C as a guide fore Mabel Pines' ear.
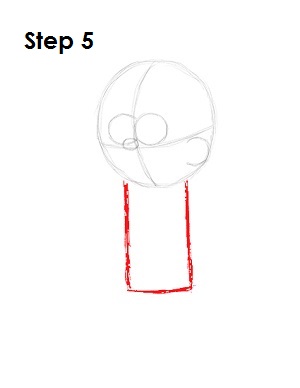
Step 5: Under the head, draw a rectangle as a guide for Mabel Pines' torso. The height of the rectangle should be about the same as the height of the head.
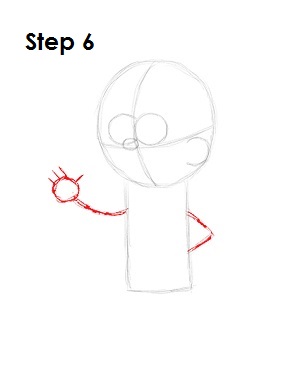
Step 6: Draw two lines on either side of Mabel Pines' body as guides for her arms. The line on the left curves up toward her head and has a small circle at the end with four small lines as guides for her hand and fingers. The line on the right angles down toward the bottom of this Gravity Falls character's torso.
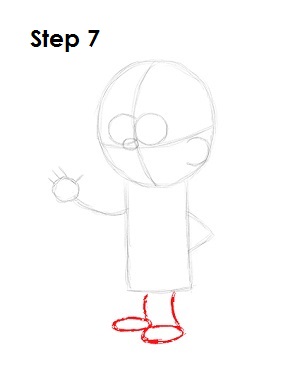
Step 7: Under Mabel Pines' body, draw two curved lines as guides for her legs. At the end of each line, draw a long oval as guides for her feet.
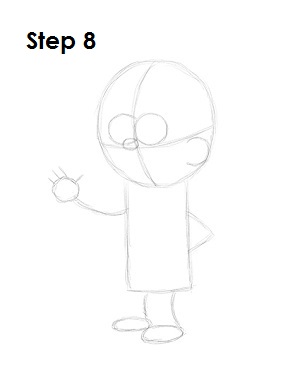
Step 8: That’s it for the initial sketch! You have the basic Mabel Pines shape. Now go in and tighten your drawing. From this point on, press harder with your pencil in order to get darker lines and a more defined sketch.
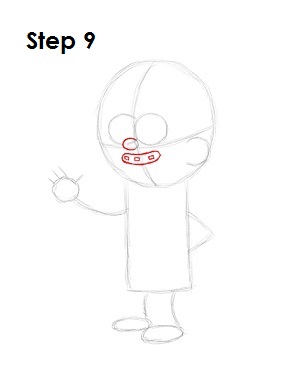
Step 9: Tighten the shape of Mabel Pines' nose by darkening the left side of the oval. Under the nose draw a shape similar to a sausage for the mouth. Inside the mouth draw three tiny squares for her braces.
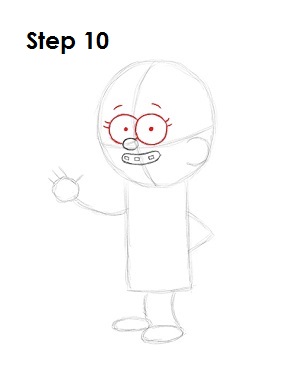
Step 10: Darken the edges of the eyes. Draw two small dots inside each eye for her pupils. Draw a couple of small curved lines on the sides of Mabel Pines' eyes for her eyelashes. Draw a small curved line over each eye for her eyebrows.
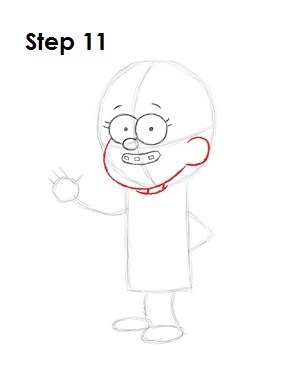
Step 11: Use the original circle shape as a guide to draw Mabel Pines' face. The edge on the left sticks out a little to form her cheek. Darken the C-shaped line on the right side of her face for her ear. Draw two tiny lines below Mabel Pines' face for her neck and a long curved line under the neck for the collar of her sweater.
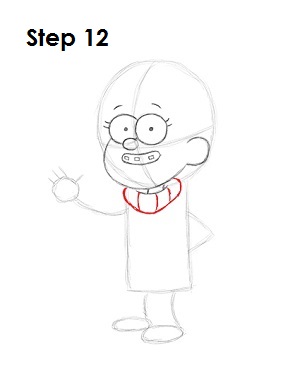
Step 12: Draw the turtleneck collar of Mabel Pines' sweater under the neck. First draw a long curved line that encompasses the neck, then draw three small lines inside for detail.
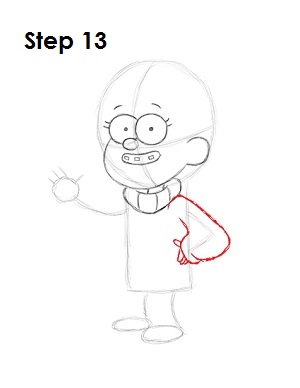
Step 13: Draw Mabel Pines' arm on the right side by using the initial line as a guide. Follow the path of the line as you make the sleeve of the sweater thicker. Draw a few curved lines at the end of the sleeve for her fingers and thumb.
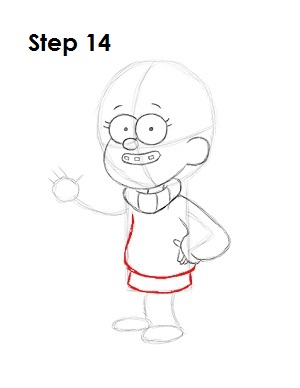
Step 14: Use the rectangle as a guide to draw Mabel Pines' loose sweater and her skirt at the bottom.
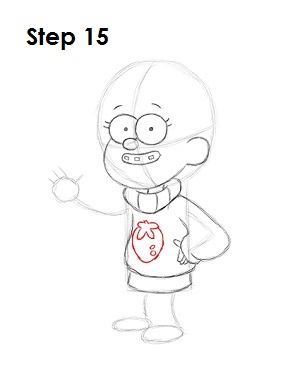
Step 15: Mabel Pines has a lot of sweaters with different designs on them. Pick your favorite design and draw it in the middle of the sweater. Use the image above as reference to draw her strawberry sweater.
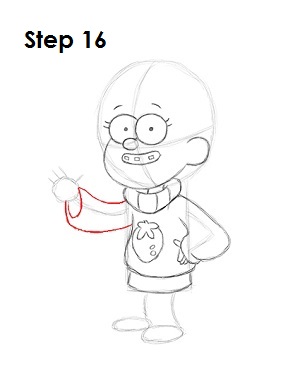
Step 16: Draw the loose sleeve of Mabel Pines' sweater on the left side using the initial line as a guide. Follow the path of the line as you thicken up the shape. Draw a half-circle at the end for the cuff of the sleeve.
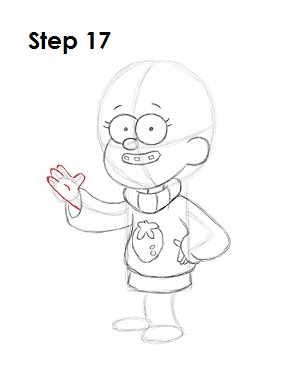
Step 17: Use the circle and small lines as guides to draw Mabel Pines' hand and fingers. Draw a small curved line inside the hand for extra detail.
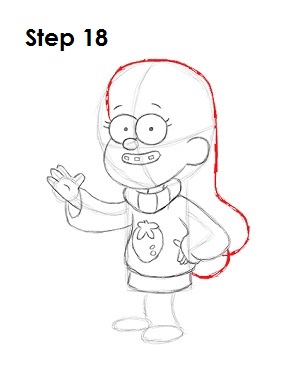
Step 18: Use the top portion of the original circle and the right side of the right arm as guides to draw Mabel Pines' long hair. The line for her hair starts above the left eye, moves up across the head and bends down toward the right arm and loops to end where the sweater and skirt meet.
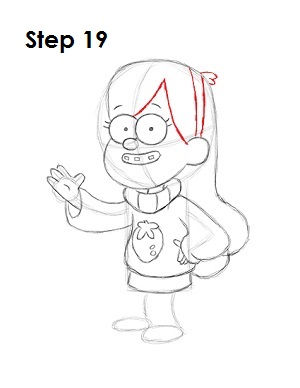
Step 19: Draw the front part of Mabel Pines' hair as a line similar to an upside-down letter V over the right eye. Draw two lines over her ear as her headband and a couple of curved lines on top of her head for the hair that sticks out in the back.
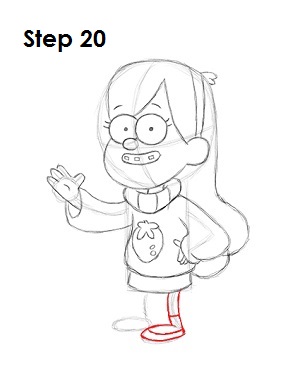
Step 20: Use the curved line on the right side as a guide to draw the right leg. Follow the path of the line as you thicken up the leg. Draw a line inside Mabel Pines' leg for her sock. Use the oval underneath as a guide to draw her shoe.
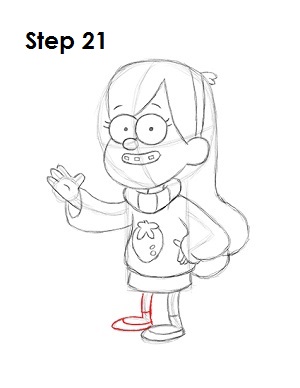
Step 21: Draw the leg on the left the same way as Mabel Pines' leg on the right but make it a bit smaller.
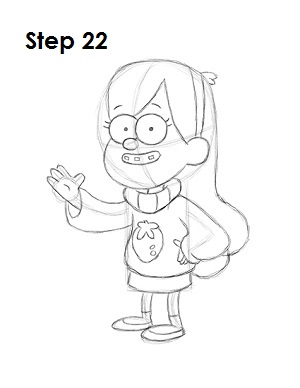
Step 22: That’s it! You now have a nice sketch of Mabel Pines from Disney Channel's Gravity Falls. You can stop at this quick drawing for a rough, sketchy look, or continue to the step below to go for a more finished look.
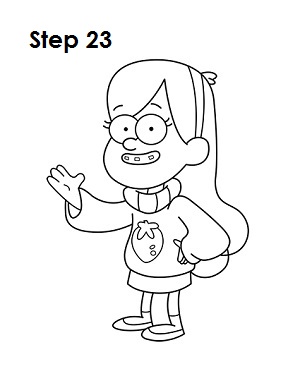
Step 23: For a more finished, inked look, carefully draw over the final sketch lines with a pen or marker. Wait for the ink to dry, and then erase your pencil marks. You now have a finished inked drawing of Mabel Pines! You can stop here or go to the final step to complete your Mabel drawing in its entirety.
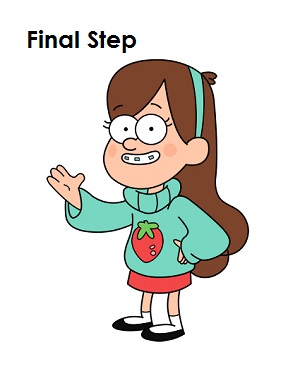
Final Step: For a completely finished drawing of Mabel Pines, you have to color it. You can use anything you want: markers, color pencils or even crayons! Color Mabel's hair brown. The color of her outfit will depend on the design you used for her sweater. Her skin is peach, but if you don't have peach, improvise and use yellow-orange or light brown. Mabel's shoes are black. That’s it! You now have a completed drawing of Mabel Pines from Gravity Falls.


