How to Draw Stitch
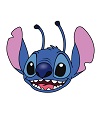
Use the video and step-by-step drawing instructions below to learn how to draw Stitch the alien from Walt Disney's Lilo and Stitch. A new drawing tutorial is uploaded every week, so stay tooned!
Intro: Start off with a pencil sketch. In the beginning stages, don’t press down too hard. Use light, smooth strokes for sketching.
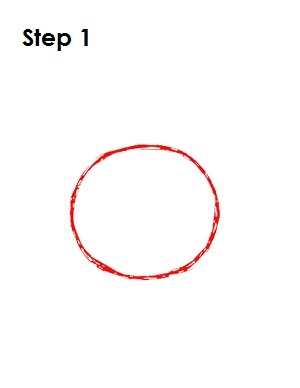
Step 1: To draw Stitch, start with a circle that’s a little bit squished down. You don't have to draw the circle perfectly. It’s just a guide for Stitch’s head.
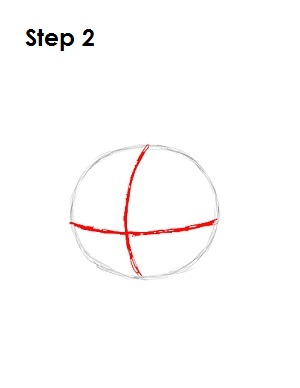
Step 2: Inside the circle draw two lines, one vertical and one horizontal. When drawing the lines, bend them slightly so that they contour to the shape of the sphere.
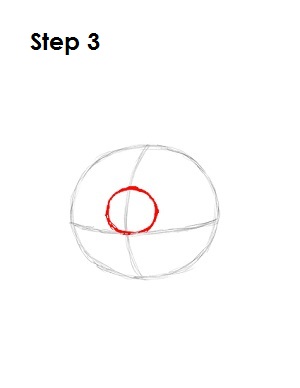
Step 3: For Stitch's nose, draw a circle that sits on top of the horizontal construction line.
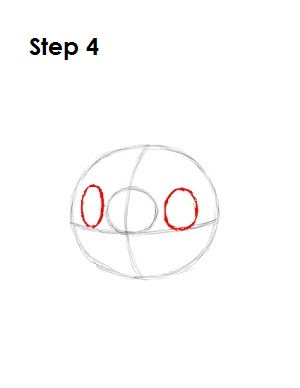
Step 4: For Stitch's eyes, draw two ovals above the horizontal line, one on each side of the nose. Draw the oval on the left a bit thinner because of the perspective.
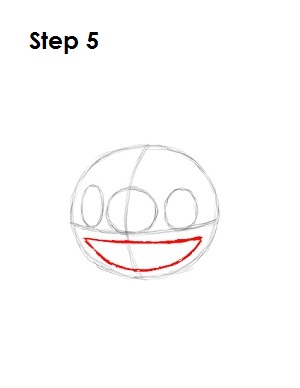
Step 5: Below the horizontal line, draw a shape similar to a crescent moon or a long, sideways letter D. This will be Stitch’s mouth.
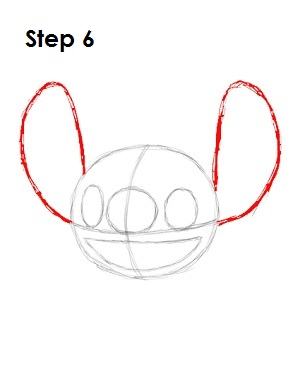
Step 6: Draw two tall curved lines on either side of the circle for Stitch's ears. The lines start at the ends of the horizontal construction line and move upward. Continue drawing the lines so they curve down and end on top of Stitch's head.
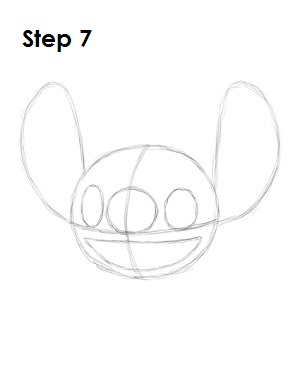
Step 7: That’s it for the initial sketch of Stitch from Walt Disney's Lilo and Stitch! You have the basic Stitch shape, so now go in and tighten your drawing. From this point on, press harder with your pencil in order to get darker lines and a more defined sketch.
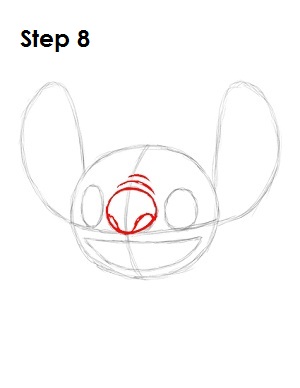
Step 8: Darken the shape of Stitch's nose and add a wavy line at the bottom to create his koala-like nostrils. Above the shape of his nose, draw a couple of lines to indicate the folds of skin or wrinkles.
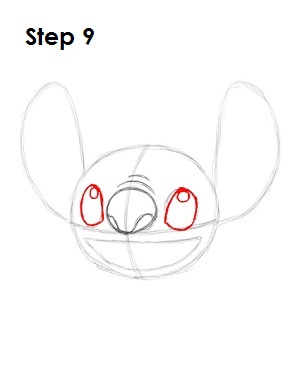
Step 9: Tighten the shape of Stitch's eyes and make them a bit pointier at the bottom near the nose. Draw circles on the top part to create a shiny glare.
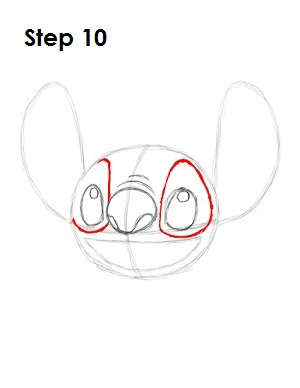
Step 10: Draw a line that goes around the eye to create that mask look. Draw the line a tad thicker at the top to indicate Stitch's eyebrows.
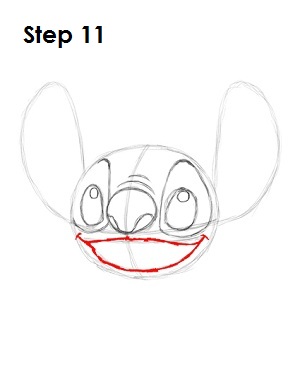
Step 11: Give Stitch's mouth more shape and draw little smile lines at either end.
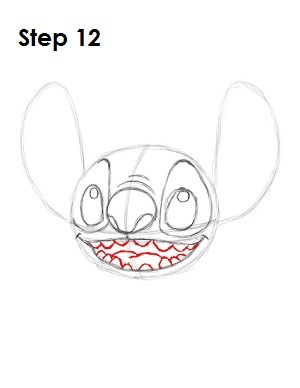
Step 12: Draw the rows of teeth inside of Stitch's mouth. The teeth are like triangles with rounded tops. Draw them overlapping each other somewhat and draw his tongue as a couple of curved lines.
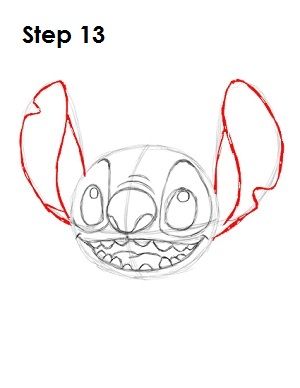
Step 13: Use the initial lines as guides to draw Stitch's ears. Don’t forget to draw the piece that’s missing from each ear.
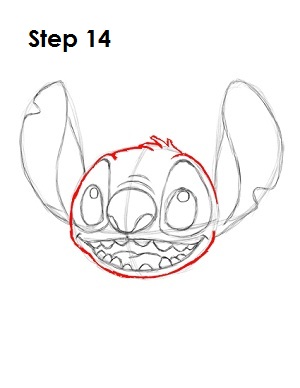
Step 14: Draw Stitch's head by using the circle as a guide. Draw a few curved lines on top to create his tuft of hair.
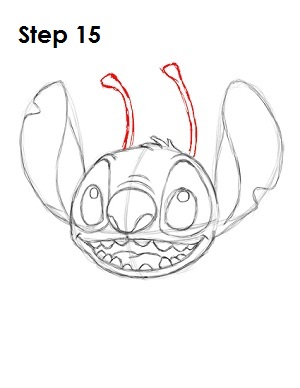
Step 15 (optional): You can give Stitch his antennae if you want to draw the alien version. To do this, just draw two thin lines on top of Stitch's head.
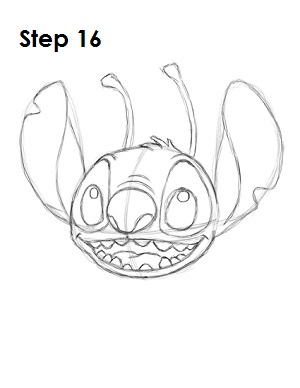
Step 16: That’s it! You now have a nice sketch of Stitch from Walt Disney's Lilo and Stitch. You can stop at this quick drawing for a rough, sketchy look or go for a more finished look by continuing to the step below.
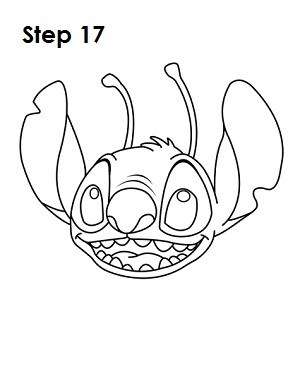
Step 17: For a more finished, inked look, carefully draw over the final sketch lines with a pen or marker. Wait for the ink to dry, and then get rid of every pencil mark with an eraser. You now have a finished inked drawing of Stitch! You can stop here or go to the final step to complete your Stitch drawing.
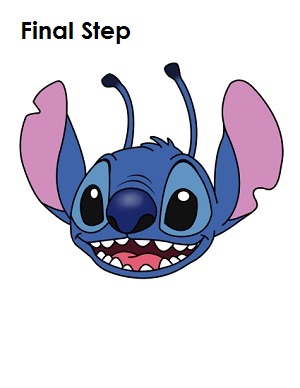
Final Step: For a completely finished Stitch drawing, you have to color it. You can use markers, color pencils or even crayons! Color his head, his antennae and the outside part of his ears blue. The part around Stitch's eyes is light blue, and his nose and top of his antennae are dark blue. Stitch's eyes and nostrils are black. The inside part of his ears and tongue are pink, and the inside part of his mouth is dark brown. That’s it! You now have a completed drawing of Experiment 626 (aka Stitch) from Walt Disney's Lilo and Stitch.


