How to Draw Huey Freeman
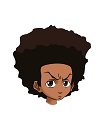
Use the video and step-by-step drawing instructions below to learn how to draw Master Chief from the Halo video games. A new drawing tutorial is uploaded every week, so stay tooned!
Intro: Start off with a pencil sketch. In the beginning stages, don’t press down too hard. Use light, smooth strokes for sketching.
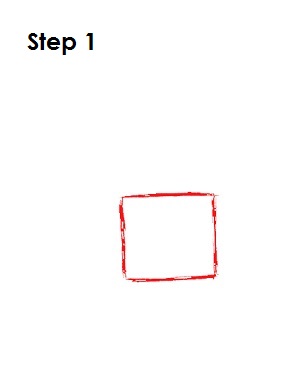
Step 1: Start by drawing a square near the bottom half of the page. Leave enough room at the top for his big fro. Don't worry about the square being perfect. It’s just a guide.
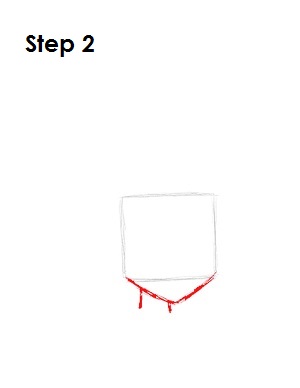
Step 2: Under the square, draw an angled line similar to an upside-down triangle without a top as a guide for his chin. Under the chin draw two small lines as guides for his neck.
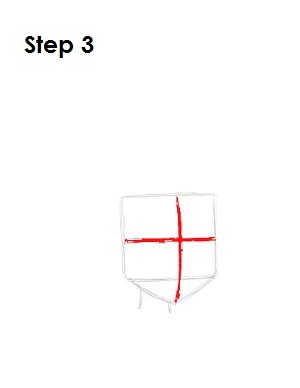
Step 3: Next, draw two intersecting lines across the entire head shape, one vertical and one horizontal. The horizontal line should split the square right in the center and the vertical line should be closer to the right side. These will be construction lines that will help you place his facial features later on.
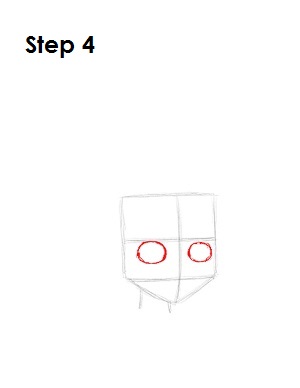
Step 4: Right under the horizontal construction line and on either side of the vertical construction line, draw two small ovals as guides for his eyes. The oval on the right side should be smaller because of perspective.
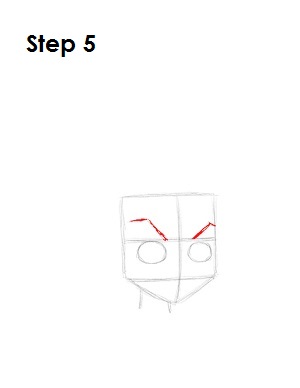
Step 5: Above his eyes, draw two angled lines as guides for his eyebrows. The lines dip down toward the space between his eyes and touch down on the horizontal construction line.
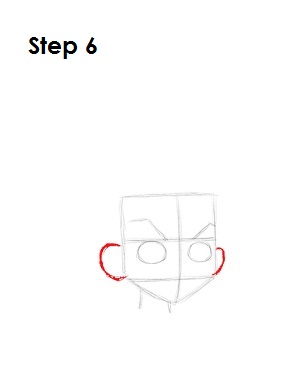
Step 6: Draw an arc on either side of his head as guides for his ears. The arcs should be below the horizontal construction line and the one on the right should be smaller.
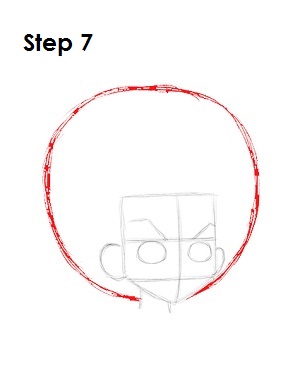
Step 7: Draw a big circle all around his head as a guide for his afro. The height of the fro should be a bit taller than the height of the original square.
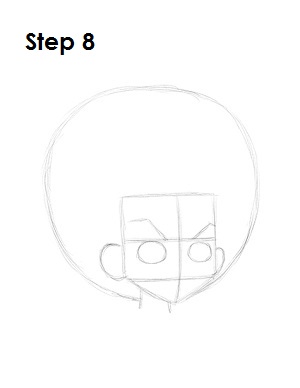
Step 8: That’s it for the initial sketch! You have the basic Huey shape, now go in and tighten your drawing. From this point on, press harder with your pencil in order to get darker lines and a more defined sketch.
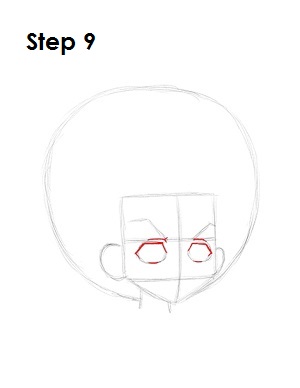
Step 9: Tighten the shape of his eyes as you make the lines darker. Don't make the shapes round. Instead give them a few corners at the top. Add a line above each eye for his eyelids.
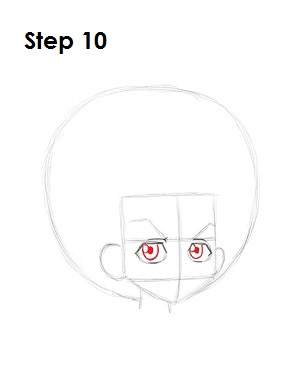
Step 10: Inside each eye draw a half circle as a guide for his irises. Inside each iris draw a small oval on the side to represent glare. In the middle of the iris draw another small oval and shade it in for the pupil.
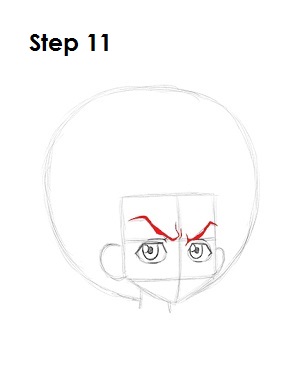
Step 11: Use the initial lines as guides to draw his eyebrows. Make them thicker and more angular. Add a few lines in between them for Huey's perpetually furrowed brow.
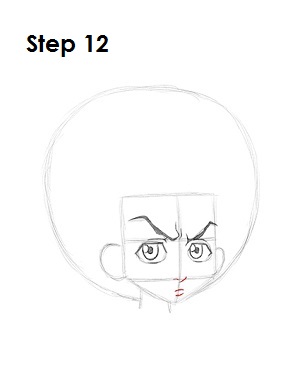
Step 12: Draw his nose as two small curved lines, one for the tip of the nose and one for the nostril. Place the nose where the vertical construction line meets the bottom of the original square. Draw two more small curve lines under the nose for his mouth and lower lip.
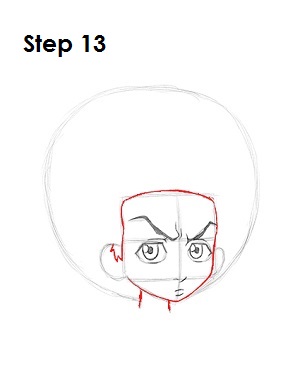
Step 13: Use the initial square and triangle as guides to draw the outline of his face. Make the edges of the shapes rounder to give the face a more organic look. Draw a few angled lines on the left side of the face near the ear for his sideburn. Darken the lines that make up his neck.
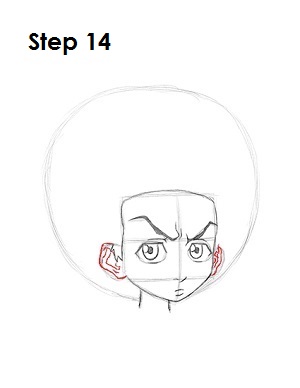
Step 14: Draw the ears using the initial arcs as guides. Give the outer portion of the ears more bends and curves. Inside each ear, add a few lines to indicate the ears' structure.
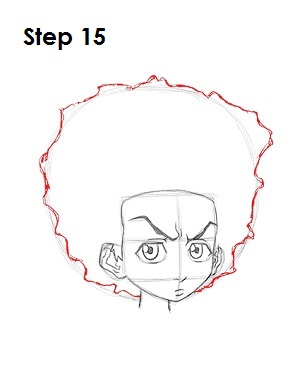
Step 15: Use the circle around his head as a guide to draw his fro. Don't use smooth strokes for the fro. Follow the path of the circle but add the fro using a series of curved lines and angled arcs all round.
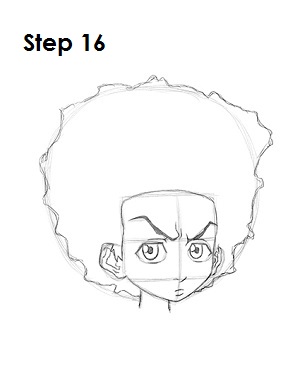
Step 16: That’s it! You now have a nice sketch of the Huey. You can stop at this quick drawing for a rough, sketchy look or go for a more finished look by continuing to the step below.
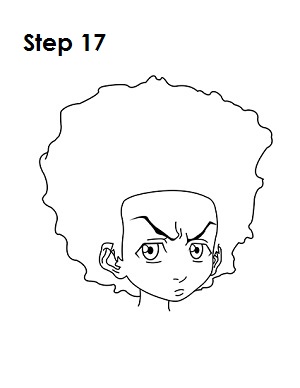
Step 17: For a more finished, inked look, carefully go over the final sketch lines with a pen or marker. Wait for the ink to dry, and then get rid of every pencil mark with an eraser. You now have a finished inked drawing of the Huey! You can stop here or go to the final step to complete your Huey drawing.
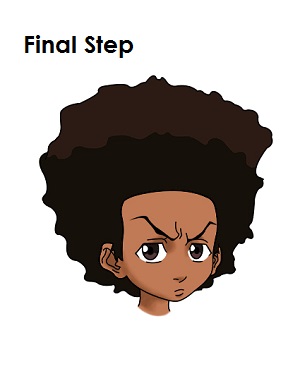
Final Step: For a completely finished Huey drawing, you have to color it. You can use markers, color pencils or even crayons! Color his skin light brown. His eyes and top part of his fro are brown. The bottom part of his fro is dark brown. If you don't have different shades of brown, use a single brown color but vary the pressure on your pencil to get different intensities of the color. You can also add a darker brown under his face and around his eyes to indicate shadows. That’s it! You now have a completed drawing of the Huey Freeman from The Boondocks.


