How to Draw Marceline
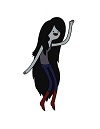
Use the video and step-by-step drawing instructions below to learn how to draw Marceline the Vampire Queen from Adventure Time. A new drawing tutorial is uploaded every week, so stay tooned!
Intro: Start off with a pencil sketch. In the beginning stages, don't press down too hard. Use light, smooth strokes for sketching.

Step 1: Start by drawing a small oval at the top of the page. It doesn't have to be perfect. It's just a guide for the Marceline's head.
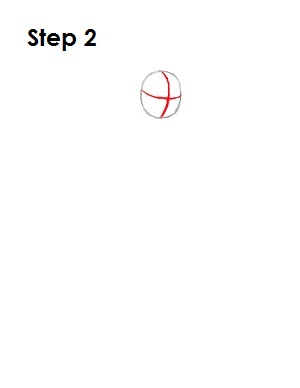
Step 2: Next, draw two intersecting lines across the oval, one vertical and one horizontal. Bend the lines so that they contour to the shape. These will be construction lines that will help you place Marceline's facial features later on.
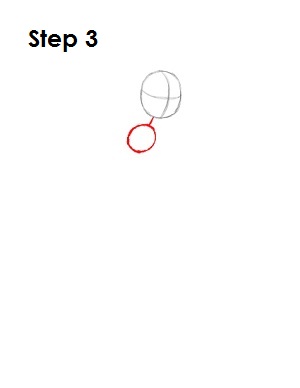
Step 3: Under Marceline's head, draw a small line as a guide for her neck. Below the line, draw a circle that's smaller than her head as a guide for the upper part of her torso.
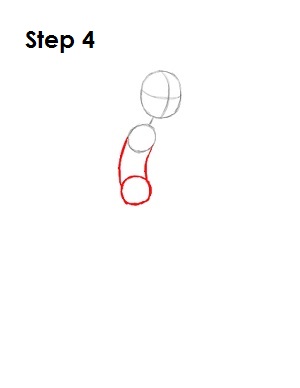
Step 4: Draw another circle of similar size to the upper torso underneath as a guide for Marceline's lower torso. Connect the two circles with curved lines to finish drawing the guide for her torso. Pay attention to the space between the circles. If you draw the circles are too far apart, Marceline's body will end up too long. The space in between should be a bit smaller than the circles themselves.
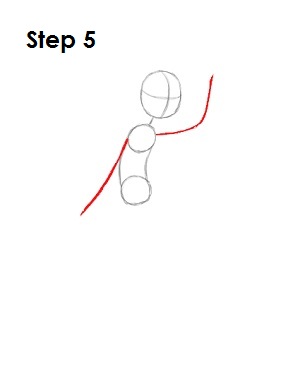
Step 5: Draw two lines that begin on the upper part of the torso as guides for her arms. That line on the left curves down and away from Marceline's body. The line on the right should bend up toward her head.
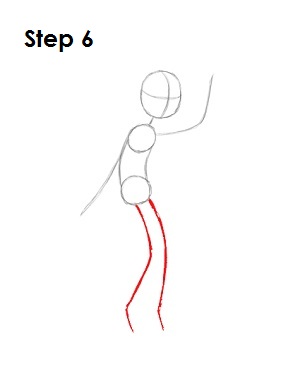
Step 6: Under Marceline's body draw two long, curved lines as guides for her legs. The length of her legs should be a bit shorter than the length of her head and torso combined.
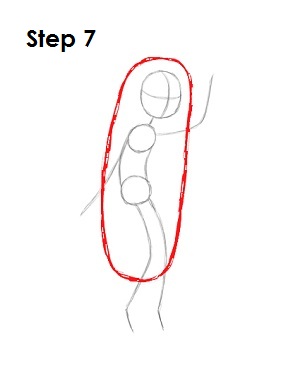
Step 7: Now draw a big, long oval that envelopes Marceline's entire body as a guide for her long hair. The shape should be similar to a pickle, and it shouldn't encompass the bottom part of her legs.
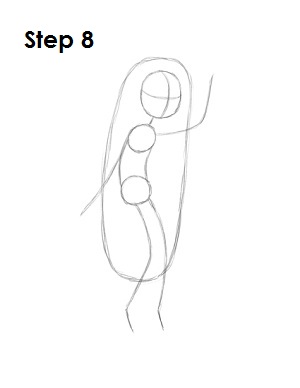
Step 8: That's it for the initial sketch! You have the basic Marceline shape. Now go in and tighten your drawing. From this point on, press harder with your pencil in order to get darker lines and a more defined sketch.
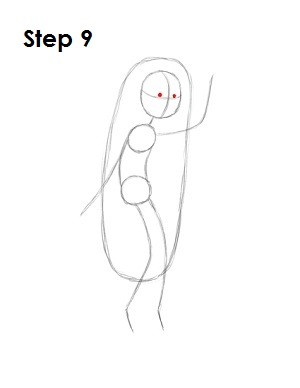
Step 9: For Marceline's eyes, draw two dots sitting on top of the horizontal construction line and on either side of the vertical construction line.
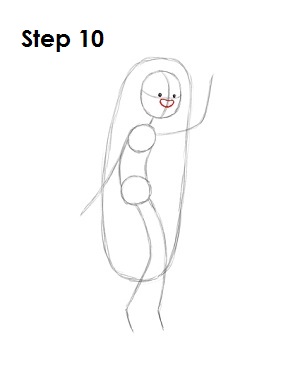
Step 10: Under the horizontal construction line, draw a small shape similar to a bean to create Marceline's mouth.
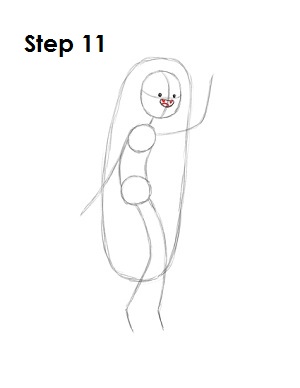
Step 11: On the top part of her mouth, draw two small triangle-like shapes for her vampire fangs. On the bottom part of Marceline's mouth, draw a small arc for her tongue.
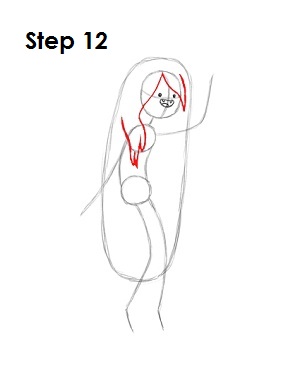
Step 12: Marceline's hair is a bit tricky, so it's divided into two parts. First, draw the front of Marceline's hair. The right side starts at the top of the vertical construction line, moves down toward the right side of her face then angles back up, creating a point at the bottom. The left side starts at the top of the vertical construction line, moves down over the top part of her torso, then creates three points before moving back up and to the left. Use the image above for further reference when drawing Marceline the Vampire Queen's hair.
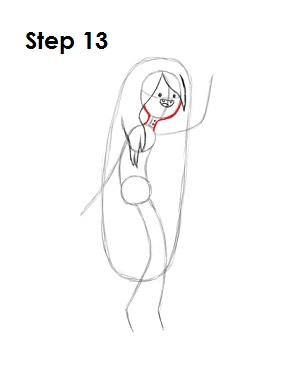
Step 13: Use the initial oval and line as guides to draw Marceline's face and neck. On the right side of Marceline's neck, draw two small dots to represent her vampire bite.
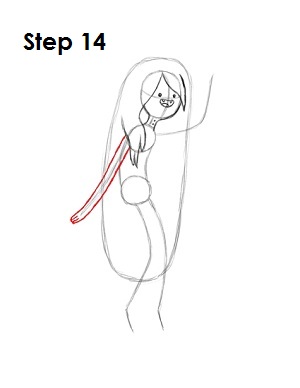
Step 14: Draw the arm on the left side by using the initial line as a guide. Follow the path of the line as you make the arm thicker. Draw a few curved lines at the end of the arm to represent Marceline's fingers.
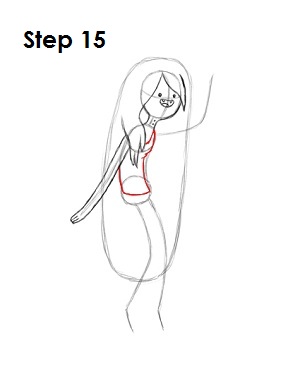
Step 15: Use the initial torso shape to draw Marceline's body and tank top. Draw a curved line on top for the shirt's neckline and a few curved lines on the right side for the folds in the shirt. The bottom of her shirt sits below the halfway point of the circle that makes up her lower torso.
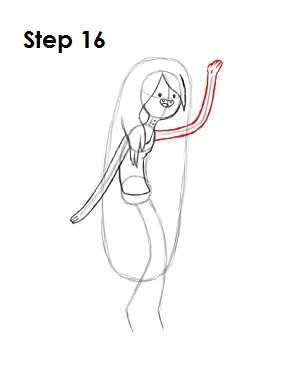
Step 16: Draw the arm on the right using the initial line as a guide. Use the same drawing technique as the other arm. Follow the basic path and make the shape thicker. Make sure to draw Marceline's fingers at the end using curved lines.
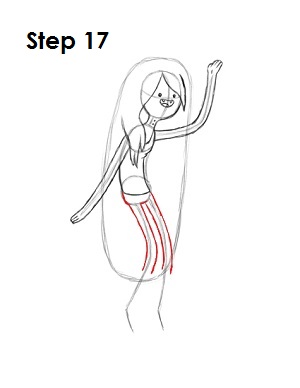
Step 17: Use the initial lines at the bottom as guides to draw the upper part of Marceline's legs the same way. Thicken up the legs as you follow the path and curve the shape.
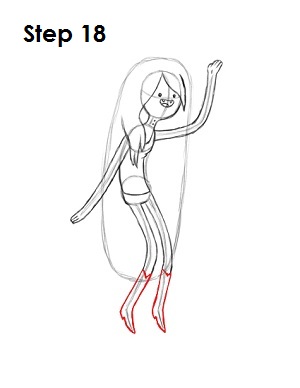
Step 18: Draw Marceline's boots using the same line as a guide. Draw small heel on the back of the boots and make them pointy. The Vampire Queen's boots also have a small point at the top.
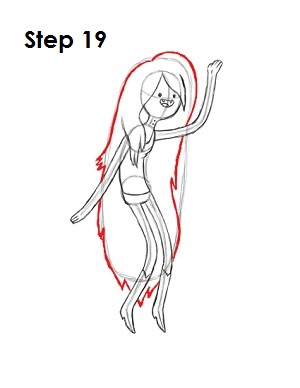
Step 19: Use the big oval shape as a guide to draw the rest of Marceline's hair. Make a bigger bump on the top right side of the hair. The bottom part should be pointy. Draw a few more jagged points throughout to give it a more hair-like feeling.
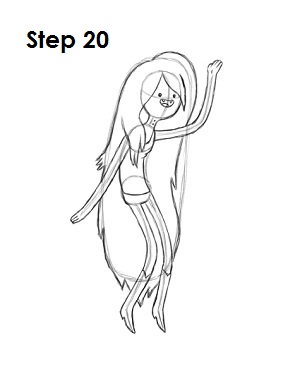
Step 20: That's it! You now have a nice sketch of Marceline the Vampire Queen. You can stop at this quick drawing for a rough, sketchy look, or continue to the next step for a more finished look.
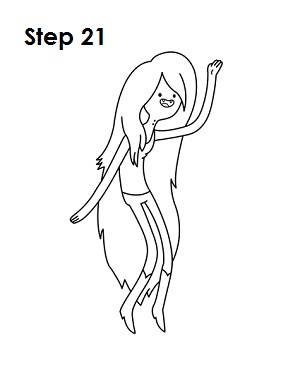
Step 21: For a more finished, inked look, carefully draw over the final sketch lines with a pen or marker. Wait for the ink to dry, and then erase your pencil marks. You now have a finished inked drawing of Marceline the Vampire Queen! You can stop here or go to the final step to complete your Marceline drawing.
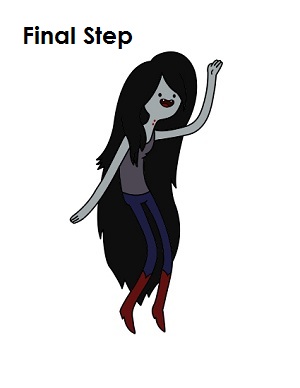
Final Step: For a completely finished Marceline drawing, you have to color it. You can use anything you want: markers, color pencils or even crayons! Color Maceline's hair black. Her skin is light gray, and her tank top is dark gray. The inside of Marceline's mouth is brown, and her tongue and boots are dark red. Her jeans are dark blue. That's it! You now have a completed drawing of Marceline the Vampire Queen from Adventure Time.
RELATED TUTORIALS
 |
 |
 |
 |
 |


