How to Draw Spider-Man (Full Body)
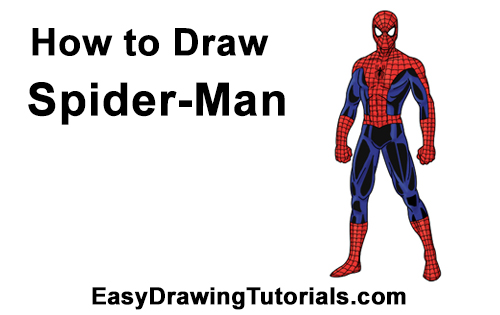
Use the video and step-by-step drawing instructions below to learn how to draw Marvel's Spider-Man (full body). A new cartoon drawing tutorial is uploaded every week, so stay tooned!
The speed drawing video:
The written step-by-step video tutorial:
Intro: Start off with a pencil sketch. In the beginning stages, don’t press down too hard. Use light, smooth strokes for sketching.

Step 1: Draw a small circle near the top of the page as a guide for Spider-Man's head. First draw four tiny marks for the height and width of the circle, then connect the marks using curved lines. Don't worry if the circle isn't perfect. It's just a guide. If you would still like a perfect circle, you can just trace the edge of a coin or anything else that's circular.

Step 2: Draw a small arc under the head as a guide for Spider-Man's jaw and chin. Don't draw the arc too low, otherwise your Spidey will end up with a big chin.
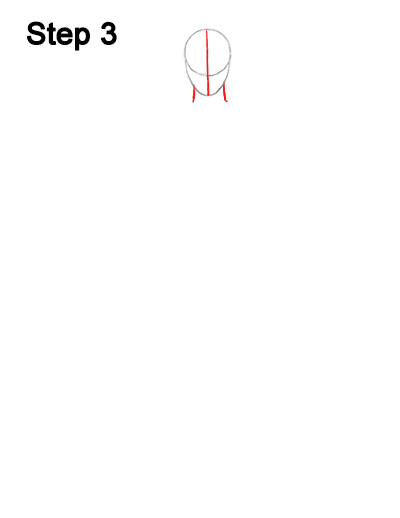
Step 3: Draw a vertical line across the middle of the head as a guide to help you place Spider-Man's facial features later on. Add two short lines under the head as guides for the neck.
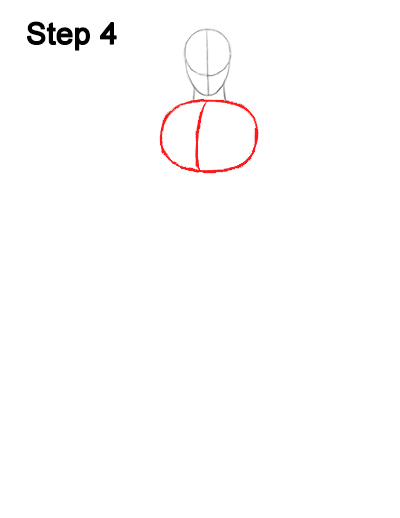
Step 4: Draw a big oval under the head as a guide for Spider-Man's chest. Pay close attention to the size of the chest in relation to the head. You can draw a bigger oval for a bigger chest , but Spidey should be leaner than other characters, like the Hulk, for example. Add a curved line near the middle of the oval for the division of the chest.
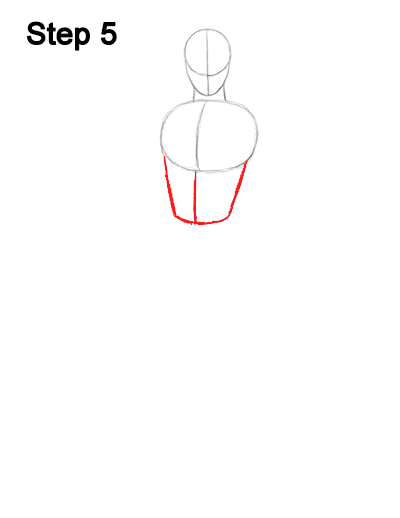
Step 5: Draw the middle section of the torso using a series of lines. Use two slightly tilted vertical lines for the sides and a curved horizontal line for the bottom. Add a vertical line across the middle that connects with the middle line from Spider-Man's chest.
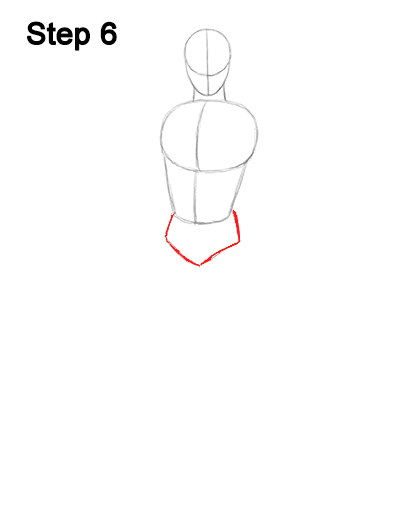
Step 6: Draw a pentagon-like shape under the midsection for the lowest part of Spider-Man's torso. Draw two short vertical lines for the sides, then add a wide V-shaped line at the bottom.
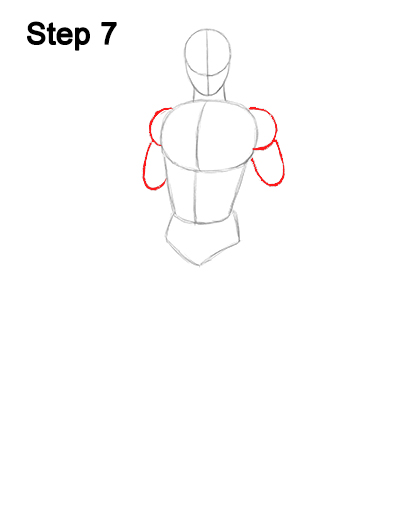
Step 7: Draw the top parts of Spider-Man's arms using a series of shapes. First draw a half- circle on either side of the torso, at the top, as guides for the shoulders. Then draw a U-shaped line under each half- cirlce as guides for the middle parts of the arms or biceps. You can make these shapes bigger but remember that Spider-Man is one of the leaner characters.
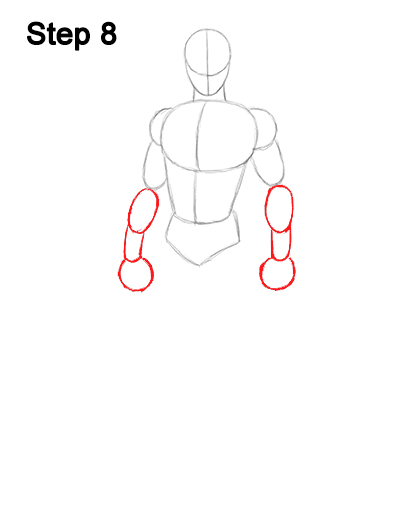
Step 8: Now draw the guides for the bottom parts of Spider-Man's arms using more shapes and lines. First draw a smal l oval on each side for the top part of the forearm. Then draw the lower halves of the forearms as rectangle-like shapes that are level with the bottom of the torso. Now add a small circle on the end of each arm as guides for the fists.
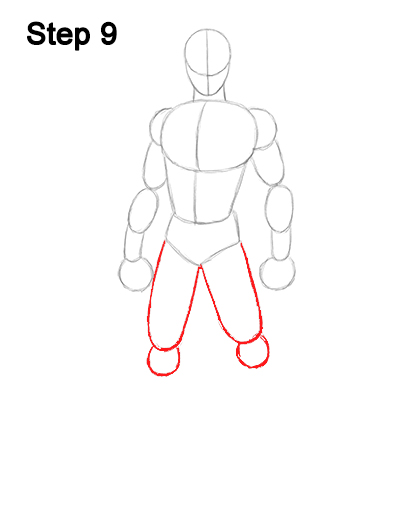
Step 9: Draw the guides for the top parts of the legs by first drawing two long U-shaped lines under the torso. You can make the guides for Spider-Man's legs longer but don't make them too long because Peter Parker is pretty average in height. The U-shaped line on the right should be a little wider than the one on the left because of the perspective. Under each U- shaped line, draw a small circle as guides for the knees.
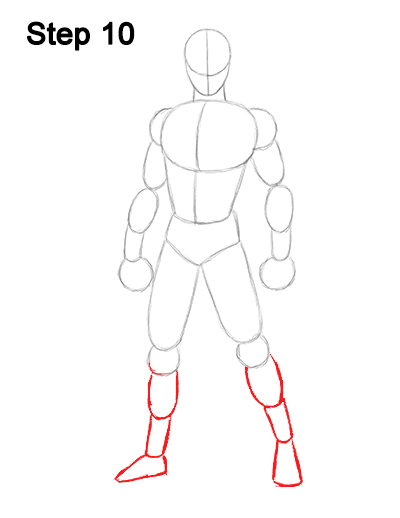
Step 10: Now draw the guides for the bottom parts of the legs and feet using more shapes and lines. First draw a small U-shaped line under each knee for the calf muscles. Under each U- shaped line, draw a two vertical lines for the lower part of the legs. Draw a triangle- like shape on the bottom of the leg as a guide for the foot pointing outward. The guide for the other foot is made up of two vertical lines and a short horizontal line because the foot will be pointing forward.
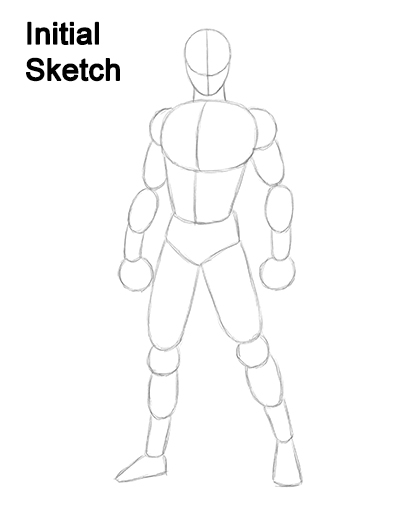
That's it for the guides! For the next steps, use darker lines for a more finished drawing. You can also use this as a basic template for other characters that have the same basic body type, like Daredevil or the Flash.
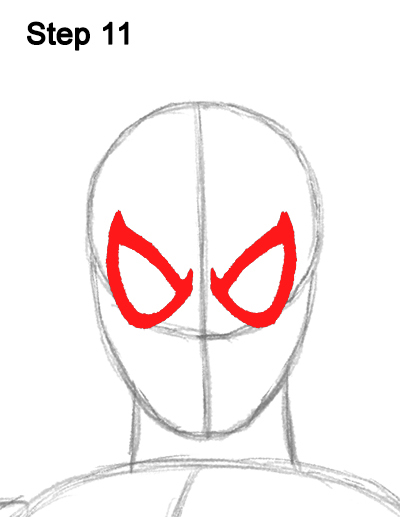
Step 11: Lightly sketch two small triangles inside the head as a base for the eyes on Spider-Man's mask. Use the initial lines as guides for the placement of the triangles. When you get the placement and size of the eyes right, darken the lines. Follow the basic path of the triangles but make the lower edge curvier as you darken the lines. The top corners of each eye should end in a spiky point.
You can also just omit the spikes and make Spider-Man's eyes rounder on the corners for a simpler drawing. Make the outline of the eyes thicker and darker for more emphasis. Different artists may draw Spidey's eye s bigger or smaller. It all depends on their particular style. You can give your Spider-Man drawing bigger or smaller eyes if you'd like.
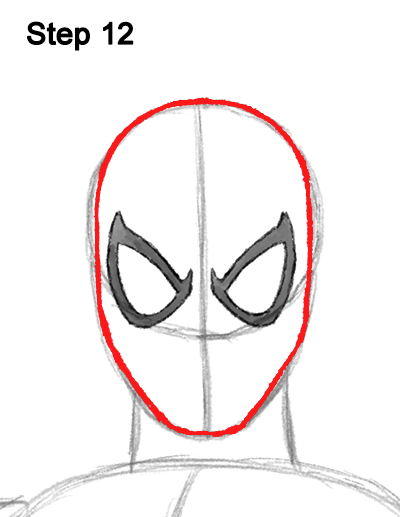
Step 12: Use the initial circle and arc as guides to draw the outline of the head. Follow the basic outer edge of the guides as you darken the lines to form the shape of Spider-Man's head. Use more pronounced angles to emphasize the shape of the jaw and the chin.
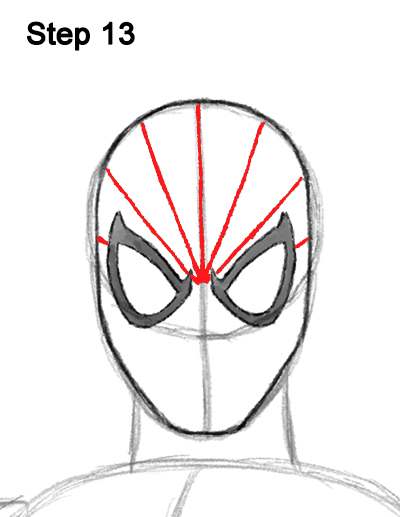
Step 13: Draw the top part of the mask's webbing as a series of lines across Spider-Man's head. First darken the vertical construction line, then add a series diagonal lines on either side. The lines should look like the letter V that progressively gets wider and wider. Make sure these lines don't overlap the shapes of the eyes.
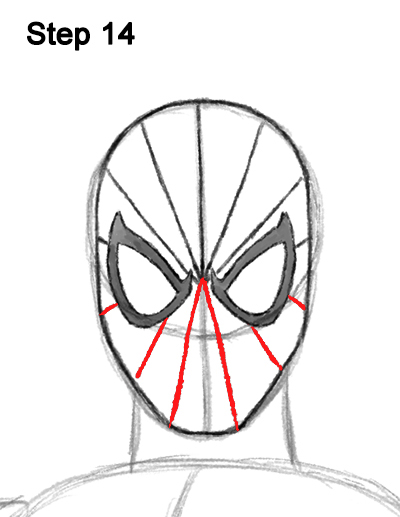
Step 14: Now draw the bottom part of the mask's webbing using more lines. First draw a couple of lines similar to an upside-down letter V below Spider-Man's eyes. Then draw more lines with a diagonal orientation on either side.
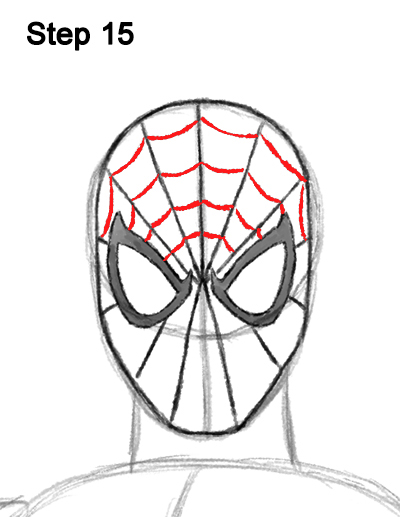
Step 15: Between each diagonal line, draw a small curved line to complete the webbing on the top part of Spider-Man's mask. This process is very slow and repetitive, so the video is sped up a bit.
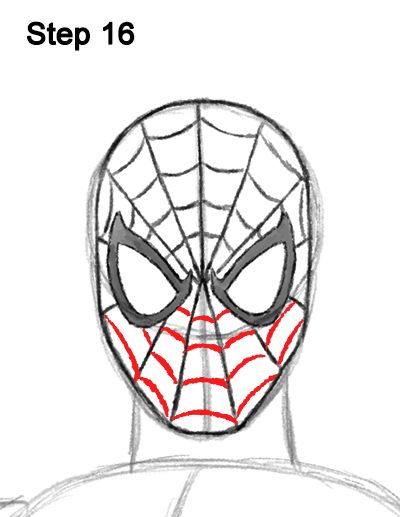
Step 16: Add small curved lines in between the lines at the bottom of Spider-Man's mask as well. This process is slow and repetitive, so this section is sped up too.
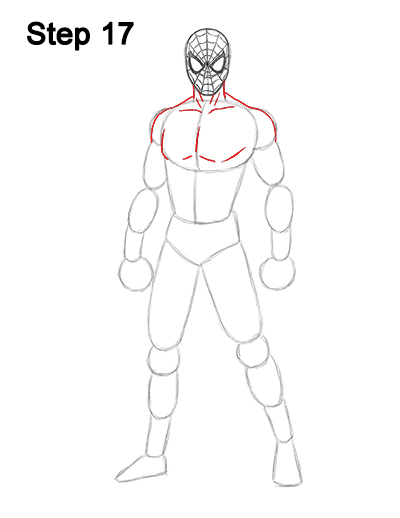
Step 17: Use the shapes under the head as guides to draw the top part of Spider-Man's torso. Follow the basic outer path of the guides as you darken the lines to create the shape of the neck and shoulders. The line that connects the neck to the shoulders should be drawn a little higher to indicate the trapezius muscles. Draw two horizontal lines near the top edge of the initial oval shape for Spider-Man's collarbone. Add a few diagonal lines under the head for the neck muscles. Draw the shape of the chest by using the initial oval as a guide. Draw a few lines close to the bottom edge of the initial oval for the pectoral muscles.
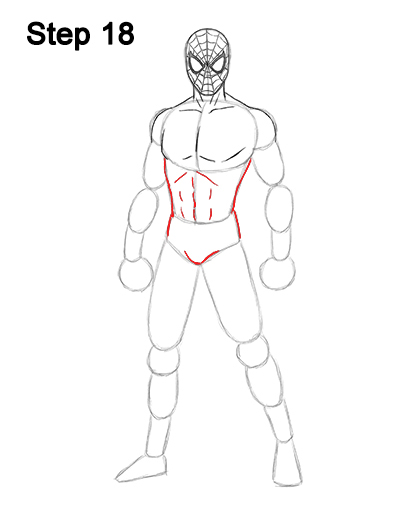
Step 18: Use the initial lines and shapes as guides to draw the bottom part of the torso. Follow the basic outer path of the guides as you darken the lines to create the shape of the torso. Draw a couple of lines below Spider-Man's chest for the bottom of the rib cage. Add a few vertical lines near the middle for the abs. The abs aren't as pronounced because Spidey isn't an overly muscular character, like Colossus, for example.
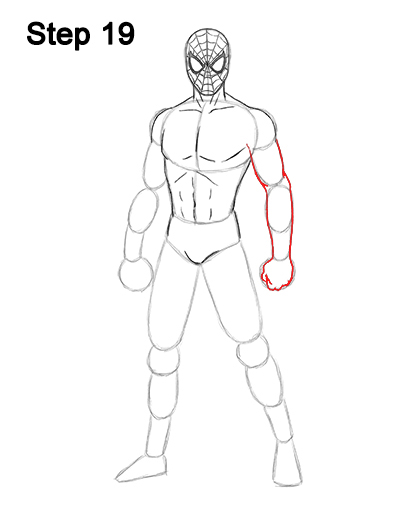
Step 19: Use the shapes on the right side as guides to draw Spider-Man's arm. The lines for the shoulder should come inward a bit to create the shape of the muscle. Make the middle section wider than the guides to create the shape of the elbow joint. Draw the fist using the circle at the bottoom as a guide but draw a few curved lines on the left side for the folded fingers.
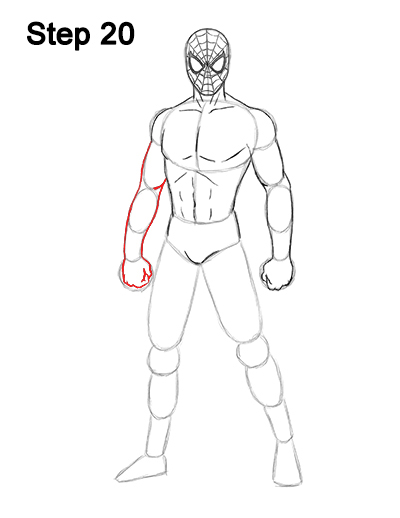
Step 20: Use the shapes on the other side to draw the arm on the left the same way. Simply darken the outer edges of the guides and make sure you make the elbow joint wider than the guides. Use the bottom circle as a guide to draw Spider-Man's fist but this time draw the lines for the folded fingers on the right side.
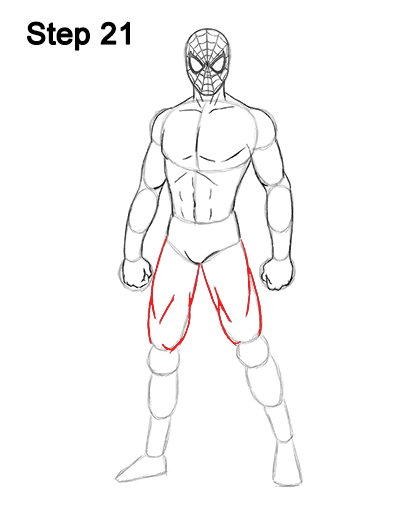
Step 21: Use the U- shaped lines under the torso as guides to draw the top parts of Spider-Man's legs. As you darken the outer shape of the leg, add a few lines coming inward to emphasize the muscle structure. Make the lines bulge out, then come inward as you darken them to create the muscles. Use the image above as reference to determine where the lines for the muscles should go.
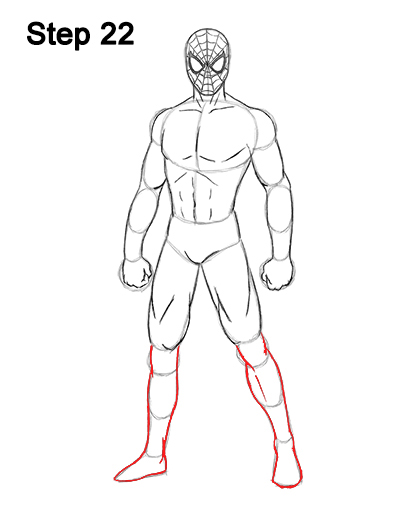
Step 22: Use the remaining shapes as guides to draw the bottom parts of Spider-Man's legs and feet. Simply darken the outer edge of the guides to create the shape of the leg and foot. Draw the leg on the right side the same way. Make the lines for the knee and ankle bulge out a bit and add a line within the shape of the leg for the shin. You can use this as a basic body template (minus the head) for any other character that has a similar body type, like Iceman or Deadpool.
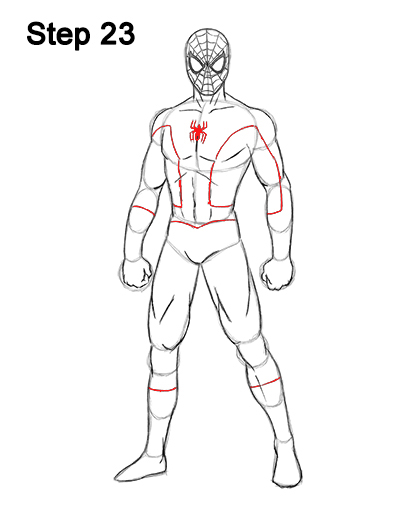
Step 23: Draw the first part of Spider-Man's costume design using a few lines directly over the body. Draw the logo on the chest by first drawing a small diamond over a slightly bigger diamond for the spider's body. Then draw four angled lines coming from the middle of the body pointing up and four pointing down.
Now draw the outline of the design that separates the red color from blue color of Spider-Man's costume. This line starts at the shoulders, then curves down across the sides of the chest and ends at the abdomen. The two lines across the torso should form kind of a V shape. Make the lines bend to contour to the body. Add a horizontal line at the bottom to form a belt-looking strip below the abdomen. The line on the right should continue down the arm to create a glove-like design at the forearm. Add a line on the other arm too. Draw a couple of curved lines at the top of the shins for the boot-like design at the bottom.
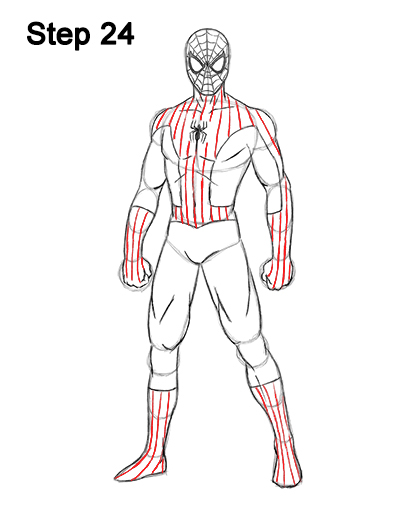
Step 24: Draw a series of vertical lines inside the previous design for the first part of the webbing. Pay close attention to the spacing of the vertical lines. Don't make them too wide or too narrow. Bend the lines as you draw them to contour to the shape of Spider-Man's muscles.
Use the image above as reference to pinpoint exactly where each vertical line should go. The vertical lines should stretch all the way down to the glove- like sections of the forearms and hands. The lines inside the boot-like sections should curve toward the tip and get a bit wider at the end. This process can be very time- consuming, so be patient and take breaks as you draw the lines.
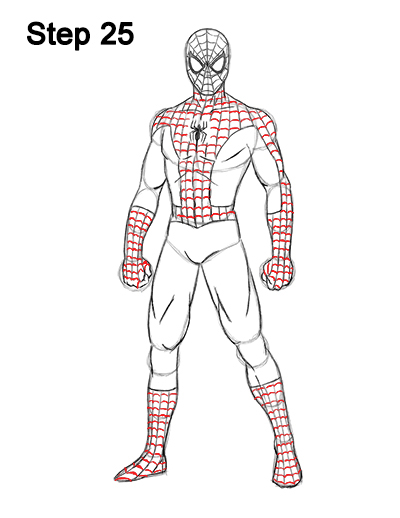
Step 25: Finish Spider-Man's webbing by drawing a series of tiny curved lines between the vertical lines. The little lines should be similar in shape to a wide, upside-down letter U. Pay close attention to the spacing of the lines. It's okay if the lines overlap the lines for Spidey's muscles.
Be sure to not overlap the spider logo on the chest with the webbing. The webbing can be time-consuming to draw, but it gives Spider-Man one of the best costume designs. Adding the little curved lines is quite simple, but it takes a very long time, so be patient and take breaks. You can add the webbing to separate sections at a time to break up the process.
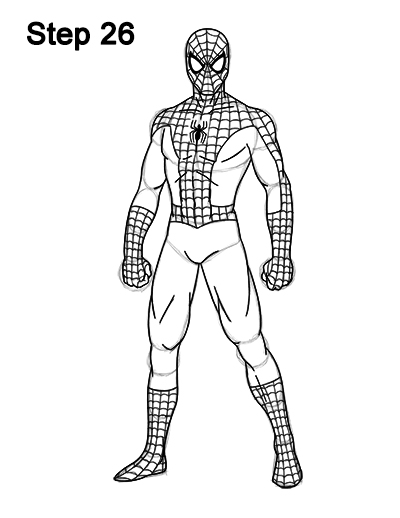
Step 26: For a more finished look, carefully go over the final sketch lines with a pen or marker. You have to retrace every single part of the webbing again!
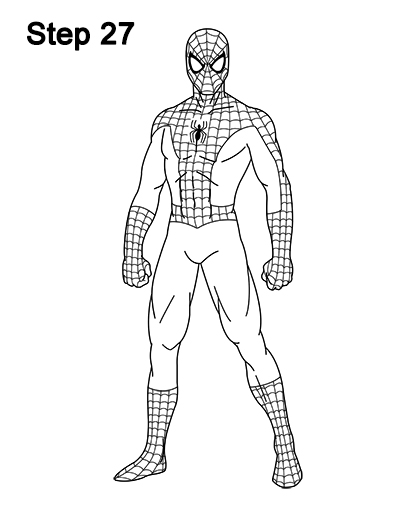
Step 27: After the ink dries, get rid of every pencil mark with an eraser for a cleaner drawing.
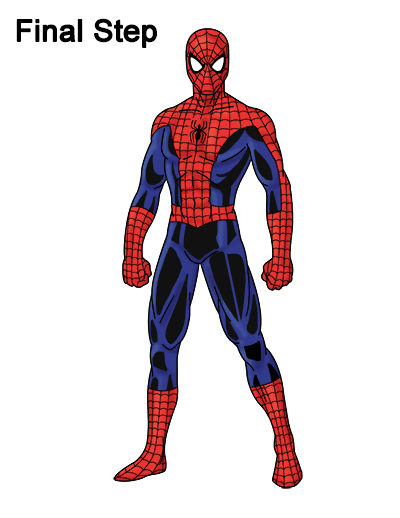
Final Step: Color your Spider-Man drawing using color pencils, markers or even crayons! First color the webbing part red. Add some dark blue and black to a few sections of the rest of the costume to emphasize the shiny blue part. Pause the video to get these sections right. You can also just draw the non-webbing section plain blue for an easier drawing. Add blue to the rest of the non- webbing section of the costume. Use a bit of brown on the webbing section to emphasize the shadows.
Thanks for visiting! Subscribe to the EasyDrawingTutorials YouTube Channel for a new tutorial every Sunday.
To learn how to draw animals, visit How2DrawAnimals.com.
RELATED TUTORIALS
 |
 |
 |


