How to Draw Corpse Bride (Emily)

Use the video and step-by-step drawing instructions below to learn how to draw Emily from Tim Burton's movie Corpse Bride. A new cartoon drawing tutorial is uploaded every week, so stay tooned!
Intro: Start drawing the Corpse Bride with a pencil sketch. In the beginning stages, don't press down too hard. Use light, smooth strokes for sketching.
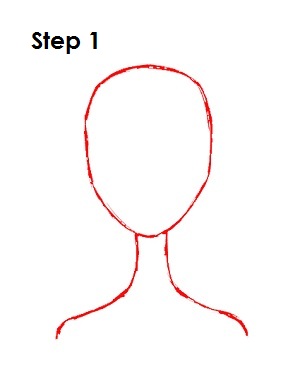
Step 1: To draw Emily from Corpse Bride, start with an oval that comes to a slight point at the bottom in the middle of the page. This is the basic shape for Emily's head. Add two curved, wavy lines at the bottom of that shape. These will be the basic shapes for her neck and shoulders.
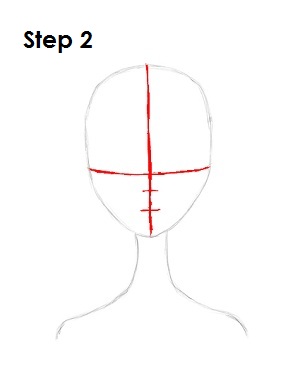
Step 2: Next, draw two intersecting lines across the original oval, one vertical and one horizontal. Now draw two smaller lines in between the horizontal construction line and the bottom of the oval. These will be construction lines that will help you place Emily's facial features later on.
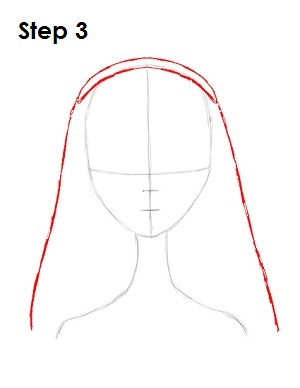
Step 3: On top of the oval, draw the top of the Corpse Bride's veil as a long, thin, horizontal shape that curves slightly downward. On either end of that shape, draw a long vertical line that nearly touches the top of Emily's shoulders. This shape will also help you draw Emily's hair later on.
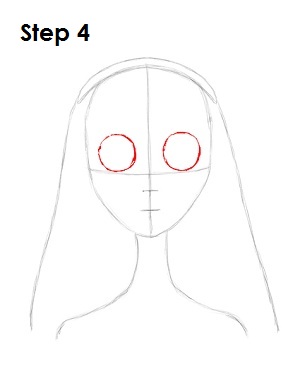
Step 4: Emily has big eyes, so draw two big circles that sit on top of the horizontal construction line and on either side of the vertical line.
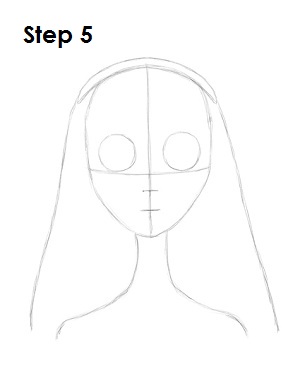
Step 5: That's it for the initial sketch of Emily from Tim Burton's Corpse Bride! You have the basic shape for Emily the Corpse Bride, so now go in and tighten your drawing. From this point on, press harder with your pencil in order to get darker lines and a more defined sketch.
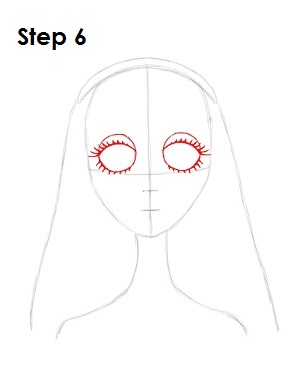
Step 6: Darken in the shape of Emily's eyes by thickening the lines a bit more. Near the top of each eye, draw a curve for her eyelids. Draw a series of curved lines on that curve and on the bottom of Emily's eyes to represent eyelashes.
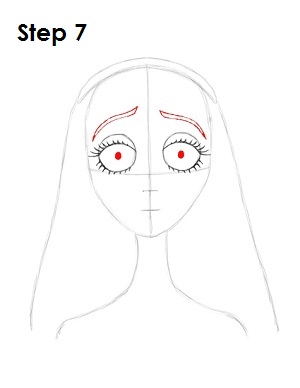
Step 7: Finish drawing Emily's eyes by drawing an oval inside of each and shading it. On top of each eye, draw a long, narrow shape that tilts up toward the middle of her face and dips down toward the sides of her face. These shapes are Emily's eyebrows.
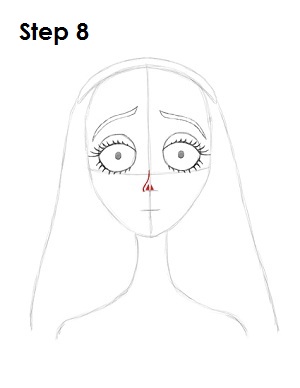
Step 8: Using the top small horizontal line as a guide, draw in Emily's nose, which are two tiny triangles that sit on top of the line. Draw a small line that begins at the vertical construction line and kind of wraps around her nose. This line gives the Corpse Bride's nose more structure.
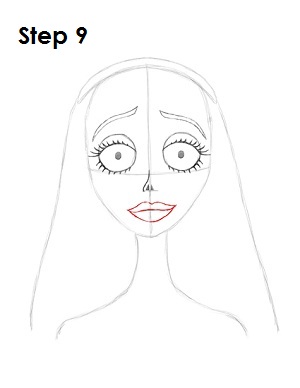
Step 9: Use the other small horizontal line as a guide to draw Emily's mouth. First make the line a bit longer and add her upper lip by drawing a shape that resembles a stretched-out letter M. Below that add a wide curve for this Tim Burton character's lower lip.
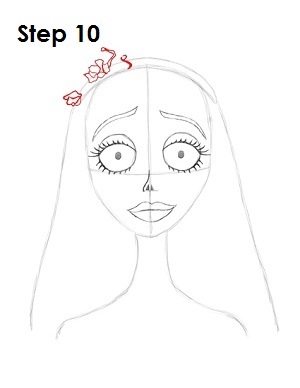
Step 10: The top of the veil is tricky, so this section about how to draw the Corpse Bride's veil is divided into three parts. The veil is composed of dead, decaying flowers. Start on the left side and draw small random shapes that resemble crumpled paper. They don't have to look like flowers because they're dead. Add some thin stems too. Use the image above if you need more reference when drawing.
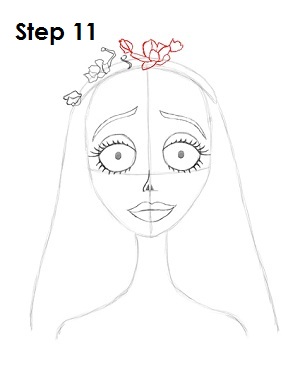
Step 11: Continue drawing the dead flowers in the middle of Emily's veil. You can draw some petals, but remember to not use smooth, straight lines. Use jagged, random lines because the flowers are wilted and decomposing.
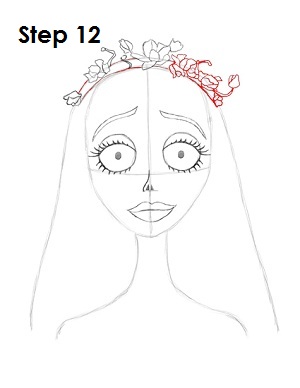
Step 12: Finish drawing the flowers on the right side. Use the image above for reference when drawing. Also darken the original line you drew for Emily's veil.
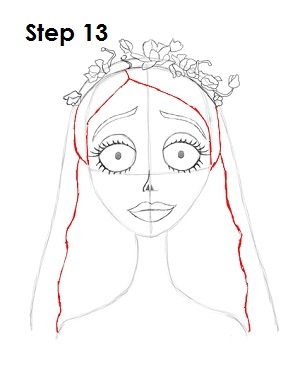
Step 13: The section about how to draw the Corpse Bride's hair is also divided into three parts. First draw a vertical line on either side of Emily's head that connects the bottom of sides of the veil to the side of the main oval. Her hair is parted, so draw a line off-center below her veil that splits in two and touches the sides of her face. Now draw a wavy line on either side of her head that touches her shoulders.
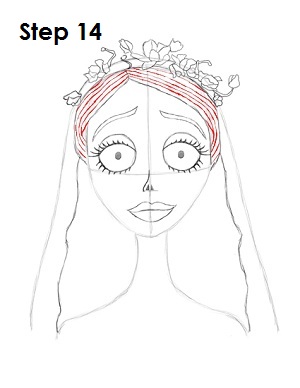
Step 14: Draw a series of lines inside each half of the top part of Emily's hair that follow the initial shape. This will represent her hair being parted in two.
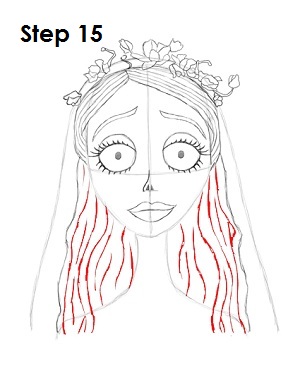
Step 15: The rest of the Corpse Bride's hair comes down to the sides. Draw random lines within the bottom part of her hair to represent her unkempt hair. Don't draw neat straight lines because her hair should be tangled and unruly. After all, the Corpse Bride is dead.
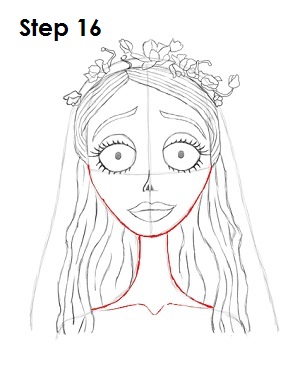
Step 16: Tighten the shape of Emily's face and neck. Draw in her collarbone below her neck. It's just two lines that meet in the middle by forming a letter V.
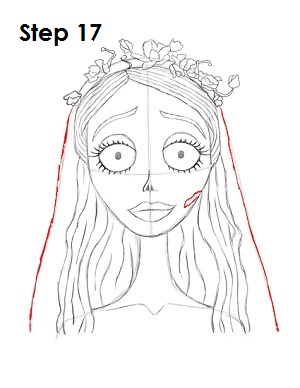
Step 17: Darken in the rest of the veil that comes down on top of the back of her hair. Draw a gash on the right side of Emily's face to represent the piece of skin she is missing there.

Step 18: That's it! You now have a nice sketch of Emily the Corpse Bride. You can stop at this quick drawing for a rough, sketchy look or go for a more finished look by continuing to the step below.
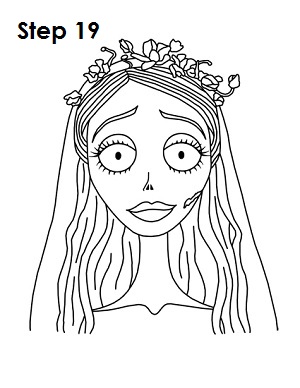
Step 19: For a more finished, inked look, carefully draw over the final sketch lines with a pen or marker. Wait for the ink to dry, and then get rid of every pencil mark with an eraser. You now have a finished inked drawing of the Corpse Bride! You can stop here or go to the final step to complete your Emily drawing.
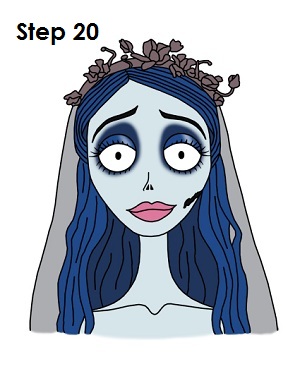
Final Step: For a completely finished drawing of Emily the Corpse Bride, you have to color it. You can use markers, color pencils or even crayons! Color her flowers a dark gray and her veil a lighter gray color. Her hair and eyelids are blue. Give her a shade of darker blue around her eyes and for the back part of her hair (the parts closest to her neck). Her eyebrows and gash are black. Her skin is a pale light blue, and her lips are pink. That's it! You now have a completed drawing of Emily from Tim Burton's Corpse Bride.
RELATED TUTORIALS
 |
 |
 |
 |
 |


