How to Draw Stitch (Full Body)
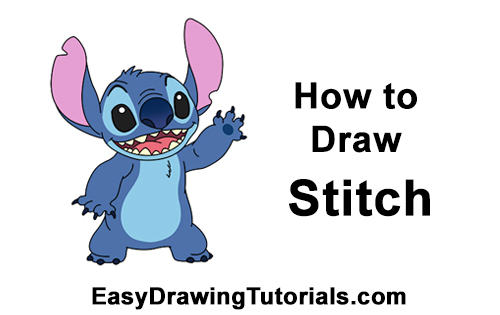
Use the videos and step-by-step drawing instructions below to learn how to draw a Stitch from Disney's Lilo & Stitch. Stay tooned for more tutorials!
The speed drawing video:
The written step-by-step video tutorial:
Intro: Start off with a pencil sketch. In the beginning stages, don’t press down too hard. Use light, smooth strokes for sketching.
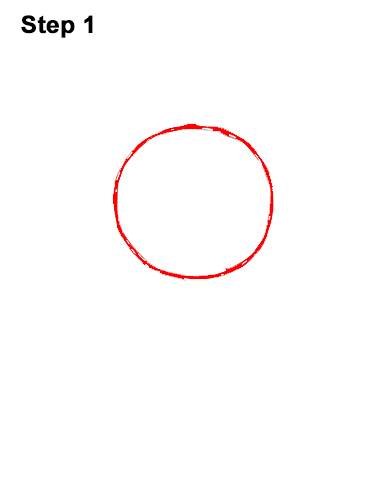
Step 1: Draw a big circle near the top of the paper as a guide for Stitch's head. First make four small marks to indicate the circle's height and width. Then connect the marks using curved lines. Sketch lightly at first so that it's easy to erase if you make mistake. If you're struggling to draw the circle, trace the outer rim of a cup, a lid or any other object with a circular edge.
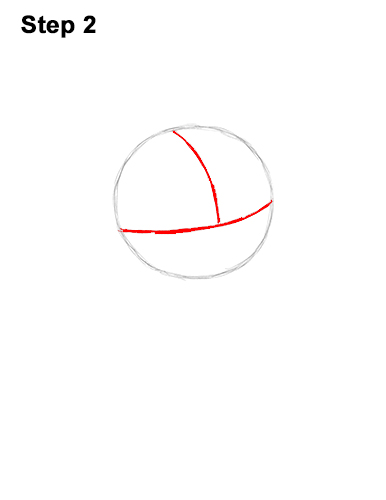
Step 2: Inside the circle, draw a curved, horizontal line to help you place Stitch's facial features later. On top of the horizontal line, draw a curved, vertical line for another construction line.
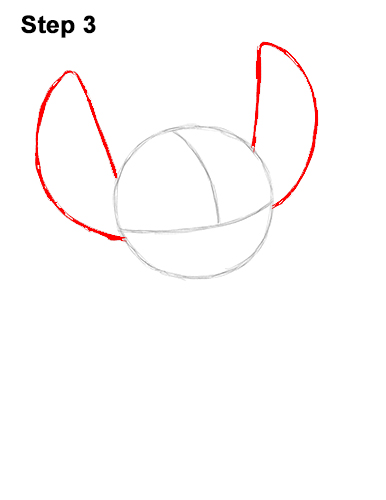
Step 3: Add the guides for Stitch's ears by first drawing two vertical lines on top of the head. Pay attention to the length of these lines in relation to the circle. On the left side, draw a long line that curves out and down and meets the circle at the bottom. Add a similar curved line on the right side to complete the guides for the ears.
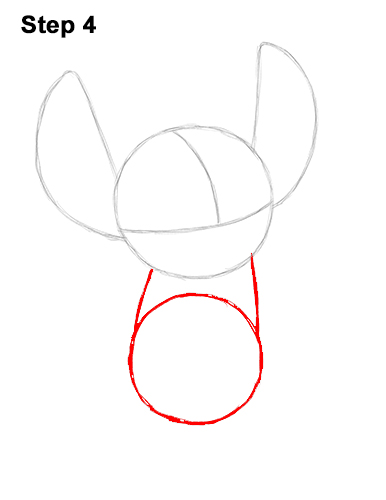
Step 4: Under the head, draw another circle the same way as the first, as a guide for the body. Draw four small marks to determine the size of the circle, then connect the marks using curved lines. This circle should be slightly smaller than the circle for the head. Draw a couple of lines that connect both circles to complete the guide for Stitch's body.
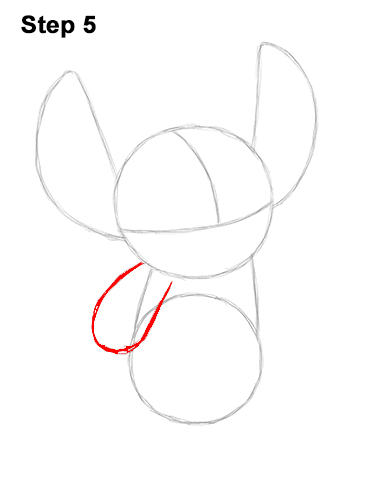
Step 5: Under the head, on the left side, draw a long, curved line, similar to a tilted letter U as a guide for Stitch's first arm.
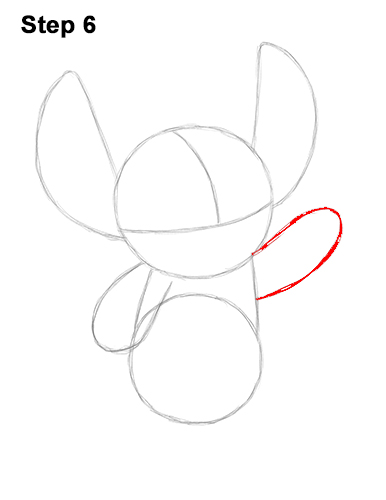
Step 6: On the right side of the body, draw a long line that curves upward as a guide for Stitch's other arm.

Step 7: Under the body, on either side, draw a curved shape as guides for Stitch's short legs. Each guide basically consists of two short , vertical lines with a horizontal line at the bottom.
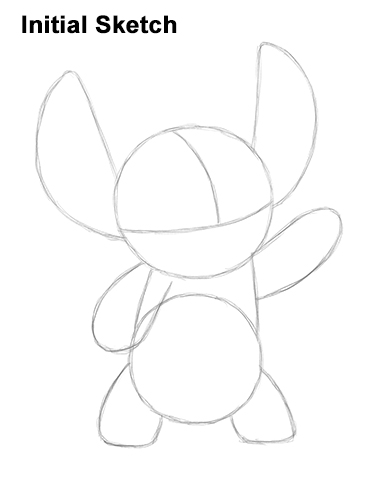
That's it for the guides! For the next steps, use darker lines for a more defined drawing.
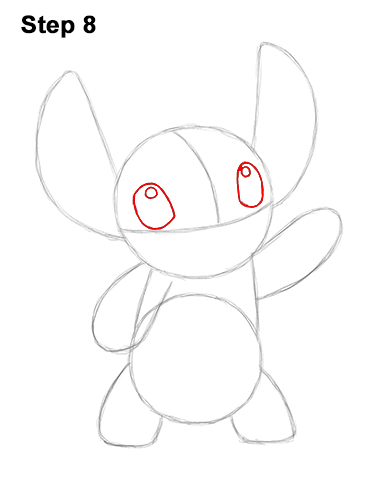
Step 8: Inside the head, lightly sketch two ovals for the eyes. Start with four small marks to determine the size of the ovals in relation to the head. As you draw the marks, pay attention to their distance from the initial guide lines. Don't draw Stitch's eyes too close together. They should be close to the opposite edges of the head. When you get the position and size of the ovals right, darken the lines. As you darken the lines, make the sides of the eyes a bit pointier. Remember to sketch lightly at first so that its easy to erase if you make a mistake. Inside each eye, at the top, draw a small circle to represent glare.
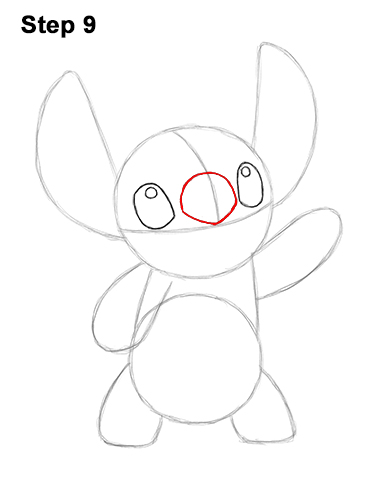
Step 9: For Stitch's nose, first make a small mark on the vertical guide line that's at the height level of the eyes. Now draw a curved line on either side of the mark for the top part of the nose. Below that, draw a line similar to a wide letter V for the bottom part of the nose.
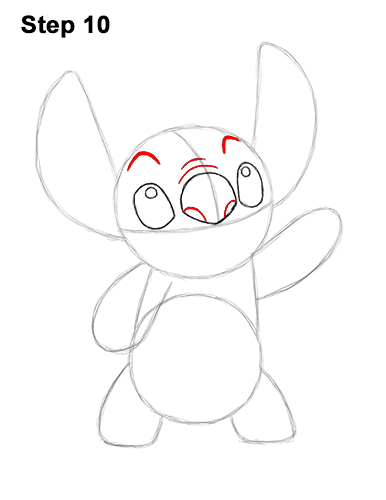
Step 10: Inside the nose, at the bottom, draw two curved lines for the nostrils. Above the nose, draw two curved lines for wrinkles. Above each eye, draw a thick, curved line for the eyebrows. The eyebrow on the right should be a bit smaller because Stitch's head is slightly turned.
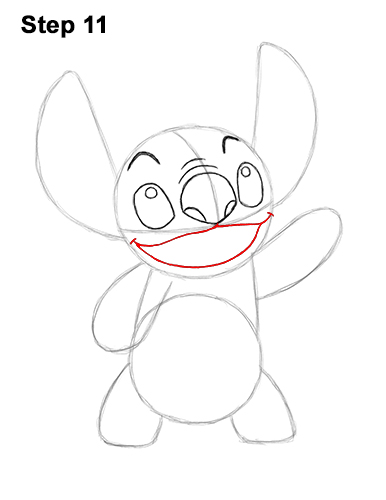
Step 11: Under the nose, draw a line that stretches to the left of the head for the first part of the mouth. Now draw another line under the nose that stretches to the right edge of the head to complete the top of Stitch's mouth. Underneath, draw a long, curved line for the bottom part of the open mouth. This line should follow the basic path of the edge of the initial circle.
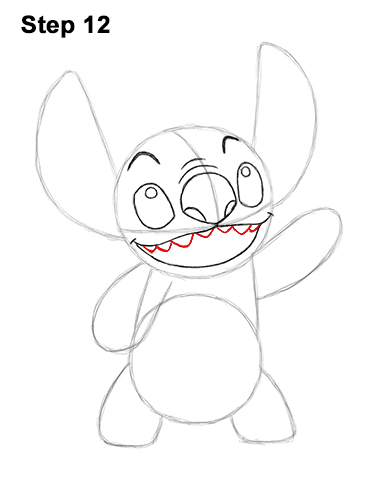
Step 12: Draw a row of V-shaped lines along the top part of the mouth for Stitch's teeth. Pay attention to the sizes of the teeth. They're not all the same.
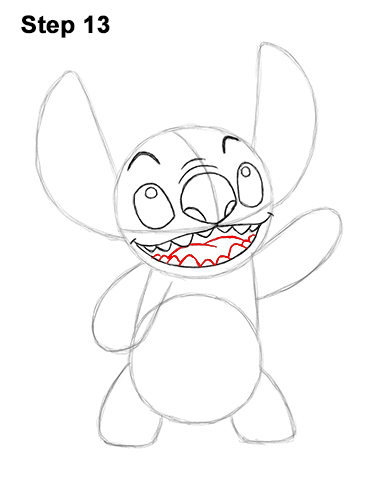
Step 13: Draw a series of triangle- like shapes along the bottom edge of the mouth for more teeth. Remember to vary the sizes of the teeth. The teeth on the sides are smaller. In the space between the teeth, draw two long, curved lines for Stitch's tongue.
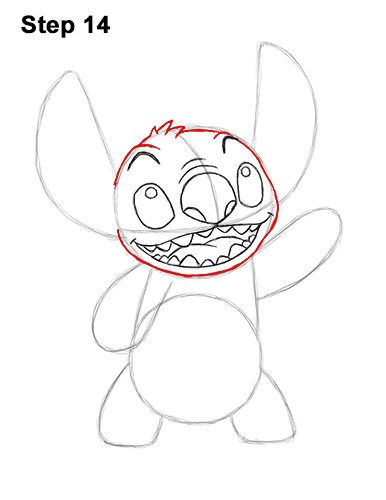
Step 14: Use the first circle as a guide to draw the shape of Stitch's head. Darken the basic path of the circle, but above the eyebrows, curve the lines inward a bit. At the top of the head, draw three curved, spike-like shapes for a bit of fur sticking up. As you darken the right side of the head, make the shape bulge outward more to create the cheek. For the bottom, simply darken the initial circle. Don't darken the left side where the base of the ear is.

Step 15: Use the big shape on the left side of the head as a guide to draw Stitch's first ear. Follow the basic path of the guide but make the shape curve more as you darken it. At the top of the shape, near the left side, curve the line inward a bit to create a notch on the ear. Inside the shape, near the bottom, draw a couple of curved lines for the folded part of the ear.
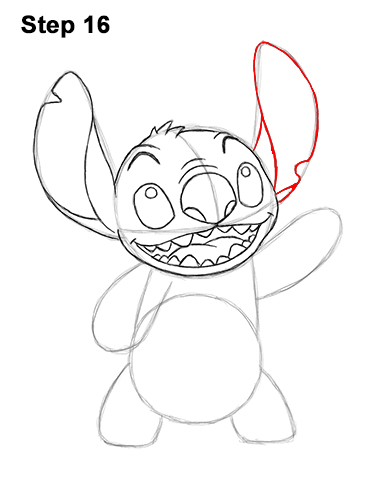
Step 16: Use the shape on the right as a guide to draw the second ear the same way as the first. Make the overall shape wavier as you follow the guide. This ear has a notch on the bottom, right side. The curved lines inside the ear should be shorter because they're being blocked by Stitch's head.
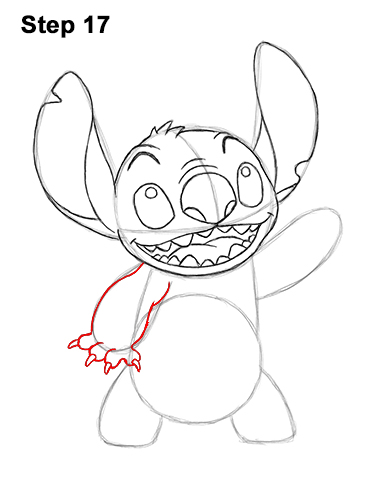
Step 17: Use the curved line on the left side as a guide to draw the first arm. Follow the basic path of the guide but make the lines wavier at the top as you darken them. Draw a series of short, curved lines along the bottom of the guide for Stitch's fingers. Sketch lightly at first to get the shapes right. Draw a total of four fingers. At the end of each finger, draw a small, thin, pointy shape for the claws.
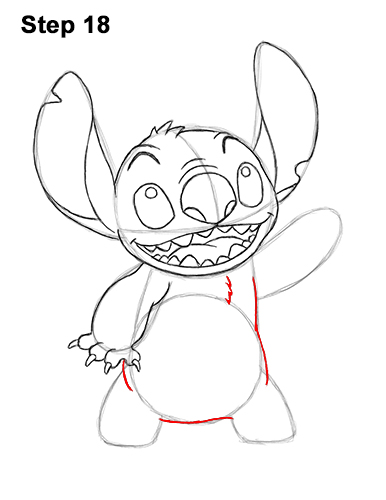
Step 18: Use the shapes under the head as guides to draw the body. Use wavier shapes as you darken the lines. Don't connect the lines for the body where the limbs are. Add a few small, spike-like shapes on the chest for Stitch's fur.
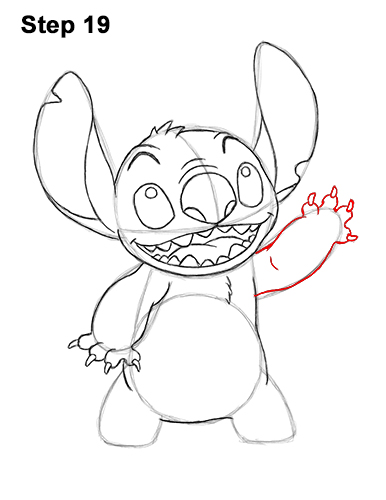
Step 19: Use the curved shape on the right as a guide to draw the other arm. Follow the path of the guide but make the shape wavier as you darken the lines. Along the edge of the guide, draw a series of short, curved lines for the fingers. Stitch has short fingers, so don't make these curved lines too long. At the end of each finger, draw a thin, pointy shape for the claws.
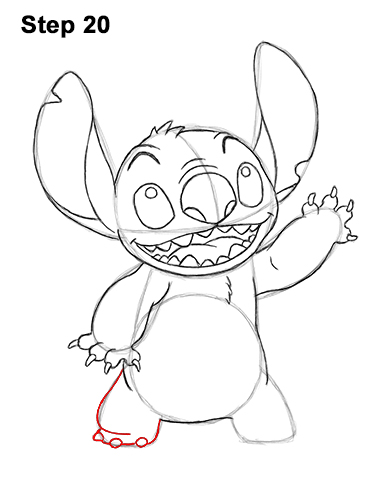
Step 20: Use the shape on the bottom, right side as a guide to draw Stitch's first leg. Darken the shape but curve the section near the bottom inward to create the knee. At the bottom of the foot, draw three small, rounded shapes for the claws.
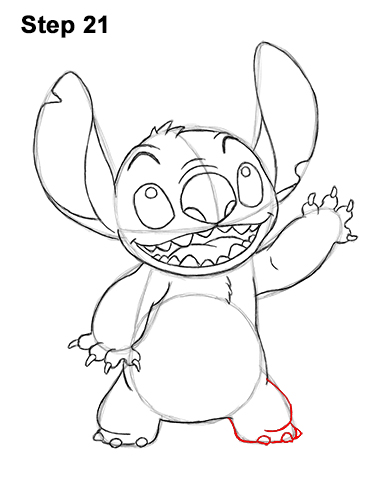
Step 21: Darken the shape on the lower, right side but curve the section near the bottom inward for the knee. At the bottom, draw three short, round shapes for Stitch's claws.
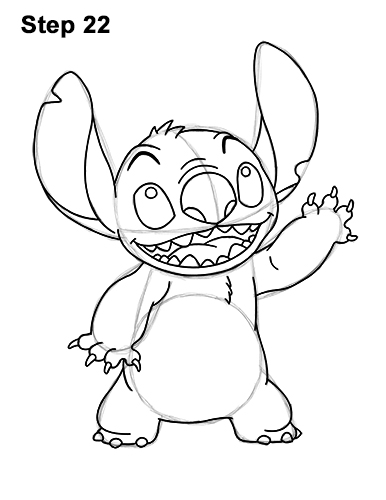
Step 22: For a more finished look, carefully go over the final sketch lines with a pen or marker.
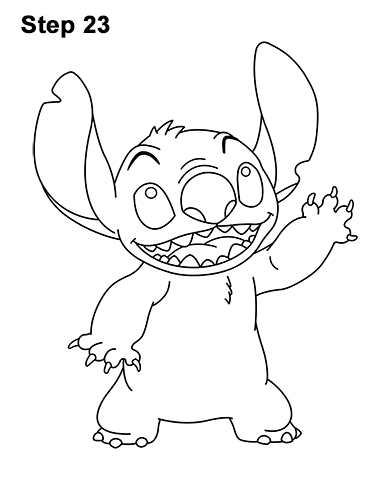
Step 23: After inking, get rid of every pencil mark with an eraser.
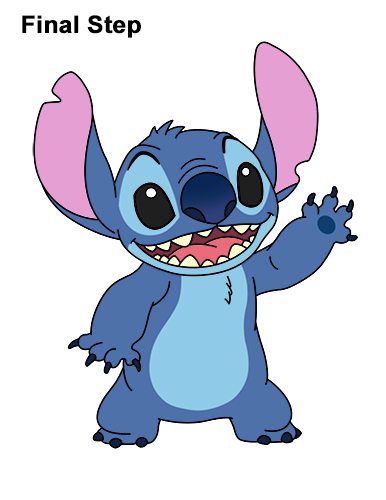
Final Step: Color your Stitch drawing using color pencils, markers or crayons! First use blue to outline a section around the eyes and torso. Then color the areas outside the outlines blue. Use black to color the eyes, nostrils and claws. Use light blue for the section around the eyes, under the mouth and torso. Use dark blue for the nose and pink for the ears and tongue. Use dark red for the inside of Stitch's mouth and a bit of yellow for the teeth.
Thanks for visiting! Subscribe to the EasyDrawingTutorials YouTube Channel for a new tutorial every Sunday.
To learn how to draw animals, visit How2DrawAnimals.com.
RELATED TUTORIALS
 |
 |
 |
 |
 |


