How to Draw Mr. Incredible from The Incredibles VIDEO & Pictures

Bob is a super-strong, nearly invulnerable, super fast super hero. After marrying Helen Parr (Elastigirl), and having three children: Violet, Dash, and Jack-Jack, Bob works at an insurance company, although he is a nice man who can't stand taking advantage of people. Although super hero work is illegal, he and his best friend Lucius Best (Frozone) sneak out at night to fight crime and safe innocent bystanders. Unfortunately, the villain Syndrome takes advantage of Bob's dreams of being super again, and tricks him into trouble on a secluded volcanic island.
Stay tooned for more free drawing lessons by:
- Liking us on Facebook>>
- Subscribing on YouTube.com>>
- Visit How2DrawAnimals.com for free animal drawing tutorials>>
All of the free art lessons on EasyDrawingTutorials.com are good drawing tutorials for beginners and experienced artists alike. The online tutorials are easy to follow; they teach you the how to draw basics while showing you how to draw fun cartoon characters step by step. Each cartoon character has a video drawing tutorial option, as well as step-by-step photos and written text to follow.
The speed drawing video:
To draw Mr. Incredible step by step, follow along with the video tutorial below and pause the video after each step to go at your own pace. You may find it easier to follow the step-by-step drawings below. The new lines in each step are shown in red, and each step is explained in the text below the photo, so you'll know exactly what to draw in each step. You may want to open the video in a new tab and use both drawing methods! Take your time and draw at your own pace.
The written step-by-step video tutorial:
Intro: Start off with a pencil sketch. In the beginning stages, don’t press down too hard. Use light, smooth strokes for sketching.
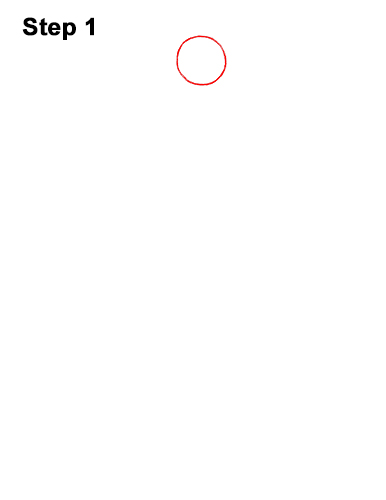
Step 1: Draw a small circle near the top of the paper as a guide for Mr. Incredible's head. First make four small marks to indicate the circle's height and width. Then connect the marks using curved lines. Sketch lightly at first so that it's easy to erase if you make a mistake. If you're struggling to draw the circle, trace the outer rim of a coin, a button or any other object with a circular edge.
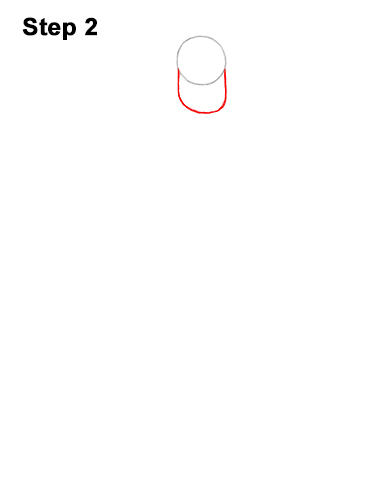
Step 2: Draw the guide for Mr. Incredible's chin/ jaw by first making a small mark below the head. Connect the mark to the head using curved lines to form a big U- shaped guide for Bob Parr's chin/jaw.
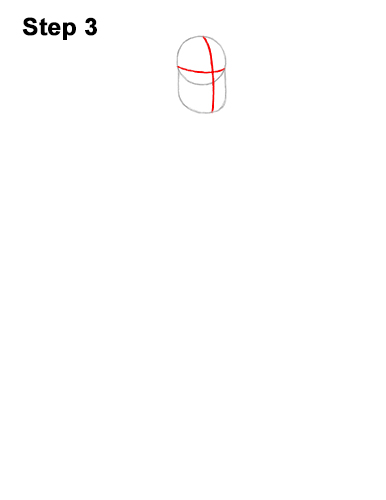
Step 3: Draw two intersecting lines across the whole head, one horizontal and one vertical. These are construction lines that will help you place Bob Parr's facial features later on.
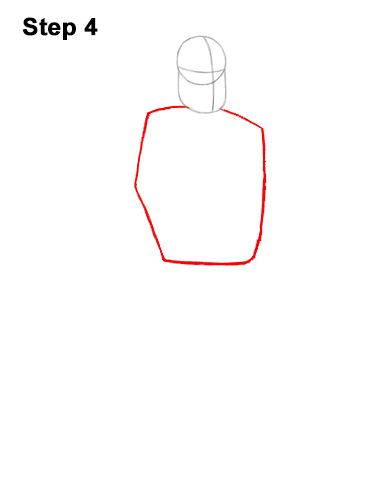
Step 4: On either side of the head, at the bottom, draw two short lines for the top part of the torso. On the left side, draw a long, vertical line that bends a little in the middle for the side of the torso. On the right, draw a long, vertical line that slopes slightly to the left for the other side of the torso. Draw a horizontal line at the bottom to connect the side lines and finish the guide for Mr. Incredible's torso.
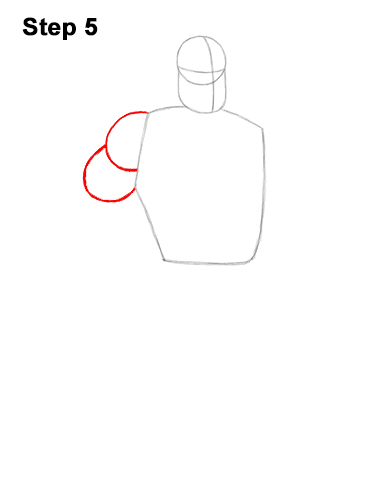
Step 5: On the left side of the torso, at the top, draw a half- circle as a guide for Mr. Incredible's shoulder. Under the shoulder, draw another curved line similar to a half circle as a guide for the bicep.
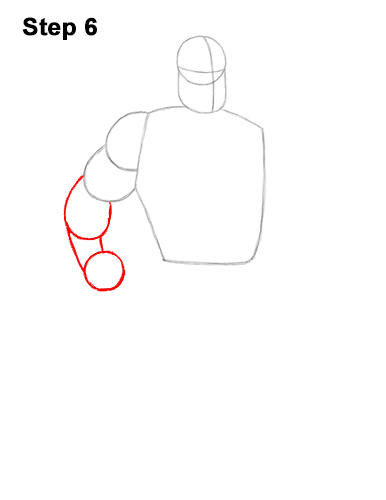
Step 6: Below the bicep, draw a curved line similar to an oval as a guide for the forearm. Below the forearm, draw two short lines that slope to the right slightly as a guide for the wrist. Below the wrist, off to the right a bit, draw a small circle as a guide for Mr. Incredible's fist.
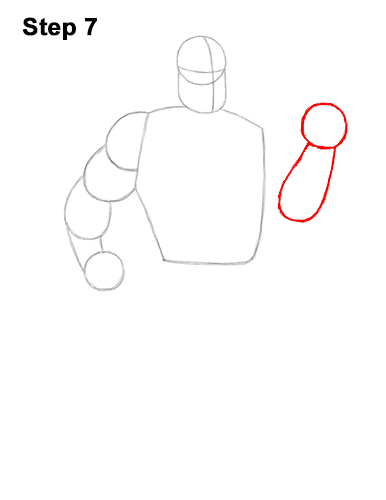
Step 7: On the upper, right side of the torso, draw a small circle as a guide for Mr. Incredible's other fist. Below the circle, draw a long, curved line as a guide for the wrist/forearm. Pay attention to how far these shapes are from the torso. The forearm should slope to the left.
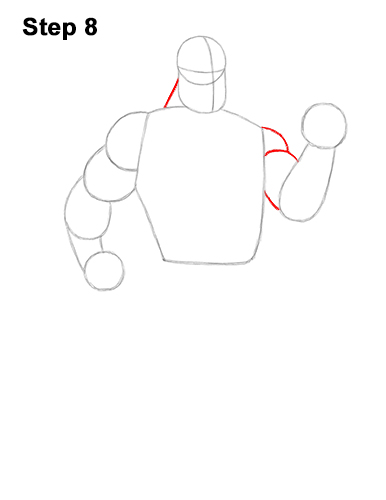
Step 8: Draw a couple of curved lines that connect the forearm to the torso and also create the guide for the bicep. Add a curved line above the bicep as a guide for the shoulder and a line to the left of the head for the neck.
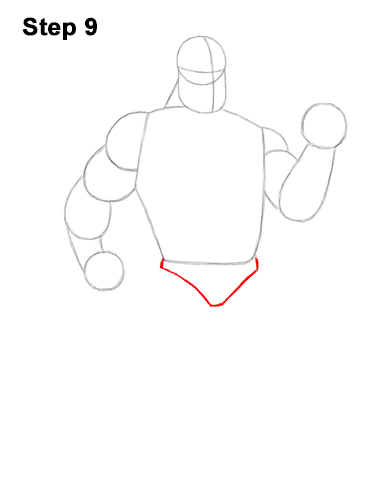
Step 9: Below the torso, on the sides, draw a couple of very short lines as a guide for Mr. Incredible's underpants. Under those lines, draw a longer V- shaped line to finish the guide for the underpants.
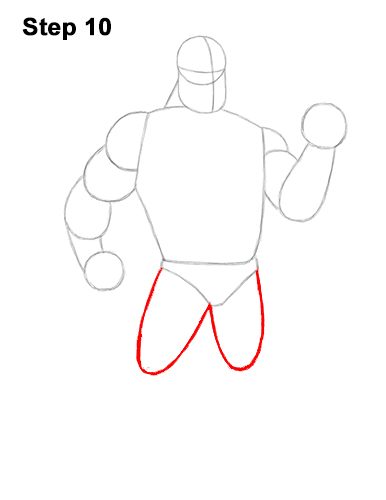
Step 10: Below the underpants, draw two long, curved lines as guides for the top of Mr. Incredible's legs. The shapes should be similar to the letter U. The bottoms of these guides should slope outwardly. Pay attention to the length of the legs in relation to the body. Bob Parr's legs aren't too long.
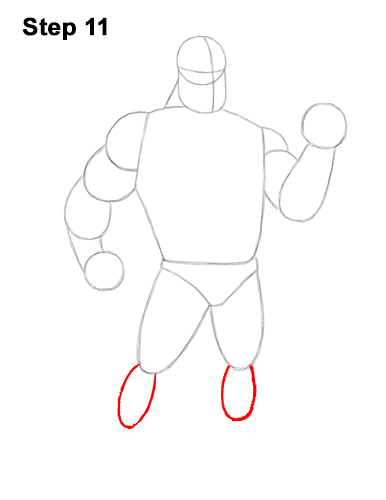
Step 11: Under each leg, draw a small oval as a guide for Mr. Incredible's calves. These ovals should be pretty skinny relative to the legs.
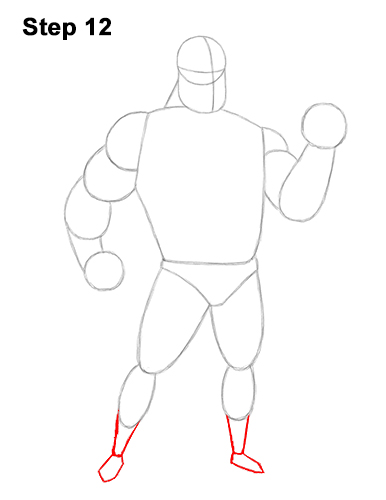
Step 12: Under each oval, draw a cylinder-like shape using a few lines as guides for Mr. Incredible's shins. The shin on the left should slope to the left slightly. Under the shins, draw the guides for the feet as pentagonal shapes. The foot on the left should point down, while the foot on the right should point right. Make them small.
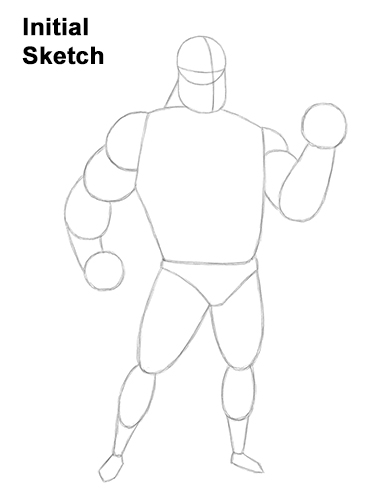
That's it for the guides! For the next steps, use darker lines for a more defined drawing.
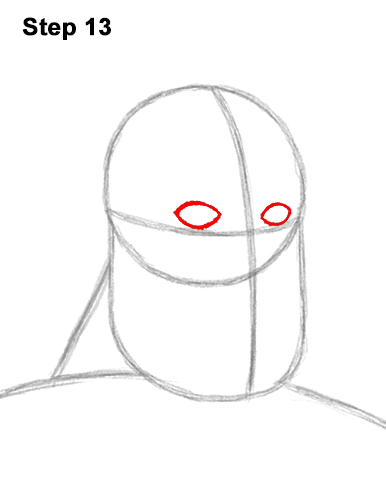
Step 13: Inside the head, lightly sketch two small ovals for Mr. Incredible's eyes. Use the initial lines as guides to help you with the placement. When you get the size and position of the eyes right, darken the lines. As you darken the ovals, make the sides pointier.
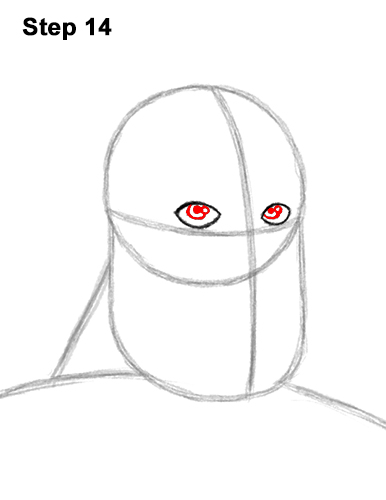
Step 14: Inside each eye, draw a tiny circle for Bob Parr's irises. Inside each iris, draw a dot for the pupils.
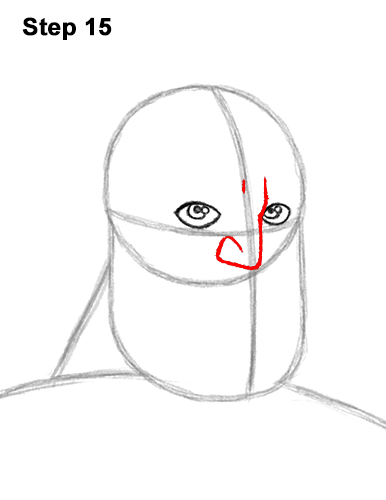
Step 15: Use the initial lines as a guide to draw the nose below the eyes. The line for the nose starts next to the eye on the right, moves down, hits the edge of the initial circle and then angles left. Curve the left side up toward the construction line and then back down a bit to create the side of the nose. Sketch lightly at first. Darken the lines when you get the shape right. Add a couple of lines at the top for Mr. Incredible's furrowed brow.
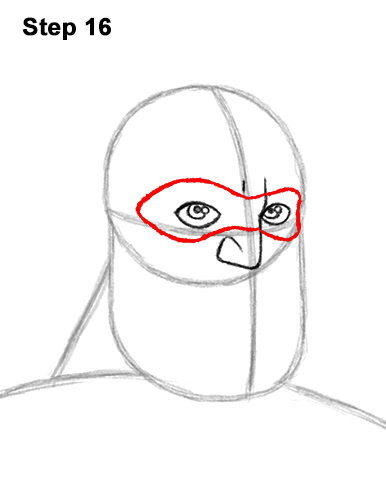
Step 16: Draw Mr. Incredible's super hero mask as a series of curved lines around the eyes. Sketch the shape of the mask lightly around the eyes. Use the initial lines as guides. When you get the shape right, darken the lines. The left side of the mask should stretch to the left almost to the edge of the initial circle. The middle of Mr. Incredible's mask should dip in. The top and bottom of should bulge outward. The right side should be flat against the side of the head.
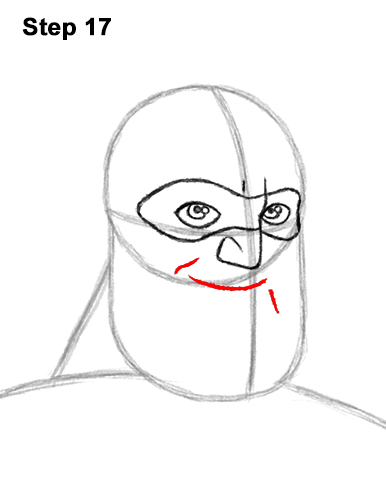
Step 17: Under the nose, draw a short, curved line for Mr. Incredible's smiling mouth. Place the mouth directly on top of the initial circle's edge. On the left side, draw a small smile line. Below the mouth, on the right side, draw a small line to emphasize Bob Parr's big chin.
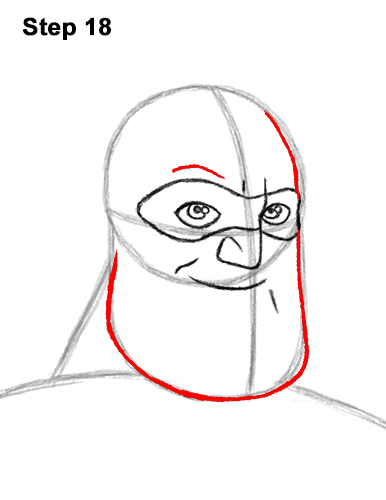
Step 18: Use the initial shapes as guides to draw the lower half of the head. Follow the basic path of the guides and darken the outer edges. As you darken the bottom, make the shape of the chin wider than the guide. Draw the left side of Mr. Incredible's jaw all the way to the edge of the initial circle. Add a curved line over the eye on the left for the raised brow.
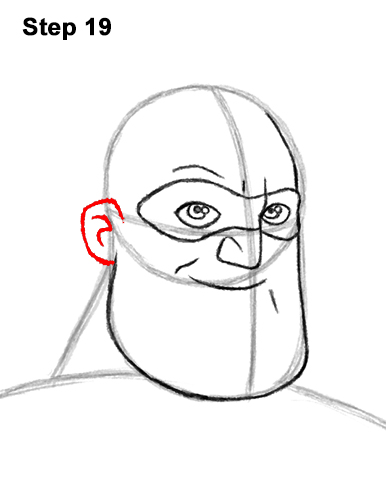
Step 19: Draw a short, curved line on the left side of the head for Mr. Incredible's ear. Draw a smaller curved line within the ear for its structure.
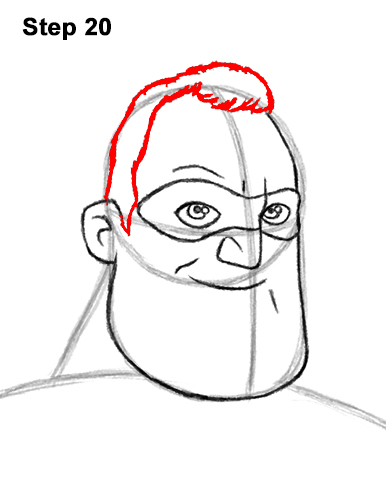
Step 20: Use the top part of the initial circle as a guide to draw Mr. Incredible's hair. First draw a wavy line from the ear to the top of the circle for the side of the hairline. Along the top edge of the initial circle, draw a series of short lines for the receding hairline. Darken the left edge of the initial circle for the back portion of the hair and head. Draw short strokes above the initial circle in the shape of an arc for the top part of the hair. Don't make the top of the hair too high because Bob Parr doesn't have too much hair on top.
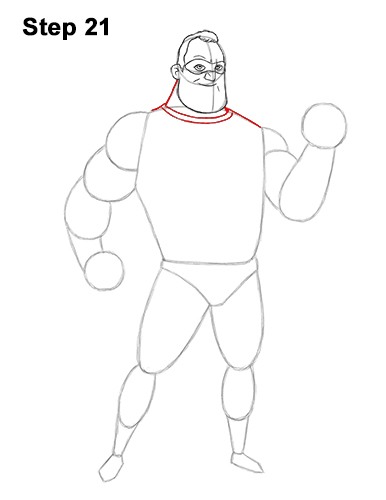
Step 21: Darken the line to the left of the head to create Mr. Incredible's neck. Below the head, draw a curved, horizontal line for the first part of the collar. Add a second curved line parallel to the first one to finish the costume's collar. Don't make the collar too wide. Darken the torso lines on either side of the collar too.
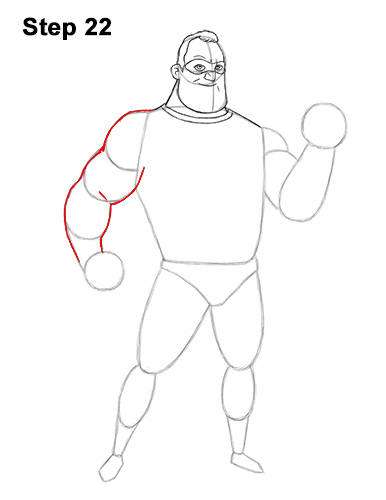
Step 22: Use the shapes on the left as a guide to draw Mr. Incredible's first arm. Simply darken the outer edges of the initial guides to create the shape of the arm. The shoulder, bicep and forearm should be big, but the wrist should be pretty thin.
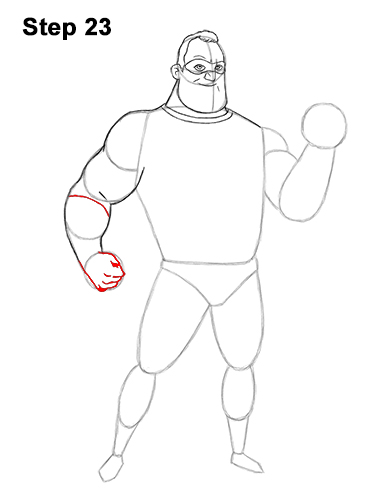
Step 23: Use the circle at the bottom as a guide to draw the fist. Follow the basic path of the circle but make the shape more blocky, almost hexagonal. On the top, right side, draw a short line that curves inward to create the folded thumb. Along the right edge, draw a series of short lines for Mr. Incredible's folded fingers. Add some small, curved lines to the left of the fingers for the knuckles. Draw a curved line across the top of the forearm for the glove opening.
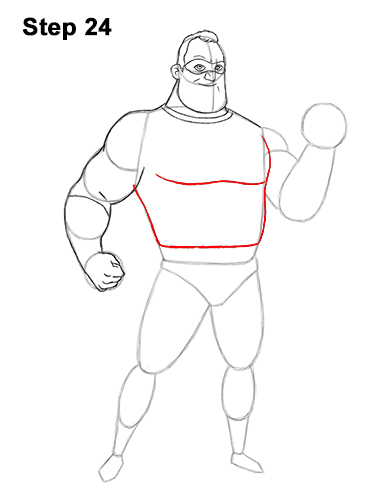
Step 24: Use the big shape in the middle as a guide to draw Mr. Incredible's torso. Darken the sides of the shape but make the right side more bulgy for the chest and stomach. At the bottom, draw a horizontal line parallel to the initial guide to create the top edge of the belt. Near the middle of the torso, draw a long, wavy, horizontal line to emphasize the chest.
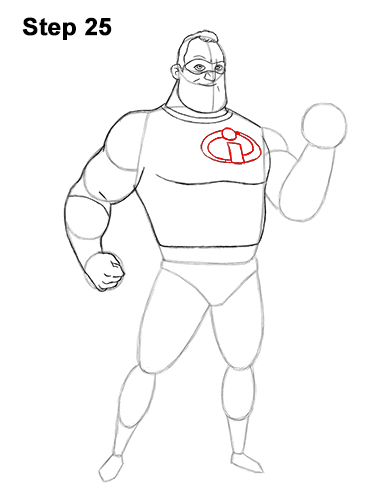
Step 25: Add the Incredibles logo near the left edge of the chest by first drawing a small circle for the "i." Below the circle, draw a small rectangle to finish the letter. Now draw a curved shape to the right . This shape should be thin at the top and thick at the bottom. Draw a similar shape on the left. The curved shape on the left should be thick at the top and thin at the bottom.
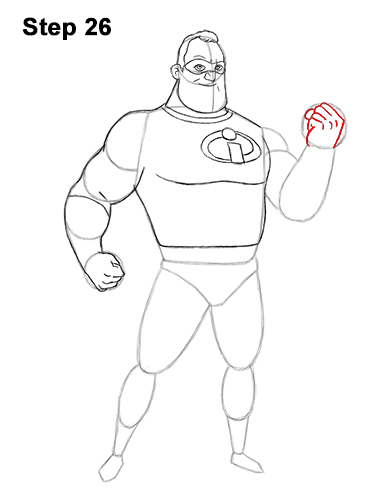
Step 26: Use the small circle on the right side as a guide to draw Mr. Incredible's other fist. Follow the basic path of the circle as you draw a blockier shape inside. Draw a series of lines along the top part of the blocky shape for the folded fingers. To the right of the folded fingers, draw a few short, curved lines for the knuckles. On top of the folded fingers, draw a short, curved line for the thumb.
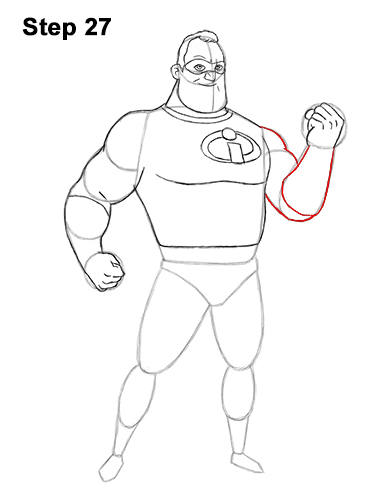
Step 27: Use the other shapes to the right of the torso as guides to draw the rest of Mr. Incredible's arm. Darken the outer edges of the guides under the fist. Draw a line across the forearm for the glove. Darken the outer edges of the guides at the top to create the shoulder and bicep.
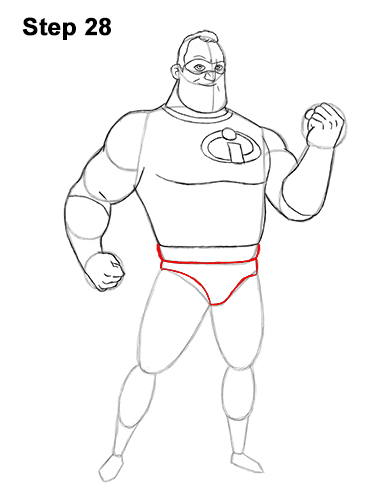
Step 28: Darken the initial horizontal line under the torso to create Mr. Incredible's belt. Darken the initial V-shaped line but make it curvier to complete the underpants.
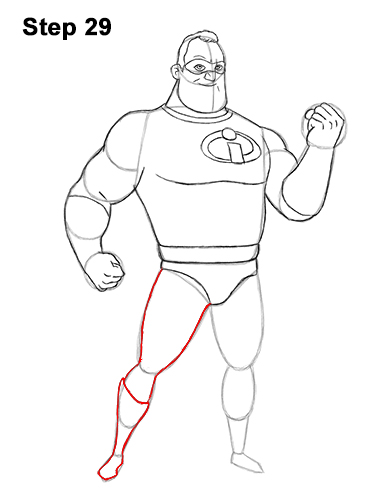
Step 29: Use the shapes on the left side as guides to draw Mr. Incredible's first leg. Simply darken the outer edges of the initial guides to create the shape of the leg. Make the section in the middle thin for the knee and curve the shape of the foot more. Draw a sloping line across the calf for the top of the boot.
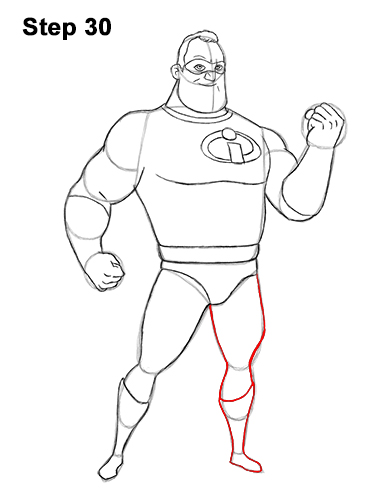
Step 30: Use the shapes on the right to draw Mr. Incredible's other leg the same way as the first. Darken the outer edge of the guides to create the shape of the leg. Make the top of the leg wide and the knee thin. Draw a sloping line across the calf for the top of the boot. Make the shape of the foot curvier at the bottom.
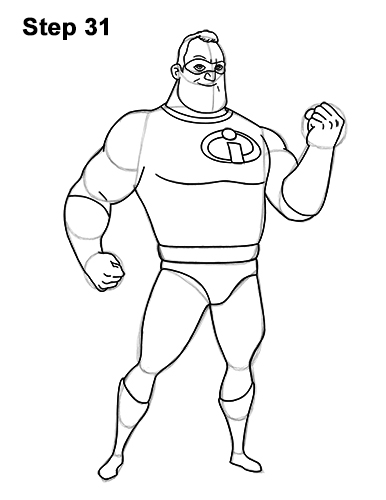
Step 31: For a more finished look, carefully go over the final sketch lines with a pen or marker.
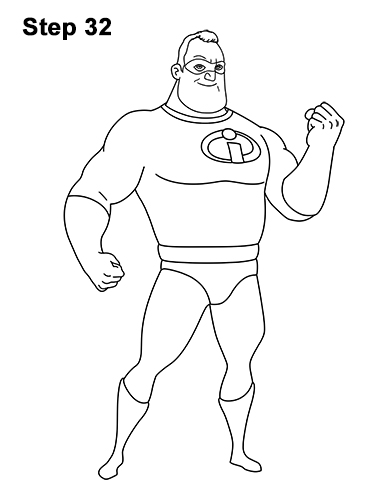
Step 32: After inking, get rid of every pencil mark with an eraser.
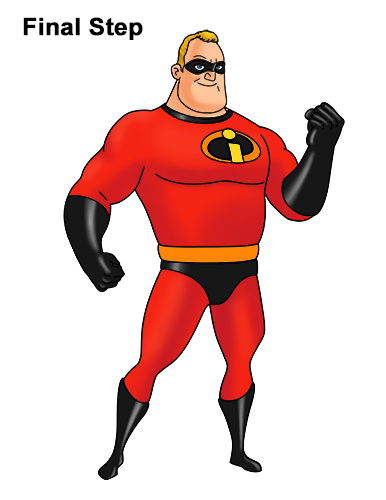
Final Step: Color your Mr. Incredible drawing using color pencils, markers or crayons! Use yellow for the hair and peach for the skin. Use black for the mask, collar, gloves, underpants and boots. Add the colors lightly at first and gradually build up to the level of darkness that you like. As you add the black, apply less pressure to create strips of lighter black and almost white, that represent shine.
Use red for the rest of Mr. Incredible's super hero costume, except for the Incredibles logo and belt. Use a bit of dark brown on top of the red to create shadows. Use black for the back of the logo. Color the i yellow and the arcs around the i yellow-orange. Use yellow-orange for the belt and light blue for Bob Parr's eyes.
Thanks for visiting! Subscribe to the EasyDrawingTutorials YouTube Channel for a new tutorial every week.
To learn how to draw animals, visit How2DrawAnimals.com.
RELATED TUTORIALS
 |
 |
 |
 |
 |


