How to Draw Tinkerbell
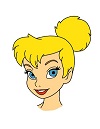
Use the video and step-by-step drawing instructions below to learn how to draw Tinkerbell from Disney's Peter Pan. A new cartoon drawing tutorial is uploaded every week, so stay tooned!
Intro: Start drawing Tinkerbell with a pencil sketch. In the beginning stages, don’t press down too hard. Use light, smooth strokes for sketching.
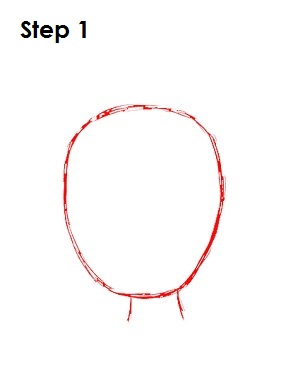
Step 1: Start with an oval that slightly tapers in at the bottom, and draw it in the middle of the page. Add two lines at the bottom of that shape. These will be the basic shapes for Tinkerbell’s head and neck.
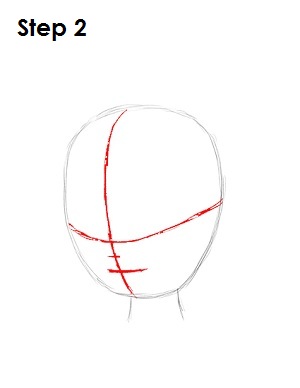
Step 2: Next, draw two intersecting lines across the oval, one vertical line and one horizontal. When drawing the lines, bend them so they follow the contour of the shape. In between the horizontal line and the bottom of the oval, draw a smaller horizontal line. In between that line and the main horizontal line, draw an even smaller horizontal line. These will be construction lines that will help you place Tinkerbell’s features later on.
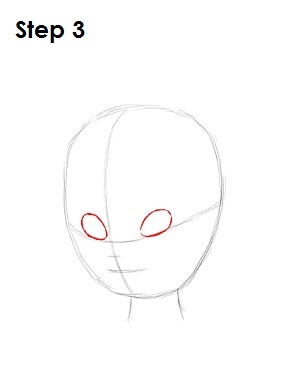
Step 3: Now draw Tinkerbell’s eyes by drawing two small egg shapes. These shapes should be placed on top of the horizontal construction line. The left shape should just barely graze the vertical construction line.
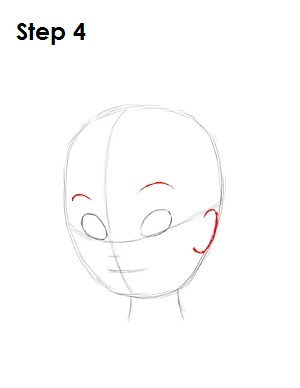
Step 4: Draw a small arc above each eye for Tinkerbell’s eyebrows. Draw a backward C-shaped curve on the right side of this cartoon character's head just below the horizontal construction line for this Peter Pan character's ear.
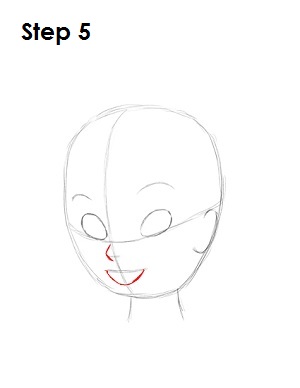
Step 5: To the left of the smallest horizontal line, draw a wide letter C. This will be Tinkerbell’s nose. Draw a wide U-shaped curve below the other small horizontal line for Tinkerbell's mouth.
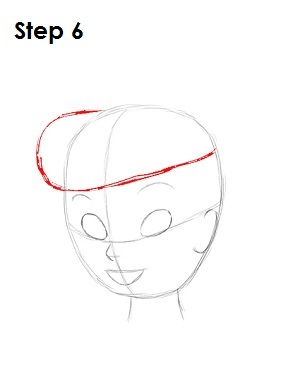
Step 6: Now draw in the first guide for Tinkerbell’s hair by drawing a curve that begins on the top left side of her head. Extend it to the left to the outside of the head shape, bring it back inside above the left eyebrow and draw it across her head. End the line on the top right side of Tinkerbell’s head.
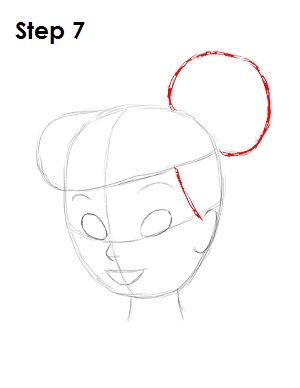
Step 7: Draw in two more guides for the hair of this Disney cartoon character. The first is a curve on the top right side of Tinkerbell's head that will be her bun. The second guide is a line that connects the curve in step 6 to her ear just below the horizontal construction line.
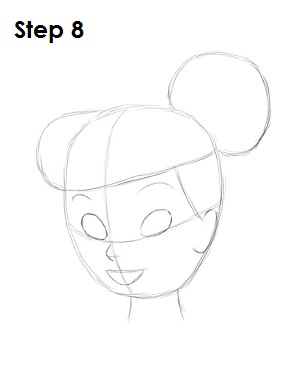
Step 8: That's it for the initial sketch of Tinkerbell! You have the basic Tinkerbell shape, so now go in and tighten your drawing. From this point on, press harder with your pencil in order to get darker lines and a more defined sketch.
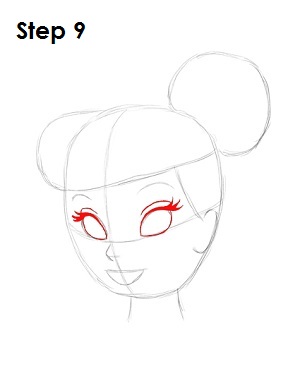
Step 9: Tighten the shape of Tinkerbell’s eyes by making them pointier and giving her thick eyelashes. Also draw a small curve above each of her eyes to represent this Peter Pan character's eyelids.
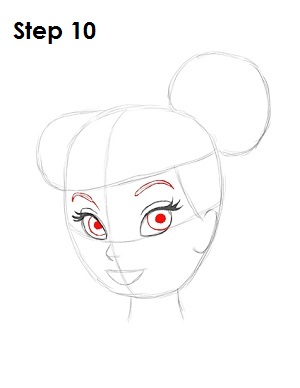
Step 10: Finish Tinkerbell’s eyes by drawing a semicircle inside each eye for her irises. Draw a smaller circle inside each iris to make pupils and shade them in. Thicken the curves above each eye to make shapelier eyebrows. Draw a small line at the right end of the left eyebrow to represent the beginning of her nose bridge.
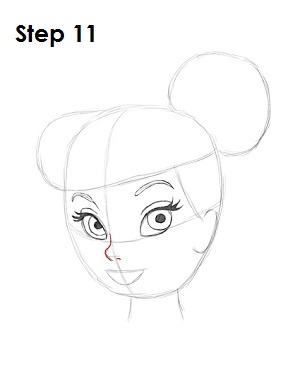
Step 11: Tighten the shape of Tinkerbell’s nose by making it point upward slightly. Draw a small line to the right of it to indicate her nostril.
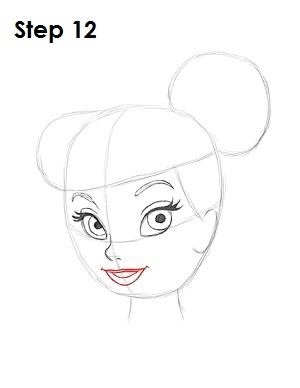
Step 12: Now tighten Tinkerbell’s lips. Draw her upper lip as a set of wavy lines, and draw her lower lip as two wide U shapes underneath. Add two small laugh lines at either end of Tinkerbell's mouth.
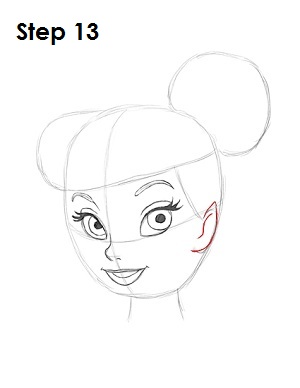
Step 13: Give Tinkerbell’s ear a fairy look by making the top part pointy. Draw a long S-shaped line within Tinkerbell's ear to indicate structure.
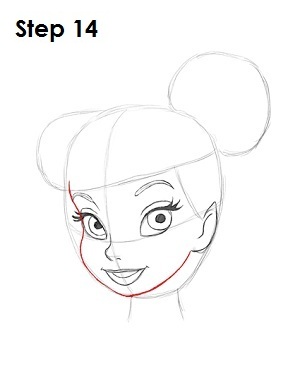
Step 14: Using the main head shape as a guide, tighten Tinkerbell’s face by drawing a line that starts just inside the head. Dip it in to touch the left eye, bring it out a bit to create her cheek bone and curve it up near the bottom to create her chin. This line will end at Tinkerbell's lower ear.
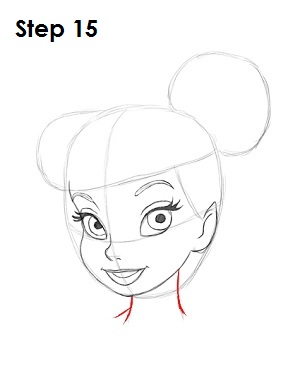
Step 15: Darken in the two lines that make Tinkerbell’s neck and curve them outward slightly. Draw a small line on the left side of her neck to indicate the beginning of her shoulder.
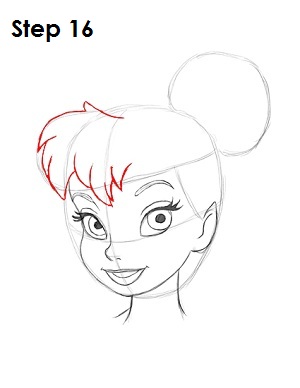
Step 16: Tinkerbell’s hair can get tricky, so it’s broken down in two parts. Use the hair guides to draw in Tinkerbell's bangs by making a series of jagged curves that represent clumps of hair on her forehead.
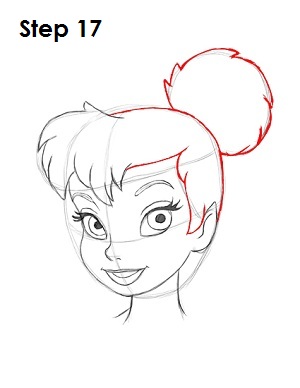
Step 17: Draw in the rest of the main head shape. Tighten the look of the bun by following the main guide, but make it more jagged. Using a series of curved lines, draw in her sideburn.
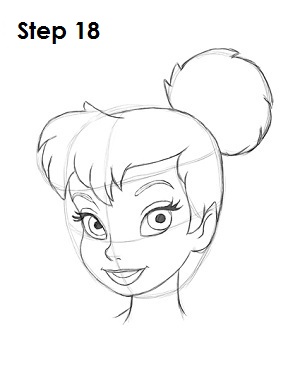
Step 18: That’s it! You now have a nice sketch of the Disney character Tinkerbell. You can stop at this quick drawing for a rough, sketchy look or go for a more finished look by continuing to the step below.
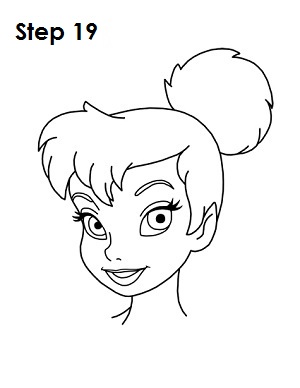
Step 19: For a more finished, inked look, carefully go over the final sketch lines with a pen or marker. Wait for the ink to dry, and then get rid of every pencil mark with an eraser. You now have a finished inked drawing of Tinkerbell! You can stop here or go to the final step to complete your Tinkerbell drawing.
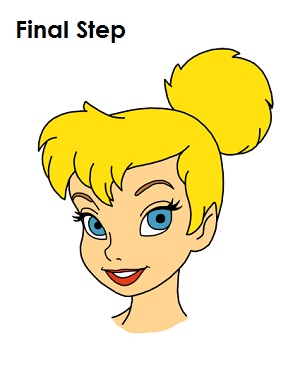
Final Step: For a completely finished Tinkerbell drawing, you have to color it. You can use markers, color pencils or even crayons! Color Tinkerbell's hair yellow, her eyebrows light brown, her eyes blue and her lips red. Her skin is a peach color. If you don’t have peach, improvise and use yellow-orange or light brown. Experiment! That’s it! You now have a completed drawing of Tinkerbell from Peter Pan.
RELATED TUTORIALS
 |
 |
 |
 |
 |


