How to Draw Batman (Full Body)
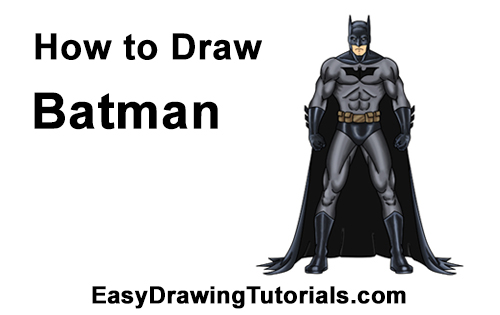
Use the videos and step-by-step drawing instructions below to learn how to draw Batman (Full Body). A new cartoon drawing tutorial is uploaded every week, so stay tooned!
The speed drawing video:
The written step-by-step video tutorial:
Intro: Start off with a pencil sketch. In the beginning stages, don’t press down too hard. Use light, smooth strokes for sketching.
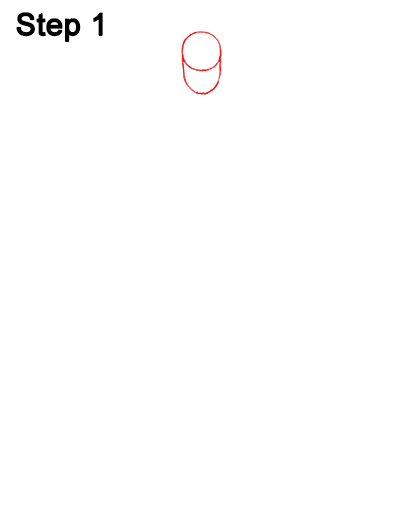
Step 1: Draw a small circle near the top of the page as a guide for Batman's head. First draw four tiny marks for the height and width of the circle, then connect the marks using curved lines. Sketch lightly at first so that it's easy to erase if you make a mistake. But the circle doesn't have to be perfect. It's just a guide. If you do want a perfect circle, trace the outer rim of a coin, bottle cap or anything else that's circular. Draw a small U- shaped arc under the head as a guide for the jaw and chin. Don't draw the arc too low, otherwise Mr. Bruce Wayne will end up with a big chin.
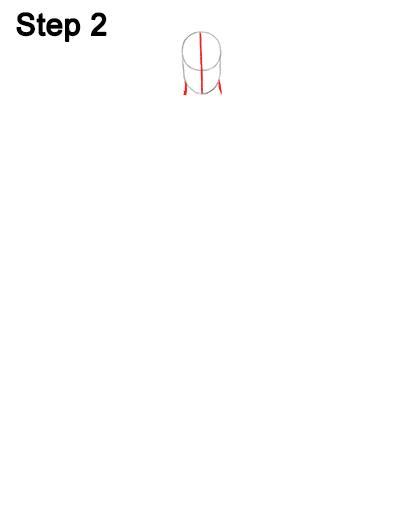
Step 2: Draw a vertical line across the entire head. This construction line will help you place Batman's facial features later. Add two tiny lines under the head as guides for the neck.
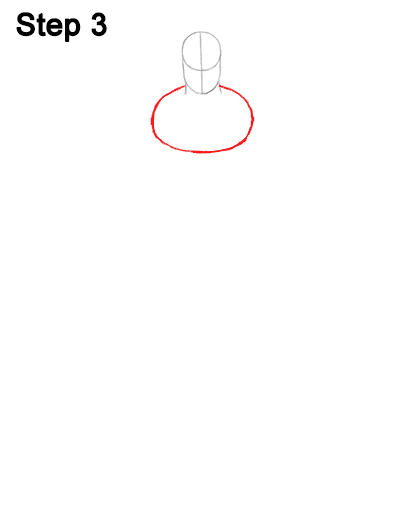
Step 3: Draw a big oval under the head as a guide for Batman's chest. Pay close attention to the size of the chest in relation to the head. Sketch it lightly at first to get it right. Batman is muscular, but he isn't as big as other huge characters, like the Hulk, so don't draw the oval too big.
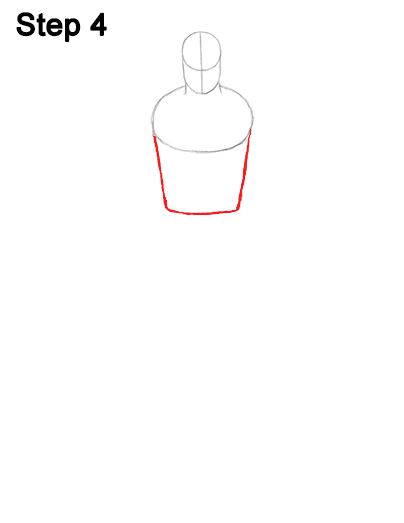
Step 41: Uner the oval, draw a square- like shape as a guide for the middle section of Batman's torso. First draw two vertical lines on the sides, then close the shape at the bottom with a horizontal line.
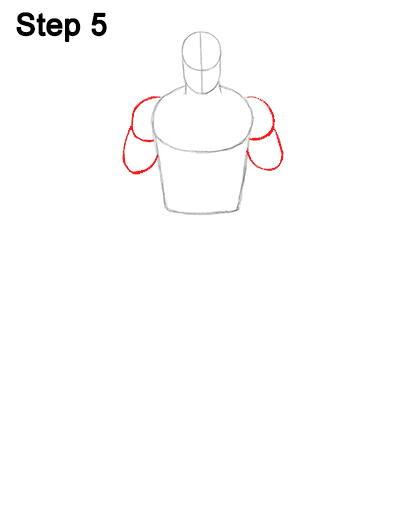
Step 5: Draw a half-circle on the top, left side of the torso as a guide for the first shoulder. Draw another half- circle on the right side as a guide for the other shoulder. Under each half- circle, draw a U- shaped arc as a guide for Batman's biceps. Pay attention to the size of all these shapes in relation to the torso.
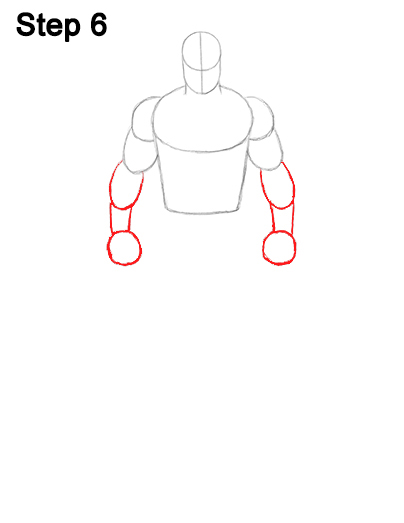
Step 6: Under each U-shaped arc, draw a small oval as guides for the top part of the forearms. The top part of each oval should be behind the U-shaped arc. Now under each oval, draw two short vertical lines as guides for the lower part of the forearms. Under each forearm, draw a small circle as a guide for the fists. Try to make the shapes on either side of Batman's body the same size so that there's symmetry.
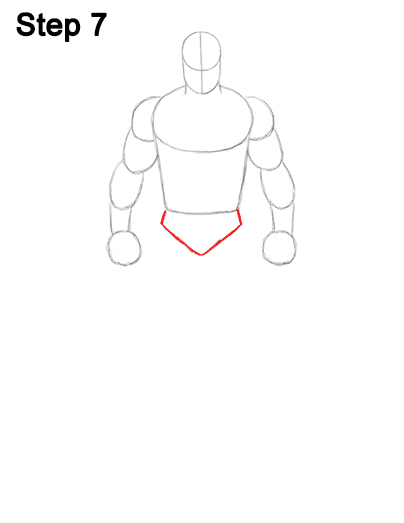
Step 7: Draw a triangle-like shape under the midsection as a guide for the lowest part of Batman's torso. First draw two short vertical lines on the sides, then connect them with a longer V-shaped line. The arcs should start right under the torso and then tilt outward slightly.
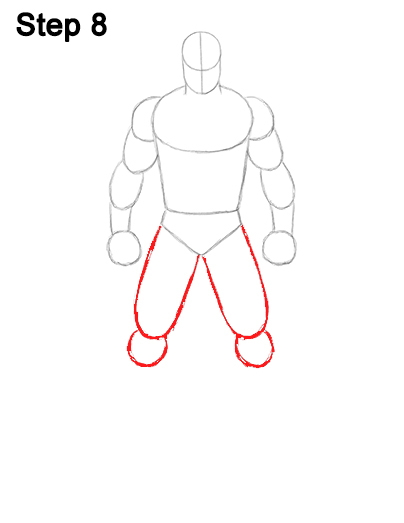
Step 8: Under the torso, draw two long U-shaped lines as guides for the top part of the legs. The arcs should start right under the torso and then tilt outward slightly. Sketch the arcs lightly at first, then darken them when you get the shape right. The longer they are, the longer Batman's legs will be. Under each arc, draw a small circle as a guide for the knees.
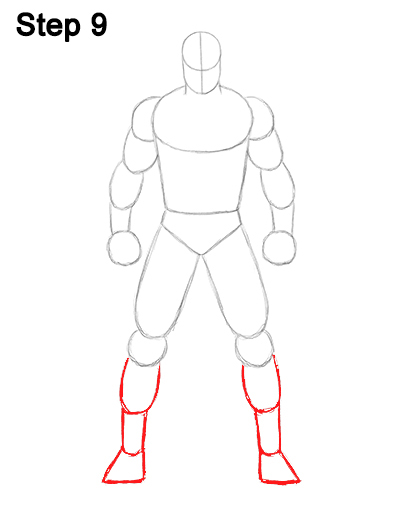
Step 9: Under each knee, draw a small U- shaped arc as a guide for Batman's calf muscles. These arcs shouldn't be as long or as thick as the arcs for the top part of the legs. Under each arc, draw two short vertical lines as guides for the lowest part of the legs. Connect the short vertical lines at the bottom using an even shorter, curved horizontal line. Now draw the guides for Batman's feet at the bottom using shapes similar to triangles with the top part missing.
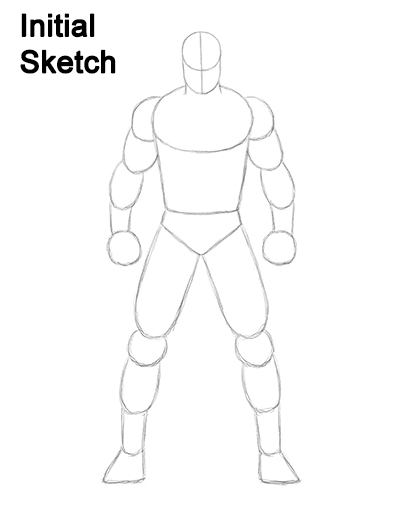
That's it for the guides! For the next steps, use darker lines for a more finished drawing.
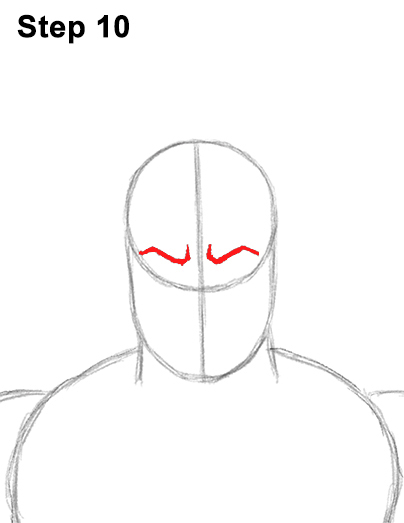
Step 10: Inside Batman's head, draw two angled lines for the heavy brow. Sketch the lines lightly at first, then darken them when you get the shape right. The lines should be on either side of the vertical construction line and a little higher than the bottom edge of the initial circle. The outer ends of the lines should almost touch the edge of the initial circle. The end result should be similar to check marks.
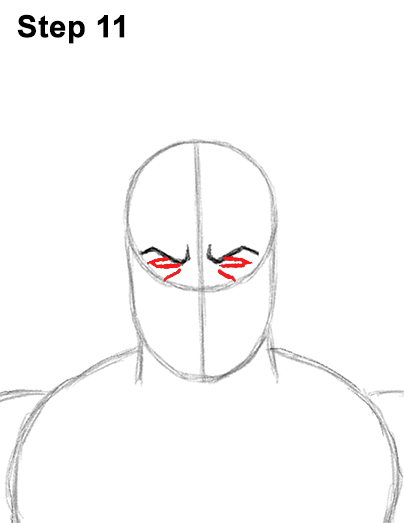
Step 11: Under the heavy brow, draw a couple of shapes for Bruce Wayne's eyes. The eyes are basically thin slits. The bottom line should be flat, while the top line should curve a bit more. When Bruce Wayne wears his costume, his eyes are white, so don't draw anything inside the shapes. Draw a small diagonal line under each eye to give Batman a more grim look.
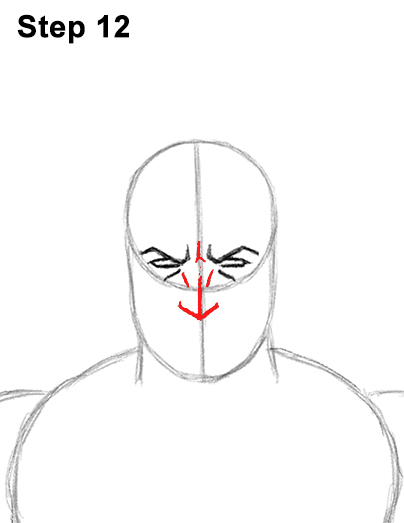
Step 12: Draw Batman's nose as an angled line below the bottom edge of the initial circle. The bottom of the nose should be similar to a wide letter V. Add a couple of lines between the eyes for the structure of the bridge of the nose.
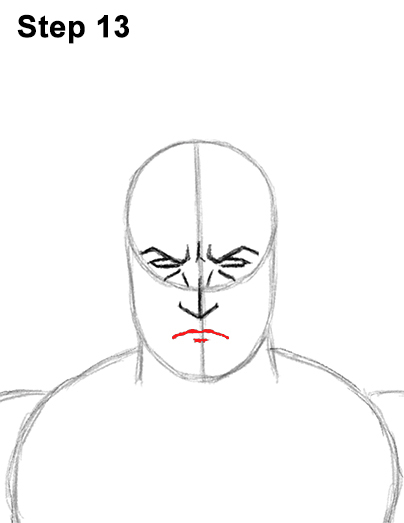
Step 13: Under the nose, draw a line that curves down on the sides for Batman's mouth. Add a shorter line under the mouth for the bottom lip.
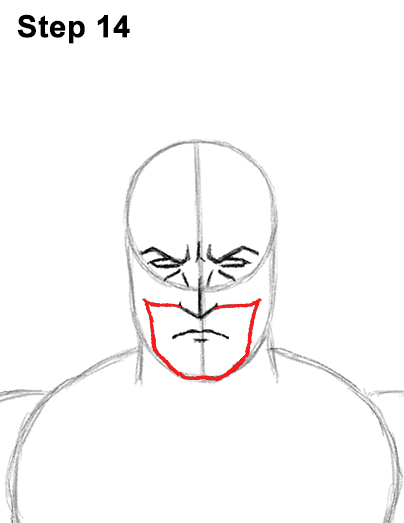
Step 14: Draw Batman's mask opening by first drawing a curved, horizontal line on either side of the nose. Now draw the sides of the mask's opening as a series of vertical lines on the sides of the face. Darken the lower part of the U-shaped arc to create Bruce Wayne's chin.
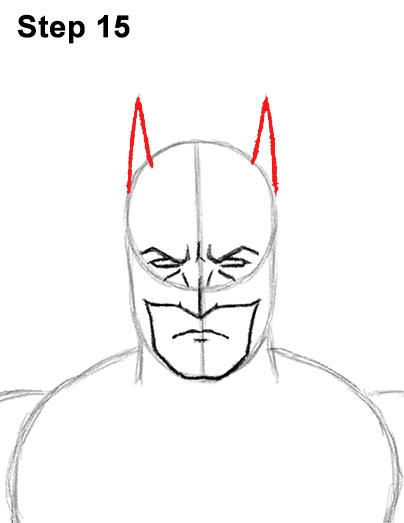
Step 15: Draw a couple of thin, triangle- like shapes on top of the head, on the sides, for the costume's ears. Some comic book pencilers draw Batman's ears long, while others draw them shorter. You can draw yours whatever length you want.
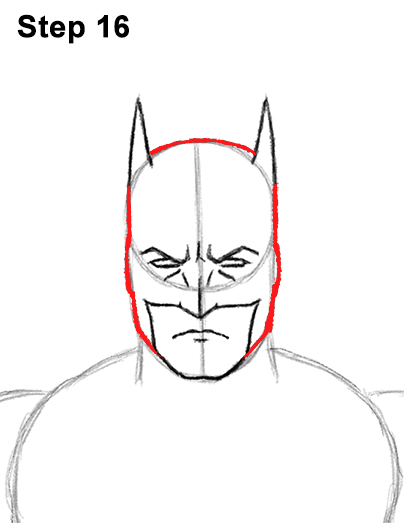
Step 16: Darken the outer edges of the initial guides to create the shape of Batman's head.
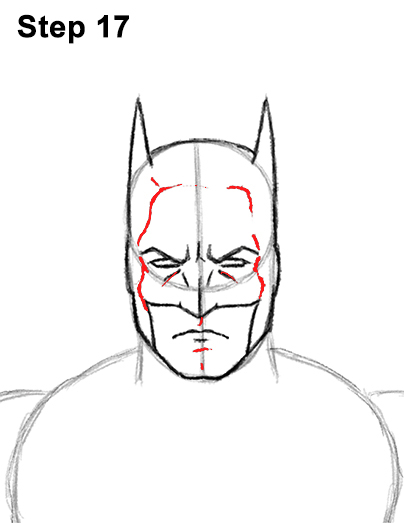
Step 17: Add a few more lines throughout the head for extra detail. Draw some lines on the head to emphasize the shape of Batman's mask and some on the chin to give him more character.
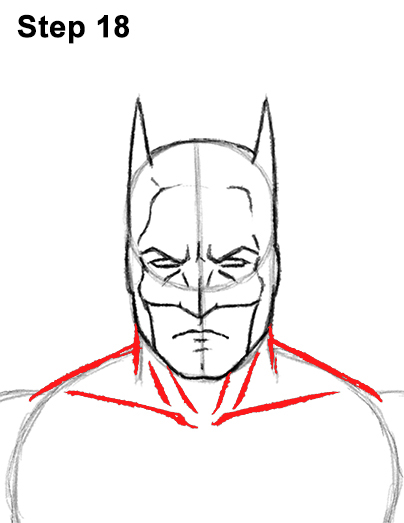
Step 18: Darken the lines under the head to create the neck and the trapezius muscles. Add two long, horizontal lines below the head for the collarbone. Draw a series of short, diagonal lines directly under Batman's chin for the neck muscles.
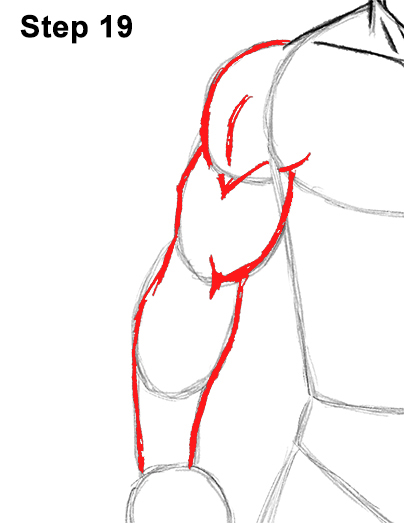
Step 19: Use the initial shapes on the left side of the body to draw Batman's arm. Simply follow the path of the guides and darken the outer edge of the shapes to create the arm. You can make the shape of the arm a little wider than the guides for bigger muscles. Add a few lines within the shape of the arm to emphasize the muscle structure.
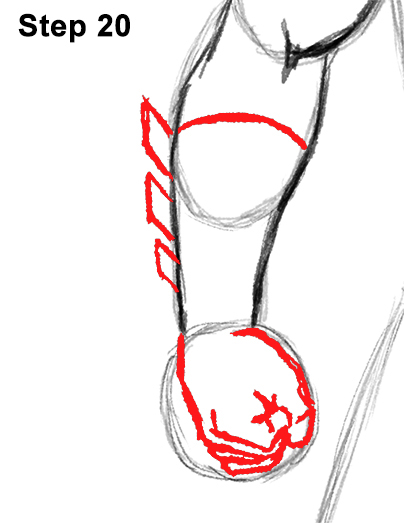
Step 20: Use the initial circle as a guide to draw the fist. Follow the path of the circle but make the fist smaller and more angular. Add the thumb on the right as a curved line. Draw the folded index finger near the middle of the circle using a series of curved lines. Add another curved line under the index finger for the folded middle finger. Draw Batman's remaining folded fingers using curved lines under the middle finger.
On the top section of the forearm, draw a curved line to show where the glove begins. On the left side of the forearm, draw three diamond-like shapes for the blades on the gloves.
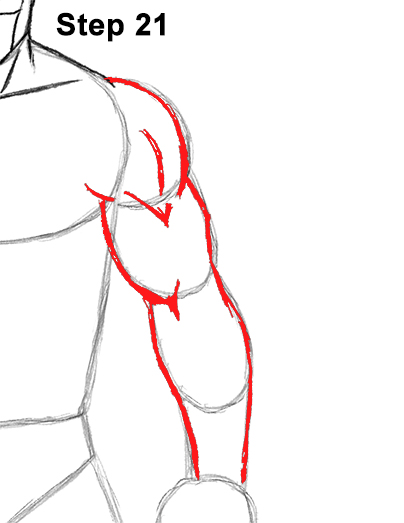
Step 21: Draw the arm on the right side using the initial shapes as guides. Follow the path of the guides and darken the outer edge of the shapes to create the arm. Add a few lines within the shape of the arm for Batman's muscle structure. If you made the other arm wider, make this one wider too. Try to keep both sides symmetrical.
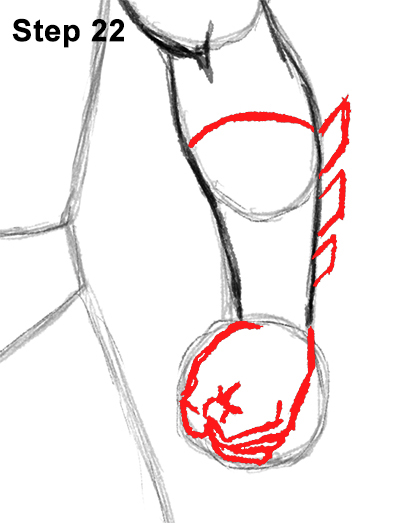
Step 22: Use the initial circle as a guide to draw Batman's fist on the right. The thumb should be on the left this time. Draw it using a small U-shaped arc. This fist should basically be the mirror image of the other fist. Everything should be more or less the same but inverted. Draw the folded index finger near the middle of the circle using a series of curved lines. Then draw the remaining folded fingers as curved lines under the index finger.
Near the top of the forearm, draw a curved line for the glove's opening. On the right side of the forearm, draw three diamond-like shapes for Batman's glove blades.
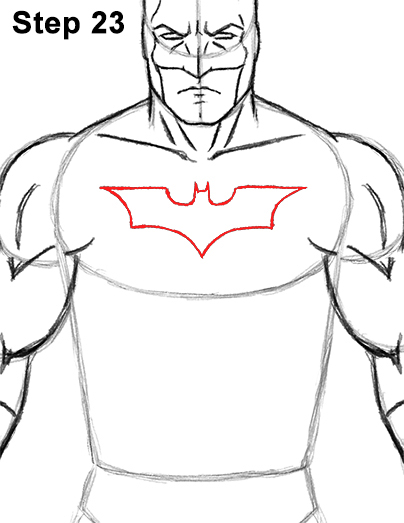
Step 23: Draw the Batman symbol on the top part of the chest by first drawing a tiny head with pointy ears. On either side of the head, draw a short, curved U-shaped line. On the sides of the U-shaped lines, draw a longer horizontal line for the top part of the wing.
Draw a V-shaped line under the head for the bottom portion of the Batman logo. Then connect the V-shaped line to the side of the wings using two curved lines on each side. This is just one style of the many variations of the Batman logo. You can use a different version if you'd like.
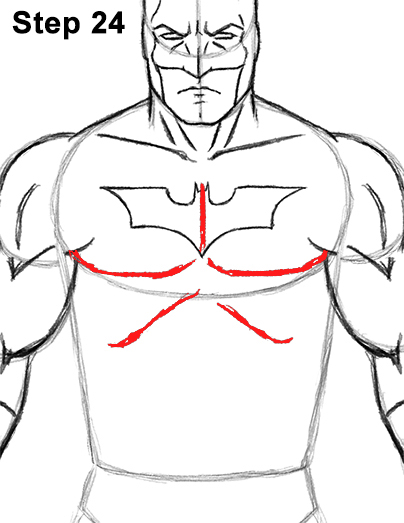
Step 24: Draw the shape of Batman's chest by first drawing a vertical line right across the logo. Follow the bottom edge of the initial oval to draw the pectoral muscles. The pecs basically consist of two long horizontal lines under the logo. Under the pecs, draw two slightly curved, diagonal lines for the rib cage.
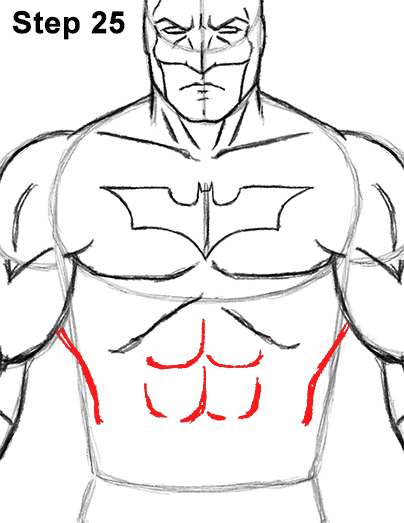
Step 25: Draw the abs under the rib cage as a series of curved lines. The curved lines should divide the abdomen into four separate shapes. Don't draw them too low. Follow the initial guides to draw the sides of the torso but make the lines curve more as you darken them.
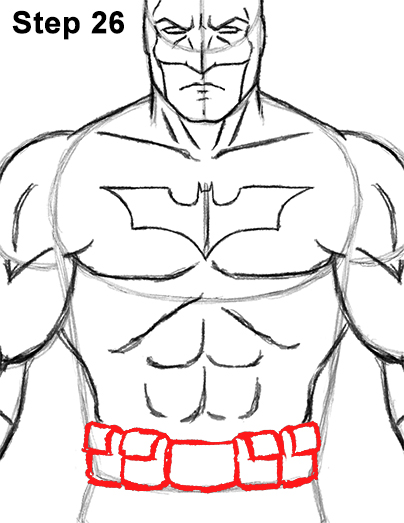
Step 26: Add Batman's belt by first drawing a small rectangle right below the abs for the buckle. On either side of the buckle, draw a thinner rectangle for the pouches where Bats keeps his gadgets. Add a curved line on top of each rectangle for the pouches' flap covers. Add another pouch on either end of the belt but make them thinner.
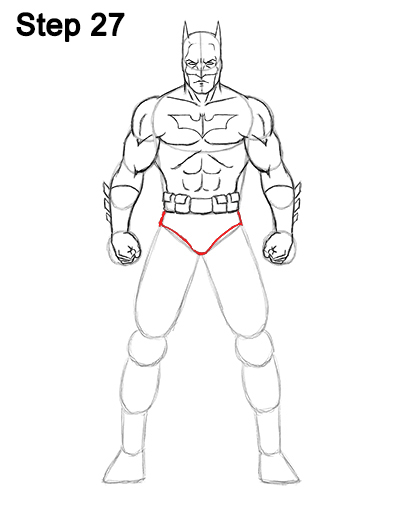
Step 27: Use the initial triangle-like shape as a guide to draw the Dark Knight's underoos. Follow the basic path of the guide but make the lines curve more as you darken them.
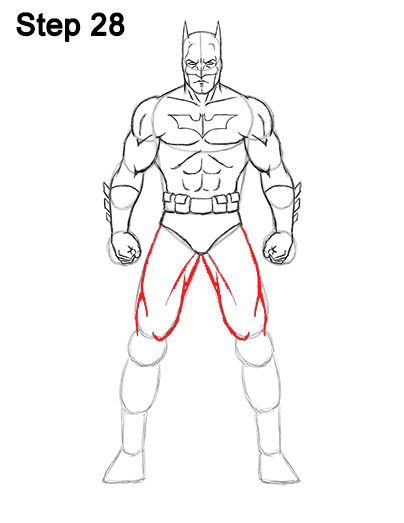
Step 28: Use the long U-shaped arcs under the torso as guides to draw the top part of the legs. Follow the basic path of the guide but make the shapes bulge out more to emphasize the muscle structure. Draw a diagonal line at the top to further define the muscles on the leg. Draw the leg on the right side the same way, only this side should be the mirror image of the left side. If you'd like, you can make the legs more muscular by drawing the shapes wider than the initial guides.
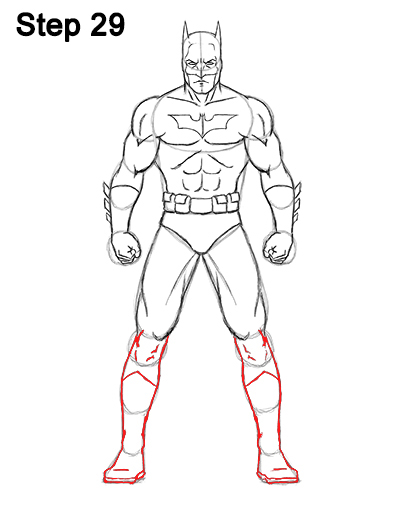
Step 29: Use the remaining shapes at the bottom as guides to draw the rest of Batman's legs and feet. Follow the path of the guides and darken the outer edges to create the shape of the rest of the leg. Add an extra line at the bottom of the foot for the shoe's sole and a smaller line inside for the bend on the shoe.
Draw the leg on the right by using the initial shapes as guides. Darken the outer edges of the initial shapes to create the leg. Add the lines to feet too. Inside each small circle in the middle, draw four tiny lines to indicate the knees bulging out. Below each knee, draw an angled line for the top part of Batman's boots.
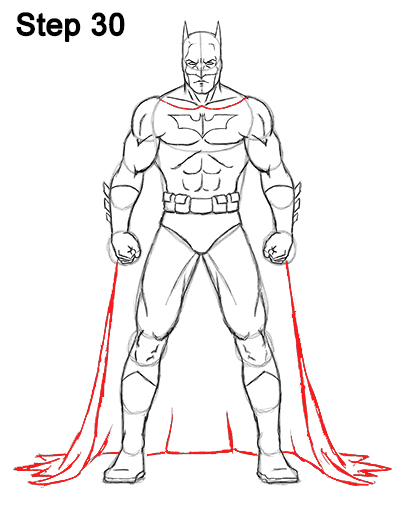
Step 30: Draw Batman's cape by first drawing two curved lines under the head as the top part of the cape. Then draw a long, slightly curved vertical line under the fist for the left side of the cape. Draw a shorter vertical line that curves to the left for the bottom part of the cape. Draw a series of triangle-like shapes on the bottom for the part of the cape that drags on the floor. You can draw your cape shorter, but ol' Bruce Wayne uses it to slow his falls and even glide, so don't make it too short.
Draw the right side of the cape the same way, only all the lines should be inverted and pointing to the right. Remember, different artists draw the caped crusader differently, so feel free to change up your drawing. Use a series of curved lines between the feet for the back portion of the cape that is draping backward. If you made the sides of the cape shorter, be sure that the back portion reflects that as well.
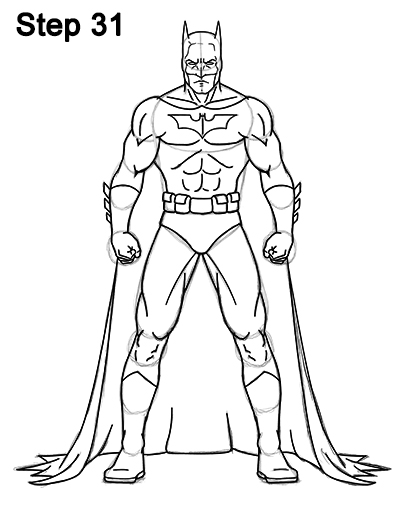
Step 31: For a more finished inked look, carefully go over the final sketch lines with a pen or marker.
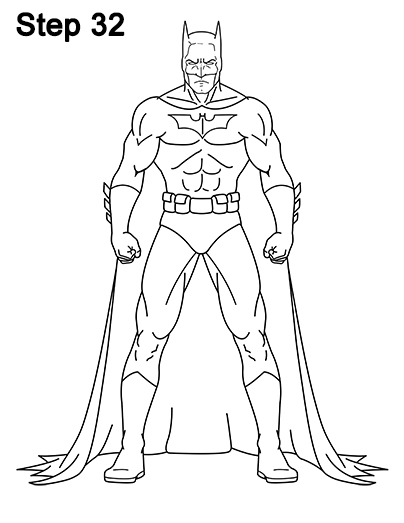
Step 32: After inking, get rid of every pencil mark with an eraser for a cleaner Batman drawing.
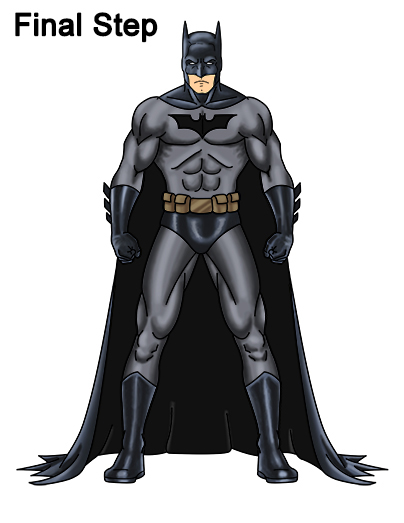
Final Step: Color your Batman drawing using color pencils, markers or even crayons! First color the bat logo black. Use black for the underpants, the mask, the gloves and the boots. Leave a few streaks blank to create shine. Only color in a few streaks of black on the gloves and the boots. Use black to create shadows too. Use black for the underside of the cape. This will take a while, so take breaks as you color.
Use gray for the other parts of the costume, except for the belt. Use a little bit of blue on top of all the other colors but leave some white on the streaks for the shine. You can also omit the blue and just color your Batman drawing black and gray. Use dark and light brown for the belt. Color Batman's face using light brown and peach. If you don't have peach, use yellow-orange or pink.
Thanks for visiting! Subscribe to the EasyDrawingTutorials YouTube Channel for a new tutorial every Sunday.
To learn how to draw animals, visit How2DrawAnimals.com.
RELATED TUTORIALS
 |
 |
 |
 |
 |


