How to Draw Wonder Woman (Full Body)
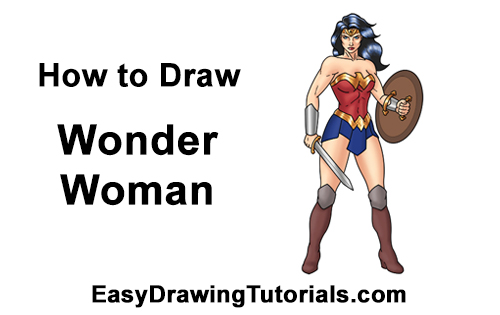
Use the videos and step-by-step drawing instructions below to learn how to draw Wonder Woman. Stay tooned for more tutorials!
The speed drawing video:
The written step-by-step video tutorial:
Intro: Start off with a pencil sketch. In the beginning stages, don’t press down too hard. Use light, smooth strokes for sketching.

Step 1: Draw a small circle near the top of the paper as a guide for Wonder Woman's head. First draw four small marks for the height and width of the circle, then connect the marks using curved lines. Sketch lightly at first so that it's easy to erase if you make a mistake. The circle doesn't have to be perfect. It's just a guide. If you're struggling drawing the circle, trace the outer rim of a coin, a lid or any other object with a circular edge.

Step 2: Draw a small, curved line under the head as a guide for the jaw and chin. Don't draw this line too low, otherwise your Wonder Woman will end up with a big chin.
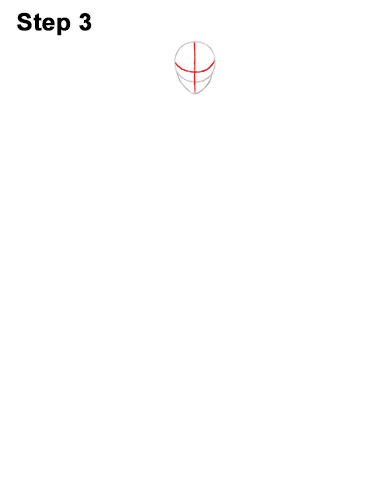
Step 3: Draw two intersecting lines inside the head, one horizontal and one vertical. The vertical line should split the head in half. Curve the horizontal line so that it contours to the shape. These are construction lines that will help you place Wonder Woman's facial features later on.
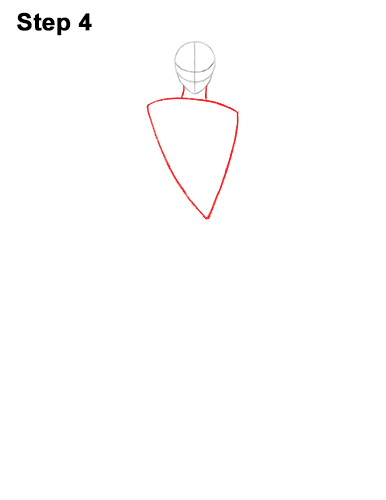
Step 4: Under the head, draw two small lines as a guide for Wonder Woman's neck. Under that, draw a longer horizontal line as a guide for the first part of the body. Then draw a big V- shaped line for the rest of the guide. Pay attention to the size of this shape in relation to the head.
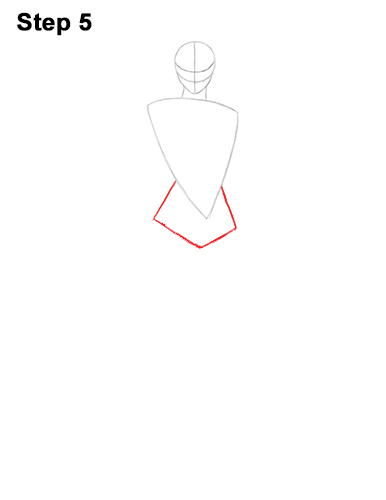
Step 5: Draw two slightly tilted vertical lines on the sides to create the first part of the guide for the bottom half of Wonder Woman's body. Draw two more diagonal lines that come to a point at the bottom for the rest of the guide.
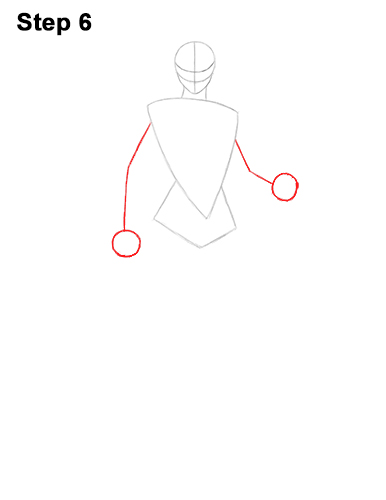
Step 6: On the top, left side, draw and angled line as a guide for Wonder Woman's first arm. Draw a small circle at the end of the line as a guide for the fist. On the right side, draw another line that's angled more as a guide for the other arm. Add another small circle at the end of that line as a guide for the other fist.
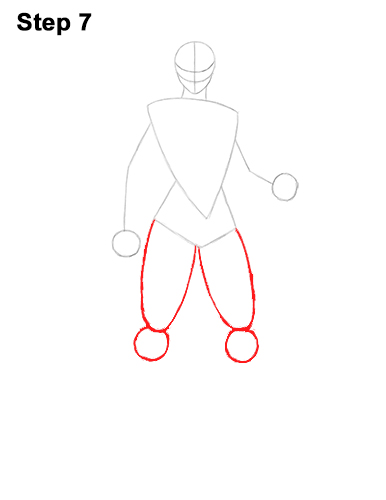
Step 7: On the lower, right side of the body, draw a big U-shaped line as a guide for the first leg. First make a mark at the bottom to indicate the length of the leg, then connect the mark to the top using curved lines. Draw another big U-shaped line on the right as a guide for the other leg. The longer these guides are, the taller your Wonder Woman will be. Under each U- shaped line, draw a small circle as a guide for the knees.
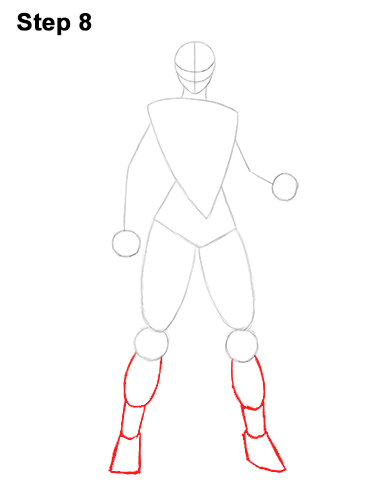
Step 8: Under each small circle, draw a smaller U- shaped line for the calf muscles. Pay attention to the size of these guides in relation to the rest of the legs on top. Under the calf muscle guides, draw a small cylinder-like shape for the bottom part of the legs. This shape basically consists of two short vertical lines with a small horizontal line at the bottom. Now add two trapezoid-like shapes at the very bottom as guides for Wonder Woman's feet. The right edge on the guide on the right should slope more because that foot will turn out more.
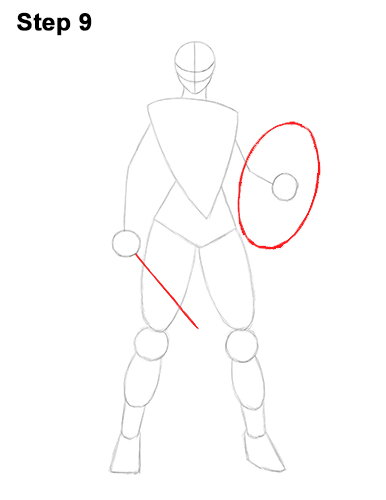
Step 9: On the hand on the left, draw a line as a guide for the sword. Draw a big oval around the hand on the right as a guide for Wonder Woman's shield. First make four marks to indicate the height and width of the oval, then connect the marks using curved lines.
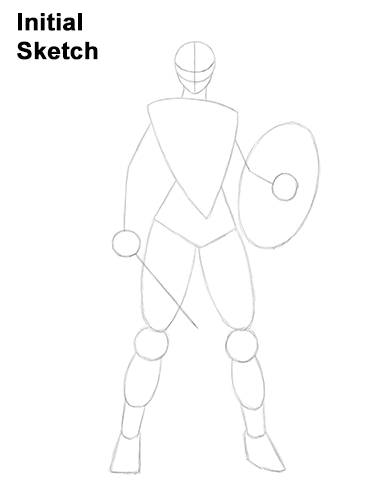
That's it for the guides! For the next steps, use darker lines for a more finished drawing.
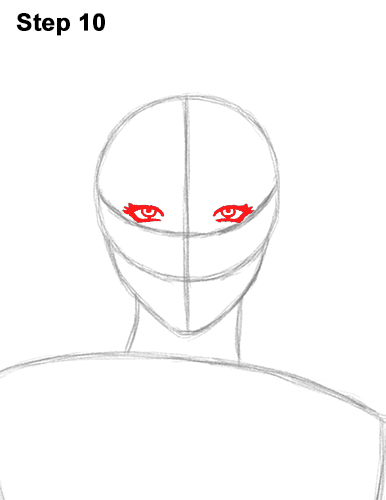
Step 10: Inside the head, draw two short, curved horizontal lines for the top parts of Wonder Woman's eyes. Use the initial construction lines as guides for the size and placement of the eyes. Make the lines thicker and darker, and add a few spikes at the ends for the eyelashes.
Now add the bottom parts of Wonder Woman's eyes as another short horizontal line. Make these lines thick and dark too. Try to make both eyes the same for symmetry. Inside each eye, draw a small half- circle for the irises and inside each iris, add a small dot for the pupils.
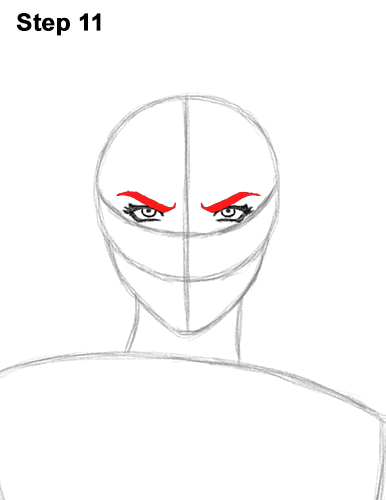
Step 11: Draw a thick, long line over each eye for the eyebrows. Tilt the eyebrows down toward the center to give Wonder Woman a stern look. The outer edges of the eyebrows should be pointy. The inner edges should be thick and touch the eyes.
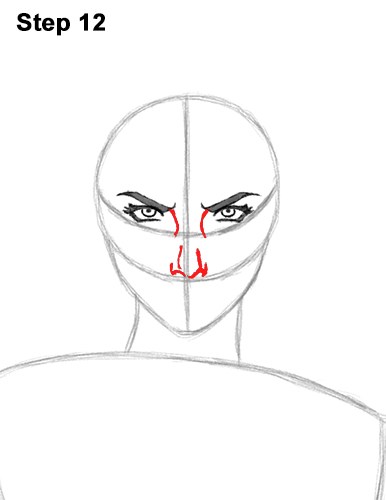
Step 12: Draw Wonder Woman's nose between the eyes. Use the lines as guides for placement. First draw two short, curved vertical lines near the top for the bridge of the nose. Near the bottom edge of the initial circle, draw two tiny, curved horizontal lines for the nostrils. Then draw a short line on either side and two slightly longer lines in the middle for more structure.
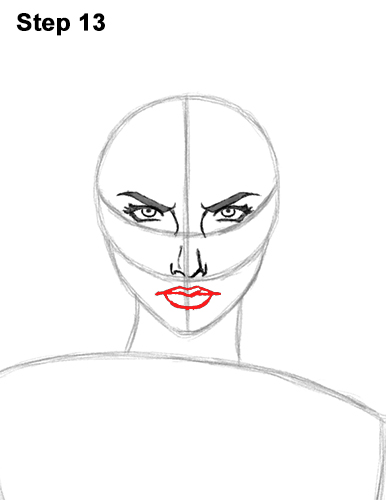
Step 13: Draw the top lip under the nose as a horizontal line with two bumps in the middle. Then draw Wonder Woman's actual mouth underneath as a long, horizontal line that dips slightly in the middle. Below that, draw a curved line for the bottom lip.
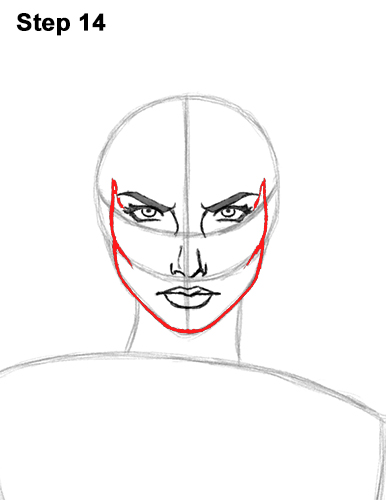
Step 14: Use the initial lines and shapes as guides to draw Wonder Woman's face. Follow the outer path of the initial guides and darken the lines. Curve the lines on the sides a bit more to create the cheekbones and jawline.
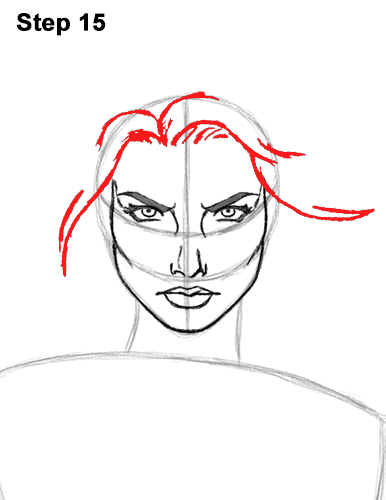
Step 15: At the top of the head, draw a series of wavy lines for the front part of Wonder Woman's hair. Draw the hair clump on the left as a couple of wavy lines that start at the top and slope toward the bottom. Draw the clump on the right the same way but curve the lines more. The tips of the hair should slope to the right. Leave enough room on the forehead for the tiara.
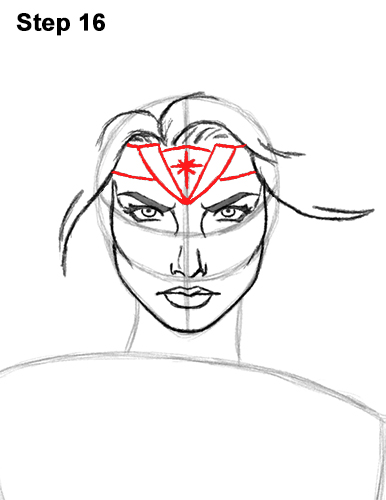
Step 16: Add a simplified version of Wonder Woman's tiara by first drawing a long, curved horizontal line at the top. Then draw a wide V-shaped line in the middle and the bottom of the tiara on either side. Draw another V- shaped line inside and the star emblem using a series of intersecting lines.
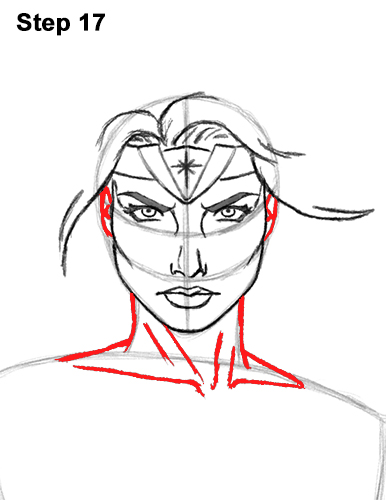
Step 17: Darken the lines under the head for the neck. Add sloping lines on the sides for the trapezius muscles. Under the chin, draw a couple of diagonal lines for the neck muscles. Under that, draw Wonder Woman's clavicle as two long horizontal lines. Use the initial lines as guides. On either side of the head, draw a curved vertical line for the visible part of the ears.
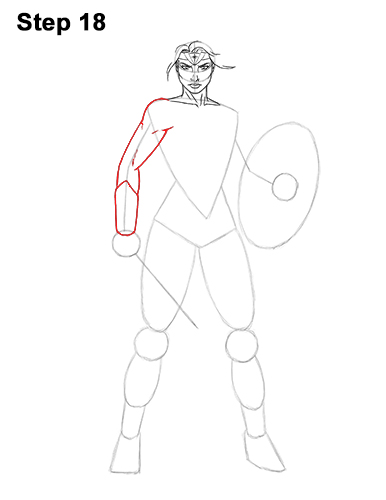
Step 18: Use the angled line on the left side of the body as a guide to draw Wonder Woman's first arm. Follow the path of the guide and lightly sketch the shape of the arm around it. Make the shoulder round and curve the lines to give the arm muscle structure. When you get the shape of the arm right, darken the lines. Add a few more short lines within the arm to emphasize the muscle definition. When you darken the forearm, add an extra angled line at the top for the bracelet.
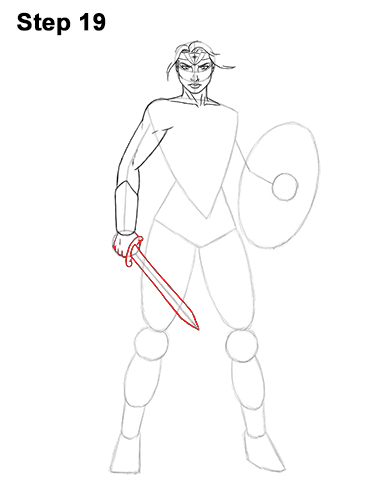
Step 19: Follow the path of the initial circle to create Wonder Woman's fist. Use curved lines at the bottom for the knuckles. Draw a couple of parallel lines around the initial guide to create the sword. You can make the sword as long as you want. Make the tip pointy. At the base of the sword, draw the crossguard using a couple of short, curved lines.
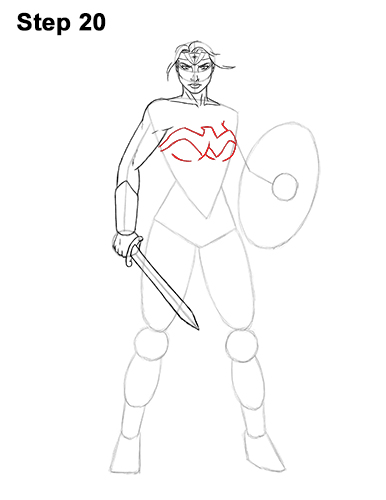
Step 20: Use the initial triangle-like shape to draw Wonder Woman's chest plate. Lightly sketch the top edge of the chest plate. It's similar to a bird with its wings spread. When you get the shape of the top of the plate right, darken the line. Now draw the bottom edge of the chest plate using a series of curved lines. The bottom edge is similar to the letter W. This is a simplified version of the chest plate. Draw a couple more curved lines underneath for the rest of the chest.
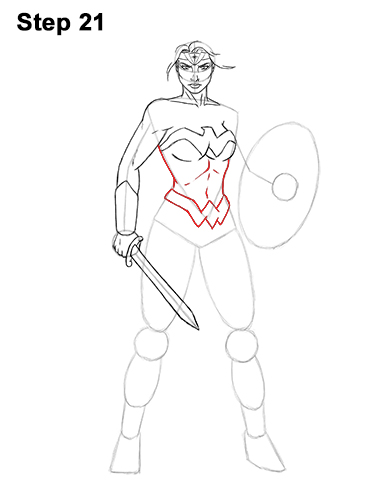
Step 21: Use the initial triangle shape as a guide to draw the rest of Wonder Woman's torso. At the bottom of the triangle, draw a series of angled lines similar to the letter W for the first part of the belt. Draw a couple more lines on the side to finish the lower edge of the belt. Add another line at the top for the top edge of the belt and another W-shaped line in the middle. Darken the sides of the initial guides to create the shape of the torso. Add a few more lines within the torso to emphasize Wonder Woman's rib cage and abs.
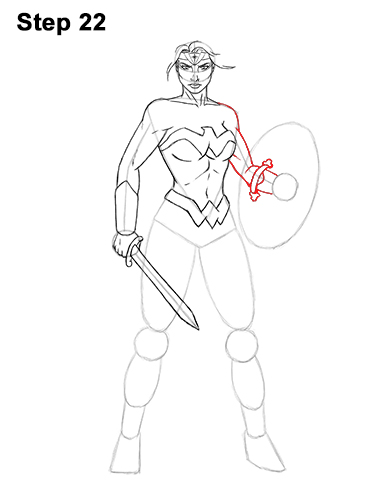
Step 22: Use the angled line on the right side of the torso as a guide to draw the other arm. Follow the path of the guide and lightly sketch the shape of Wonder Woman's arm around it. Curve the lines to emphasize the muscle structure. The arm should bend at the elbow. At the forearm, draw a couple of curved vertical lines for one of the shield's straps. Darken the forearm and add a curved line for the bracelet.
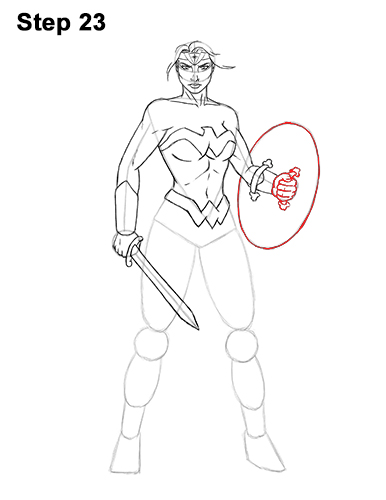
Step 23: Use the small circle as a guide to draw Wonder Woman's fist. Draw a small curved line at the top for the thumb. Then add the folded fingers on the left side and the knuckles on the right. Add a few more lines in the middle to finish the shape of the fingers. At the top and bottom of the fist, draw a couple of shapes to indicate the shield's strap she's holding on to. Darken the initial oval to create the shape of the shield. Don't overlap the lines for the arm.
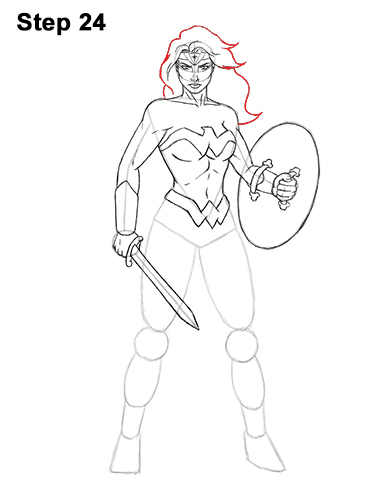
Step 24: Draw Wonder Woman's hair as a series of wavy lines around the head. Don't draw every individual hair strand. It's better to draw long hair a single big clump. Follow the shape of the head as you draw the wavy lines around it. Add a few points on the right side to indicate the tips of the hair blowing in the wind.
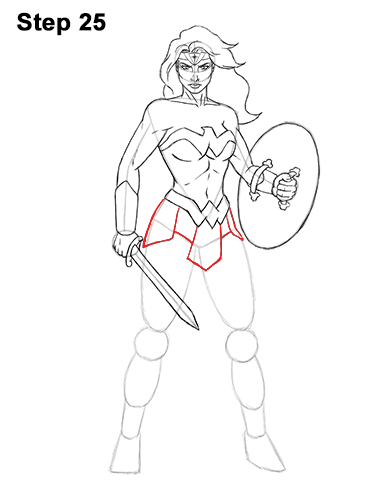
Step 25: Use the lines under the belt as guides to draw Wonder Woman's skirt. Follow the path of the guides and draw the first part of the skirt as an angled shape on the left side. Then draw the shape in the middle as a long pentagon- like shape. Add the small visible part of the skirt on the right side and darken the lines that connect these shapes.
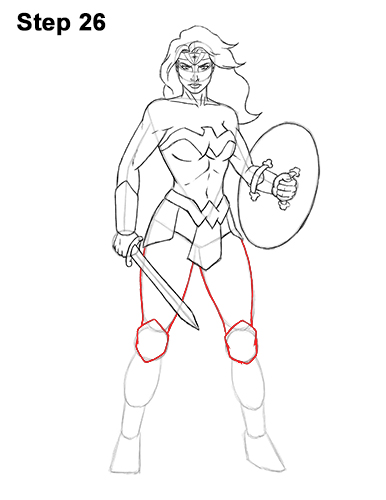
Step 26: Darken the outer edges of the shape under the skirt on the left to create Wonder Woman's first leg. Don't overlap the lines for the sword. Use the small circle as a guide to draw the knee guards. Now darken the outer edges of the initial guides on the right to create the other leg. Use the other small circle to draw the other knee guard the same way as the first one. This is a simplified version of the knee guards, so don't worry too much about the details inside.
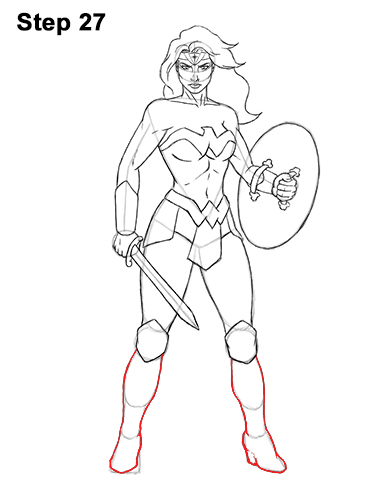
Step 27: Darken the outer edges of the remaining initial guides to create Wonder Woman's shin guards and footwear. Add a tip to the bottom of the shape and make the lower right side more curved to emphasize the heel. These are simplified versions of the foot wear, so don't add all the detail inside. When you darken the foot on the right, make the tip pointy and add a bit of a heel on the left.
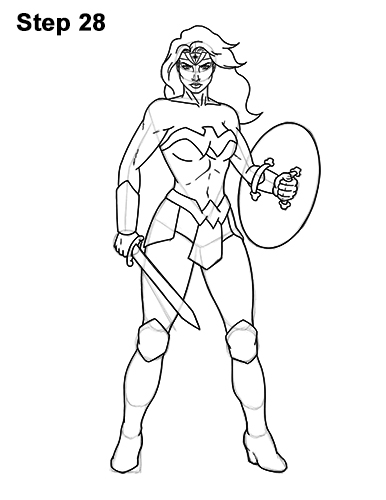
Step 28: For a more finished look, carefully go over the final sketch lines with a pen or marker.
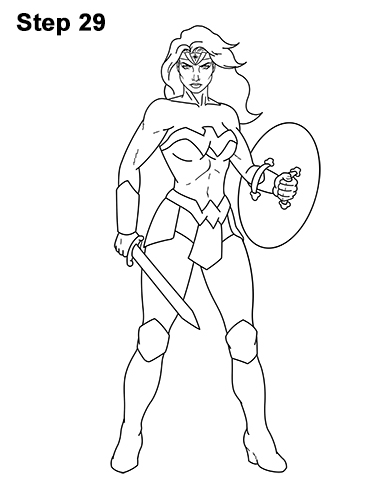
Step 29: After inking, get rid of every pencil mark with an eraser for a cleaner drawing.
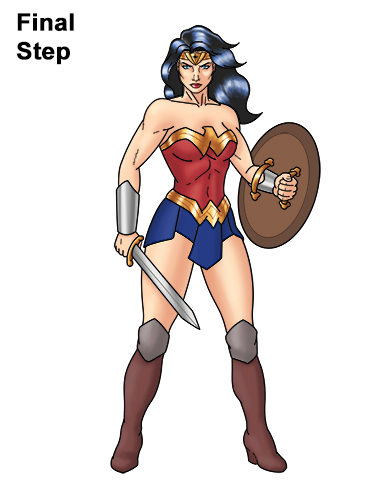
Final Step: Color your Wonder Woman drawing using color pencils, markers or even crayons! Use black for the hair but leave a few streaks at the top and on the sides blank to represent shine. Use a bit of blue to emphasize the darkness of the hair and the shine.
Lightly add a base of brown to Wonder Woman's tiara, chest plate, belt, shield and footwear. Now add yellow- orange to the tiara, chest plate and belt to make them more gold-looking. Add a few lines of detail on the gold sections using brown and color the shield brown too. Use a bit of light brown to add shadows to Wonder Woman's bare skin. Then use peach to color the skin. If you don't have peach, use yellow- orange or pink.
Use dark red and dark brown for the footwear. Use a bit of light brown and mainly dark red to color the torso. Color the bracelets gray but leave a section blank for shine. Use dark blue for the skirt. Color the sword's crossguard yellow- orange and light brown . Color the blade gray. Use red for the lips and blue for the eyes.
Thanks for visiting! Subscribe to the EasyDrawingTutorials YouTube Channel for a new tutorial every Sunday.
To learn how to draw animals, visit How2DrawAnimals.com.
RELATED TUTORIALS
 |
 |
 |
 |
 |


