How to Draw Kylo Ren (Star Wars)
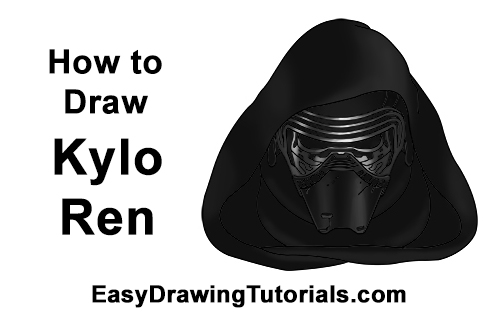
Use the video and step-by-step drawing instructions below to learn how to draw Kylo Ren from Star Wars: The Force Awakens. A new cartoon drawing tutorial is uploaded every week, so stay tooned!
Intro: Start off with a pencil sketch. In the beginning stages, don’t press down too hard. Use light, smooth strokes for sketching.
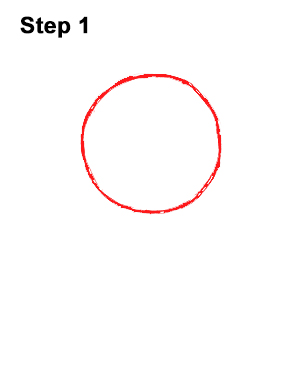
Step 1: Start with a circle near the top of the page. It doesn’t have to be perfect. It’s just a guide for the top part of Kylo Ren's head. Leave enough room on the sides for the big hood.
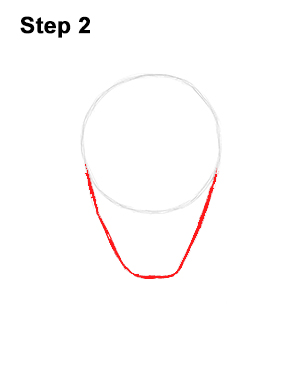
Step 2: Draw a small arc under the head as a guide for the jaw and chin. The arc is kind of V-shaped, with the bottom part being flatter. These combined two shapes make the guide for Kylo Ren's head.
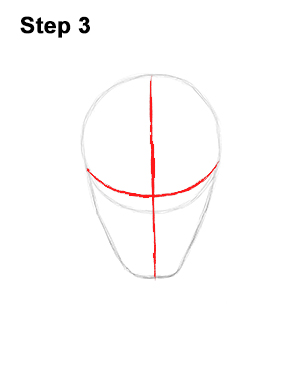
Step 3: Next, draw two intersecting lines across the entire head, one vertical and one horizontal. The horizontal line should curve to follow the shape of the circle and should be close to the bottom edge of the circle. These will be construction lines that will help you place Kylo Ren's facial features later on.
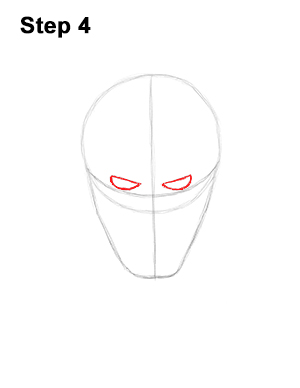
Step 4: Draw two small shapes similar to half-circles as guides for the eyes on Kylo Ren's helmet. Draw them sitting on top of the horizontal construction line and on either side of the vertical construction line.
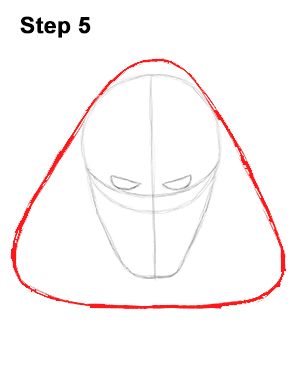
Step 5: Add a big triangle-like shape that surrounds the entire head as a guide for Kylo Ren's hood. The sides of the triangle-like shape should touch the top of the head, and the bottom edge should be far from the chin. The corners of the triangle-like shape should be round.
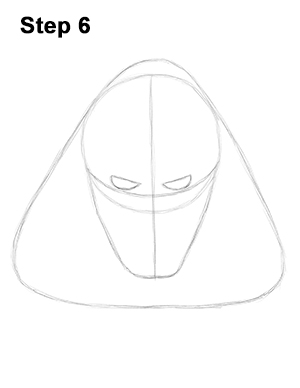
Step 6: That’s it for the initial sketch! You have the basic head shape for Kylo Ren from Star Wars: The Force Awakens. Now go in and tighten your drawing. From this point on, press harder with your pencil in order to get darker lines and a more defined sketch.
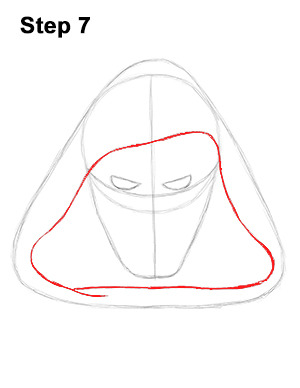
Step 7: Draw a wavy line inside the triangle-like like shape for the hood's opening. To draw this shape, first draw a wavy line with a diagonal orientation above Kylo Ren's eyes. Then continue drawing the wavy sides of the lines by using the initial triangle-like shape as a guide. Finish the hood's opening by adding the bottom part of the shape.
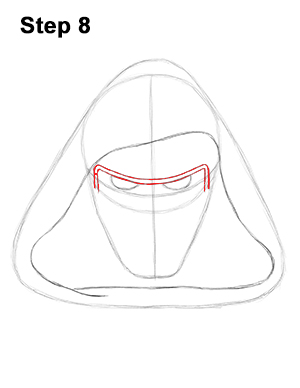
Step 8: Kylo Ren's helmet has a number of metallic rows across the forehead. Draw the first row as a couple of curved lines that are right above the eyes. The sides of these lines should bend down and end on the bottom edge of the main circle.
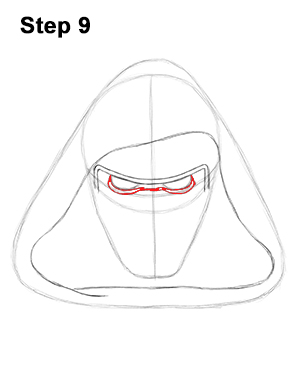
Step 9: Use the initial half-circles as guides to draw the shape of the eyes on Kylo Ren's helmet. The eye opening on the helmet is actually just one shape. Follow the path of the half-circles using a line to connect both shapes and turning it into a single shape. Add another curved line under eyes to make the shape more three-dimensional.
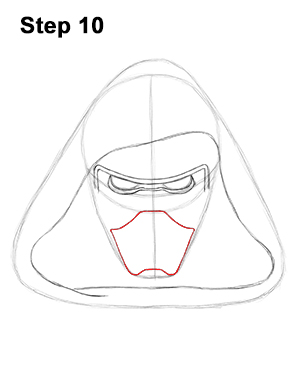
Step 10: Use the initial bottom arc as a guide to draw the bottom portion of Kylo Ren's helmet that covers his mouth and nose. This top of this shape should be flat and right on the bottom edge of the main circle. The sides should then extend outward and follow the path of the initial arc. There should be two small bumps on the lower corners of this shape.
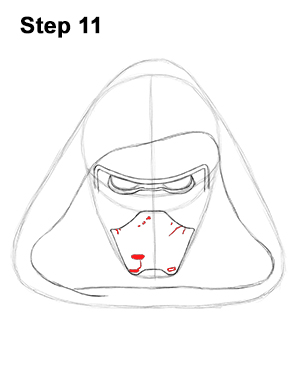
Step 11: Add some detail to the lower portion of Kylo Ren's helmet. Draw a few oval-like shapes near the bottom for the helmet's openings. And add a few lines near the top to represent the cracks and wear of the helmet.
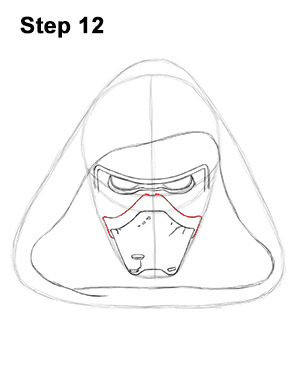
Step 12: Draw another curved line above the mouth cover of Kylo Ren's helmet. This line should parallel the top portion of the shape created in the last step and should be very close to the eyes.
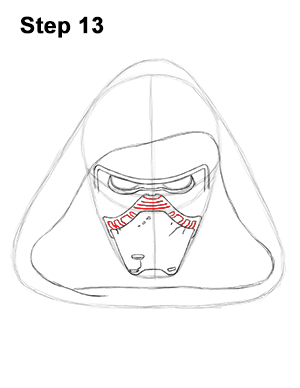
Step 13: Add four small horizontal lines on the top portion of the shape you created in the previous step. On each side of the shape, draw four small shapes similar to squares.
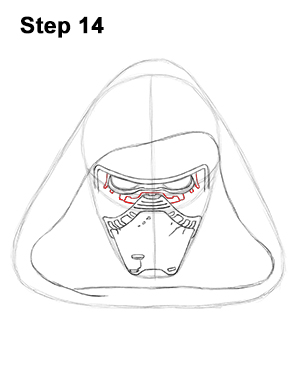
Step 14: Kylo Ren's helmet has a series of metallic parts on the top section. These shapes are a bit tricky to draw, so they're divided into a few steps. Use a series of curved lines on the sides and bottom of the eyes for the first portion of these metallic bits. Use the image above for further reference.
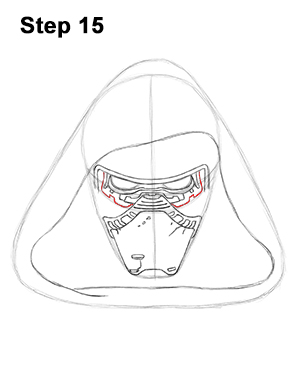
Step 15: Add another line around the eyes for the continuation of the metallic section of Kylo Ren's helmet. This line starts at the sides and ends on the middle section of the helmet.
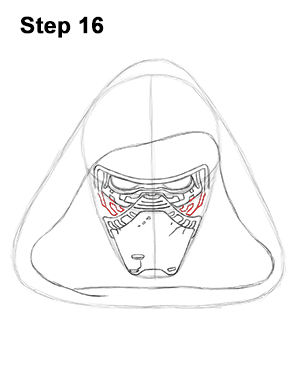
Step 16: Draw a few more angles lines on the sides of Kylo Ren's helmet to finish off the metallic section. The shapes are very similar to puzzle pieces. Use the image above for further reference.
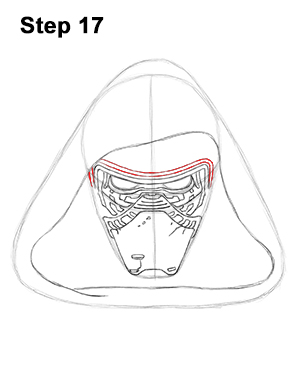
Step 17: Add another metallic row above Kylo Ren's eyes using a couple of curved lines. These lines are thin, so make sure your pencil is sharp so that your lines are parallel to each other and not overlapping.
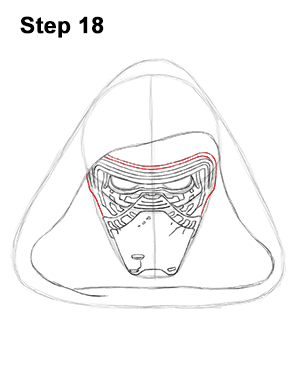
Step 18: Draw another metallic row above the one you just drew. This row, however, will have its sides coming down either side of Kylo Ren's helmet.
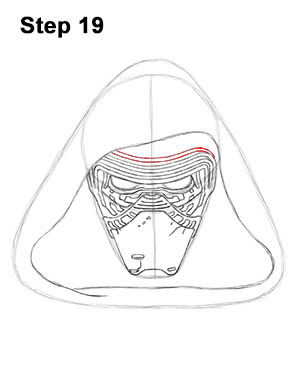
Step 19: Add the final metallic row on Kylo Ren's helmet using a couple of curved lines. Take your time as you draw these lines because it's easy to make them too far apart or make the overlap. Draw them lightly at first and when you're sure you got them right, darken them. Be patient, young padawans.
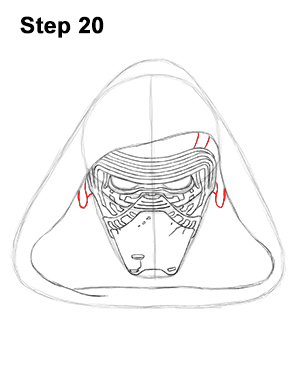
Step 20: On either side of the head, draw a small arc to indicate the lower edge of the helmet. Kylo Ren's helmet is very similar to his grandfather Darth Vader's helmet, only smaller. Add a couple of lines on the top right side of the helmet for extra detail.
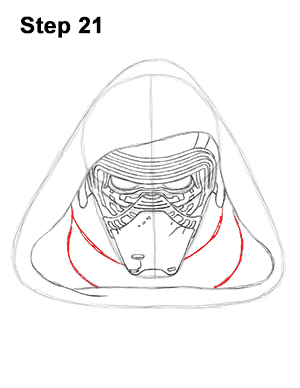
Step 21: Draw a few curved lines under Kylo Ren's helmet to indicate the folds on the hood's cloth.
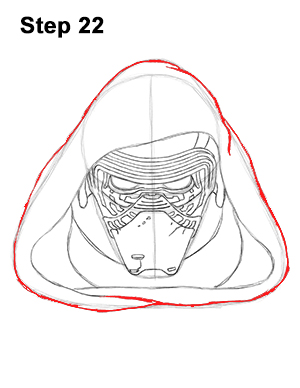
Step 22: Use the initial triangle-like shape as a guide to draw the outer portion of Kylo Ren's Hood. Follow the basic path of the guides but make the edges wavier as you darken the lines. Notice how the lines for the bottom edge fold onto each other.
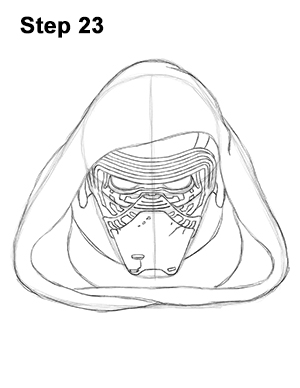
Step 23: That’s it! You now have a nice sketch of Kylo Ren from Star Wars:The Force Awakens. You can stop at this quick drawing for a rough, sketchy look, or continue to the next step for a more finished look.
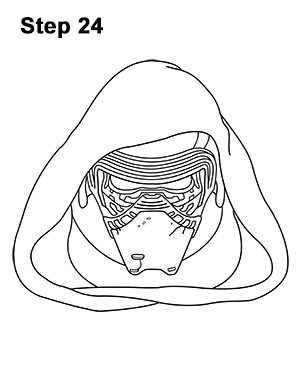
Step 24: For a more finished, inked look, carefully draw over the final sketch lines with a pen or marker. Wait for the ink to dry, and then erase all of the pencil marks. You now have a finished inked drawing of Kylo Ren! You can stop here or go to the final step to complete your Kylo Ren drawing in its entirety.
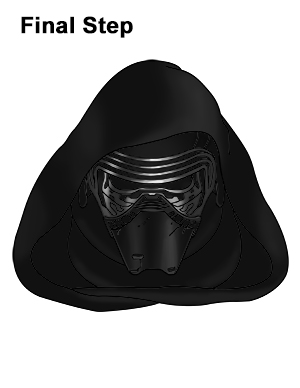
Final Step: For a completely finished Kylo Ren drawing, you have to color it. You can use anything you want: markers, color pencils or even crayons! Kylo Ren is basically all black. Use a lighter shade of black around the edges of the hood and on the sides of the bottom portion of the helmet to make them more three-dimensional. Use gray for the metallic bits around the eyes. Make the sides dark gray and leave a section near the middle almost blank to indicate shine. That’s it! You now have a completed drawing of Kylo Ren from Star Wars: The Force Awakens.
Thanks for visiting! Subscribe to the EasyDrawingTutorials YouTube Channel for a new tutorial every Sunday.
To learn how to draw animals, visit How2DrawAnimals.com.


