How to Draw Boba Fett
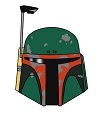
Use the video and step-by-step drawing instructions below to learn how to draw Boba Fett from Star Wars. A new cartoon drawing tutorial is uploaded every week, so stay tooned!
Intro: Start drawing Boba Fett from Star Wars with a pencil sketch. In the beginning stages, don't press down too hard. Use light, smooth strokes for sketching.
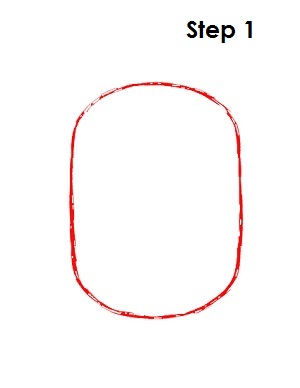
Step 1: To draw Boba Fett, start with a big oval with somewhat flat sides in the middle of the page. This will be the basic shape for Boba Fett’s head.
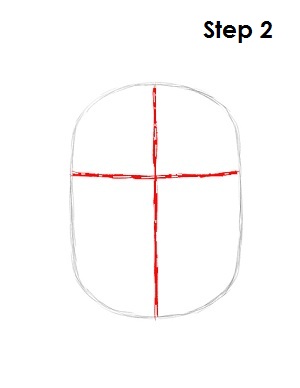
Step 2: Next, draw a vertical line down the center of the oval and a horizontal line near the top of the oval. These will be construction lines that will help you place this Star Wars character's features later on.
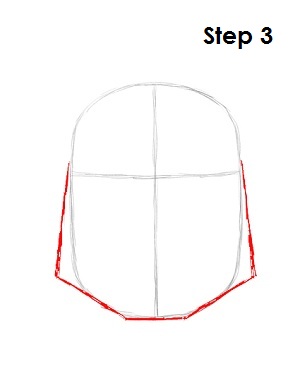
Step 3: Now draw a tighter shape for Boba Fett's helmet by squaring the lower part of the oval starting at the horizontal construction line. Just widen the lower edges of the oval slightly and give them four corners.
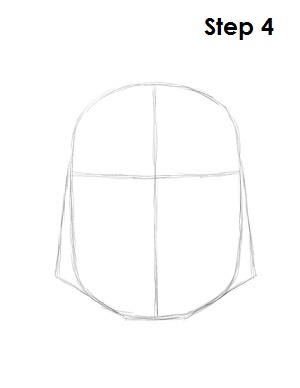
Step 4: That's it for the initial sketch of Boba Fett from Star Wars! You have the basic Boba Fett shape, so now go in and tighten your drawing. From this point on, press harder with your pencil in order to get darker lines and a more defined sketch.
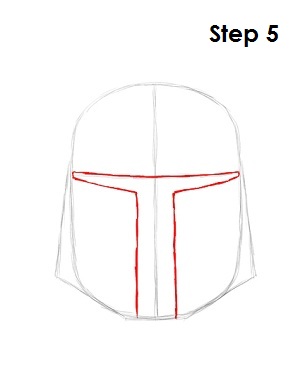
Step 5: Draw in the design where Boba Fett sees through the helmet. The shape is basically a capital letter T. Use the construction lines as guides to draw it.
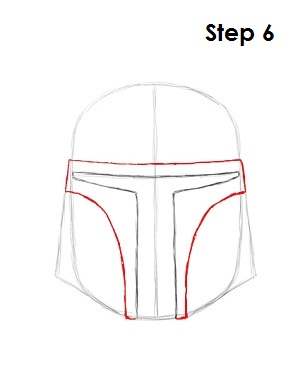
Step 6: Continue on the front part of Boba Fett's helmet by adding a series of lines that envelop the capital T shape you drew in step 5. Notice that the edges curve inward at the top and sides of the shape.
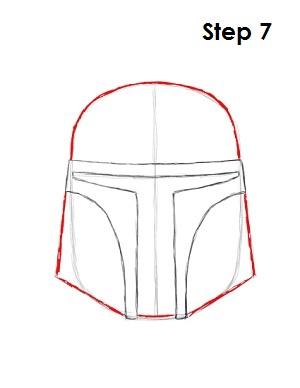
Step 7: Draw in the rest of this Star Wars character's helmet by darkening the lines that are connected to the shape in step 6, including the dome on the top.
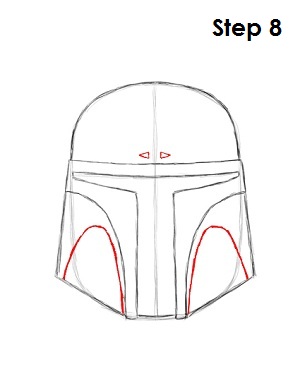
Step 8: Finish up the designs on the front of Boba Fett's helmet by drawing two curves that look like upside-down U’s on either side of the helmet. Also, draw two little triangles on the top part of the helmet.
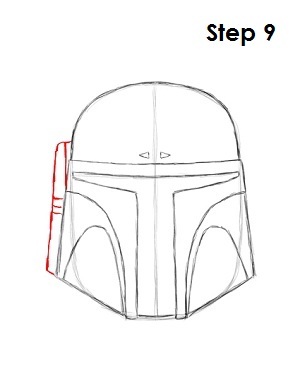
Step 9: Boba Fett has many accessories to aid him in bounty hunting. One of those is the antenna and external targeting rangefinder on his helmet. Draw this on the left side of the helmet by drawing a long, rounded rectangle somewhat parallel to the side of his helmet. Add in a few lines for detail.
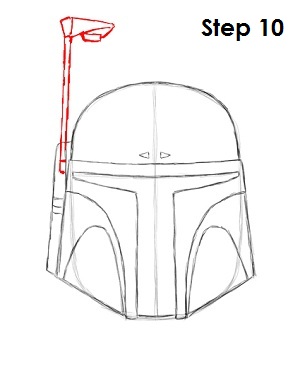
Step 10: Now draw the rest of this Star Wars character's external targeting rangefinder, which comes out of the shape that you drew in step 9. Draw a rectangular shape on top of this and add a few design details.
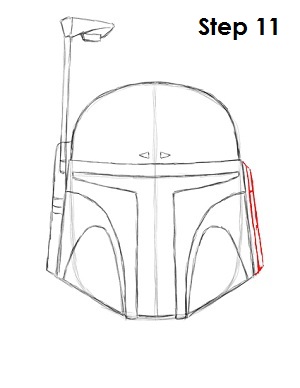
Step 11: Draw in Boba Fett's motion and sound sensor system on the right side of his helmet by drawing a series of lines that are parallel to the side of his helmet.
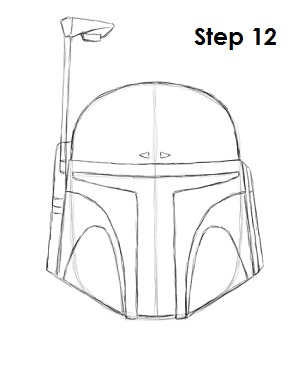
Step 12: That’s it! You now have a nice sketch of Boba Fett from Star Wars. You can stop at this quick drawing for a rough, sketchy look or go for a more finished look by continuing to the step below.
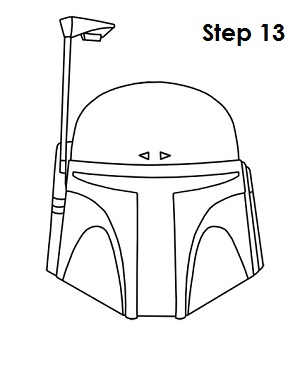
Step 13: For a more finished, inked look of Boba Fett from Star Wars, carefully go over the final sketch lines with a pen or marker. Wait for the ink to dry, and then get rid of every pencil mark with an eraser. You now have a finished inked drawing of Boba Fett! You can stop here or go to the final step to complete your Boba Fett drawing.
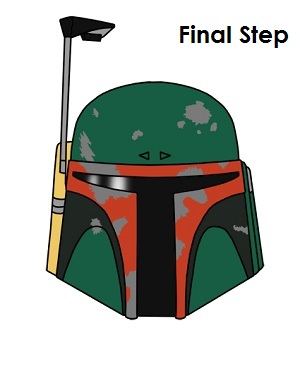
Final Step: For a completely finished Boba Fett drawing, you have to color it. You can use markers, color pencils or even crayons! Boba Fett has been in many battles, so his helmet is not in brand-new condition. Give his helmet “battle scars” by first coloring random areas gray where the original paint on his helmet has come off. Now color around these gray shapes. Boba Fett's main helmet is a dark green color. The T shape is red. The curved designs are dark gray, and bits of his earpieces are light gray. The right earpiece is yellow. The visor and top of the right earpiece are black. Leave a portion of Boba Fett's visor blank to simulate glare. That’s it! You now have a completed drawing of a Boba Fett from Star Wars.
RELATED TUTORIALS
 |
 |
 |
 |
 |


