How to Draw Marvin the Martian
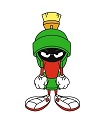
Use the video and step-by-step drawing instructions below to learn how to draw Marvin the Martian from the Looney Tunes cartoons. A new cartoon drawing tutorial is uploaded every week, so stay tooned!
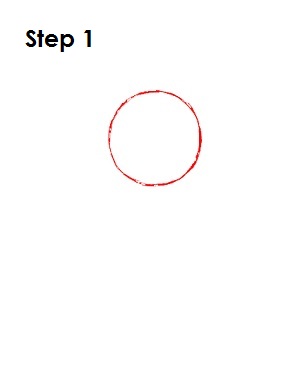
Step 1: To draw Marvin the Martian, start with a small circle near the top of the page. If you have a hard time drawing a circle, just trace the edge of a bottle cap or some other circular object. This will be the basic shape for Marvin the Martian's head.
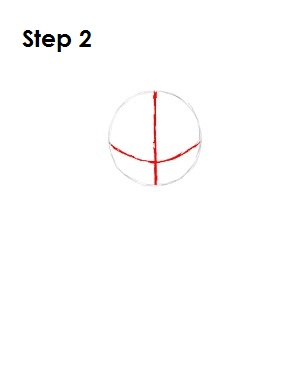
Step 2: Next, draw a vertical line that spits the circle in half. Draw a horizontal line near the bottom of the circle that bends to the contour of the circle. These will be construction guides that will help you place Marvin the Martian's features later on.
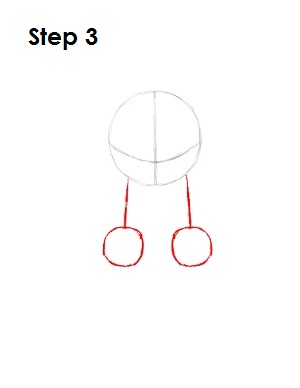
Step 3: Below Marvin the Martian's head, draw two straight lines that are slightly shorter than the height of the head. Below those lines, draw two small circles. These are guides for Marvin the Martian's arms and clenched fists.
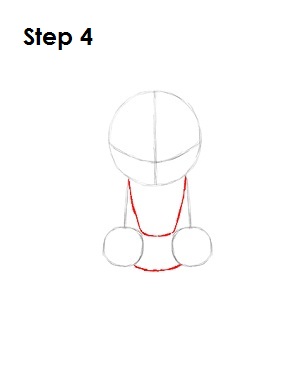
Step 4: Draw his torso by drawing kind of a U-shaped line that starts where his arms start. When drawing this line, make it bend at the top of his hands. For Marvin the Martian's skirt, simply draw a curved line in between his hands near the bottom.
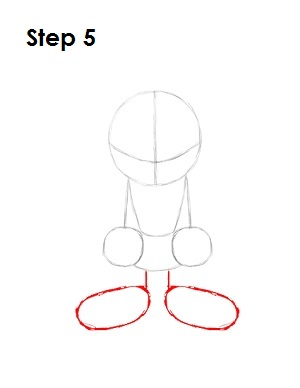
Step 5: Right below Marvin the Martian's skirt, draw two short vertical lines for his legs and a large oval underneath each line for his feet.
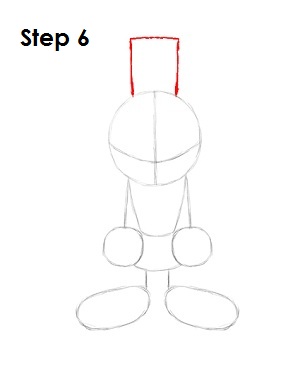
Step 6: Draw a guide for Marvin the Martian's helmet at the top of his head. It should look like a rectangle that's missing the bottom part.
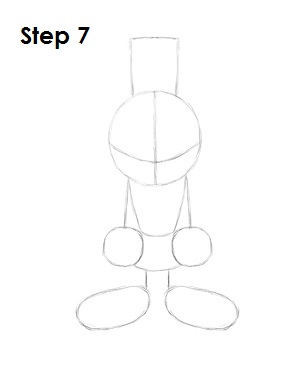
Step 7: That's it for the initial sketch of Marvin the Martian from the Looney Tunes cartoons! You have the basic Marvin the Martian shape, so now go in and tighten your drawing. From this point on, press harder with your pencil in order to get darker lines and a more defined sketch.
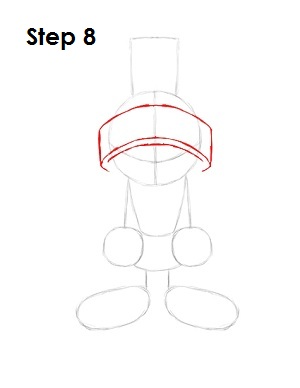
Step 8: The helmet is tricky, so this section about how to draw Marvin the Martian's helmet is broken down into a few steps. First draw a curved line near the top of the head that comes out of the circle. Then draw two more curved lines that are closer together located below the first. Now draw a vertical line on each side that connects the top and middle lines.
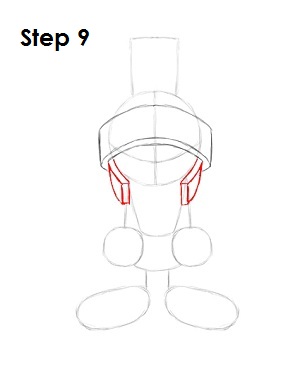
Step 9: Draw the sides of Marvin the Martian's helmet as a series of lines that extend down from the bottom of the helmet and overlap the guides for his arms. Use the image above for reference when drawing Marvin the Martian's helmet.
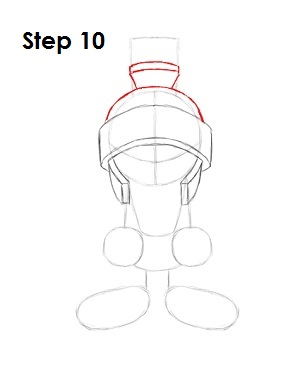
Step 10: Draw the top of Marvin the Martian's helmet by drawing a half circle that is a bit bigger than the original guide for his head. Using the rectangle guide above his head, draw the base for the brush portion of his helmet.
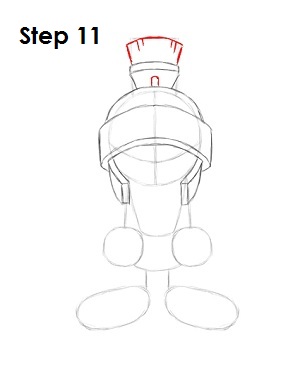
Step 11: Finish the helmet by drawing the brush portion by using the rectangle guide. Draw a small shape near the middle that connects the brush portion to the helmet portion.
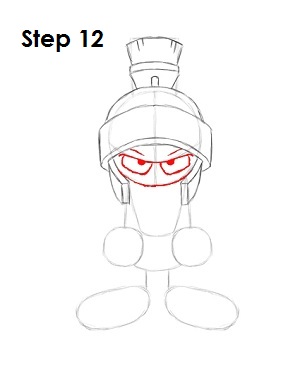
Step 12: Draw Marvin the Martian's eyes as rounded rectangles below the horizontal construction line. Draw a circle inside each eye and shade in his pupils. Draw a line above each eye to indicate his brow. Also darken in the bottom of the head guide for the bottom of this Looney Tunes character's face.
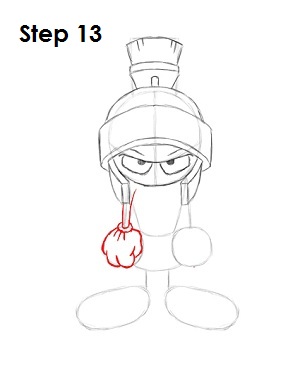
Step 13: Tighten the left arm by fattening the guide. Remember that the top part is hiding behind the helmet. Tighten the shape of Marvin the Martian's hand by curving the lines of the circle so they look like a fist. Marvin wears gloves, so draw a ring around his wrist to indicate where the glove begins. Also draw three lines inside the glove to indicate folds.
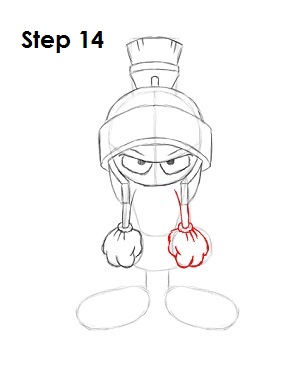
Step 14: Draw the right arm and hand exactly how you drew the left. Fatten the guide and tighten the shape of his hand. Don't forget the glove!
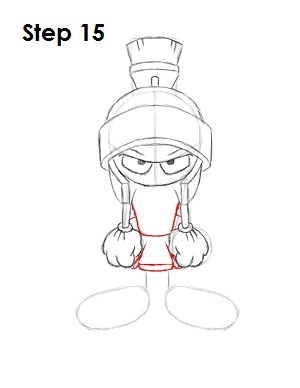
Step 15: Darken Marvin the Martian's torso and draw his skirt. Draw a few lines to the skirt to indicate the thickness and flaps.
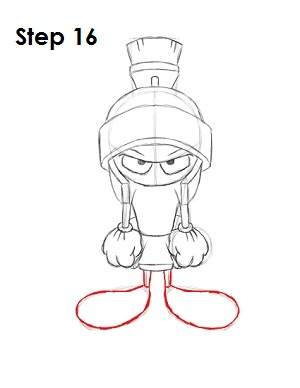
Step 16: Thicken the guides for Marvin the Martian's little legs and tighten the oval shapes of his feet so that they curve more and are narrower near the top.
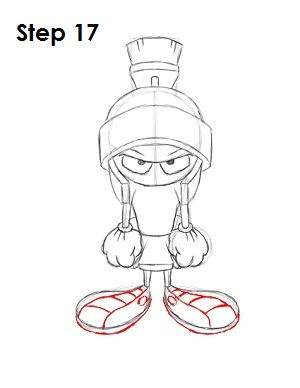
Step 17: Draw the details on Marvin the Martian's sneakers. Add a line at the bottom for his soles, and draw a series of lines inside each sneaker to represent his shoelaces. Draw circles near Marvin the Martian's ankles for extra detail.
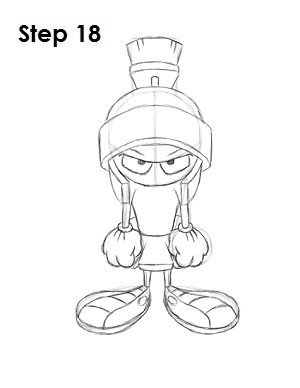
Step 18: That's it! You now have a nice sketch of Marvin the Martian from the Looney Tunes cartoons. You can stop at this quick drawing for a rough, sketchy look or go for a more finished look by continuing to the step below.
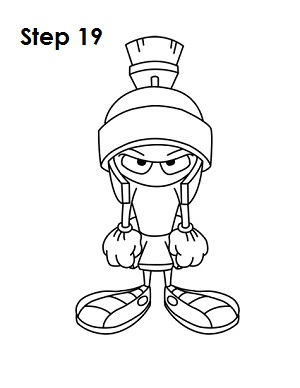
Step 19: For a more finished, inked look, carefully draw over the final sketch lines with a pen or marker. Wait for the ink to dry, and then get rid of every pencil mark with an eraser. You now have a finished inked drawing of Marvin the Martian! You can stop here or go to the final step to complete your drawing of Marvin the Martian.
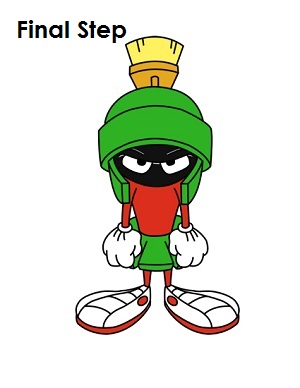
Final Step: For a completely finished Marvin the Martian drawing, you have to color it. You can use markers, color pencils or even crayons! Color the brush portion of his helmet yellow and the base a light brown. His face is black except for a small section above his brow. Marvin the Martian's helmet and skirt are green, and his shirt and detail on his shoes are red. That's it! You now have a completed drawing of Marvin the Martian from the Looney Tunes cartoons.
RELATED TUTORIALS
 |
 |
 |
 |
 |


