How to Draw Perry the Platypus (Agent P)
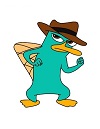
Use the video and step-by-step drawing instructions below to learn how to draw the Phineas and Ferb character Perry the Platypus (Agent P). A new cartoon drawing tutorial is uploaded every week, so stay tooned!
Intro: When learning how to draw the Phineas and Ferb character Perry the Platypus, start off with a pencil sketch. In the beginning stages, don't press down too hard. Use light, smooth strokes for sketching.
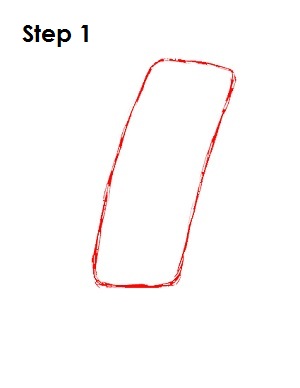
Step 1: To draw Perry the Platypus, start with a long rectangle that bends to the right side of the page. This is the basic shape for Perry the Platypus's head and body.
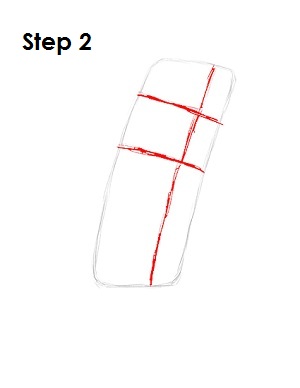
Step 2: Next draw a vertical line and two horizontal lines across Perry the Platypus's head and body shape rectangle. Draw the vertical line close to the right edge of the rectangle and the horizontal lines closer to the top. These will be construction lines that will help you when learning how to draw this Phineas and Ferb's facial features later on.
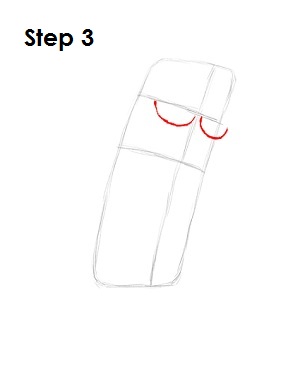
Step 3: For Perry the Platypus's eyes, draw two half circles under the top horizontal construction line and on either side of the vertical construction line. Draw the right half circle slightly smaller because of the perspective.
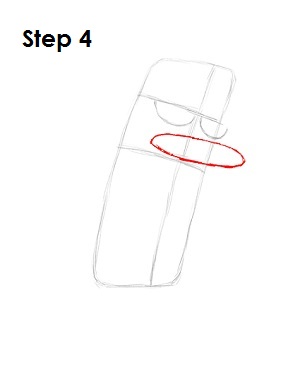
Step 4: Above the bottom horizontal construction line, draw a thin, long oval as a guide for Perry the Platypus's beak.
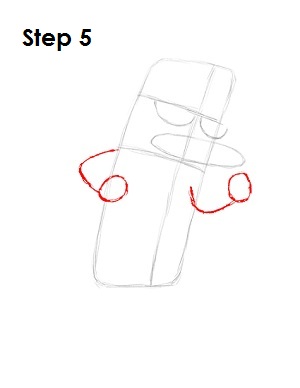
Step 5: Below the bottom horizontal construction line, draw guides for Perry the Platypus's arms. They're basically two curved lines with circles at the ends of them for his hands.
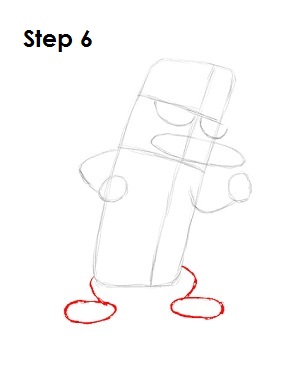
Step 6: Draw Perry the Platypus's legs at the bottom of his body as curved lines. For his feet, draw ovals instead of circles at the end of the leg lines.
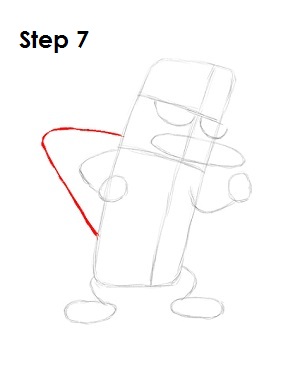
Step 7: Starting above the bottom horizontal guideline, draw a curved line that extends to the lower left side of this Disney cartoon character's body as a guide for his tail.
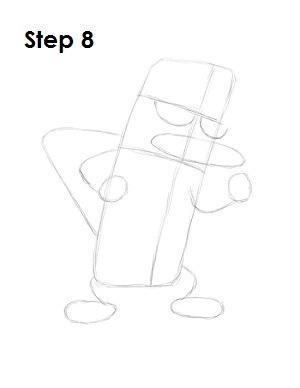
Step 8: That's it for the initial sketch of the Phineas and Ferb character Perry the Platypus! You have the basic Perry the Platypus shape, so now go in and tighten your drawing. From this point on, press harder with your pencil in order to get darker lines and a more defined sketch.
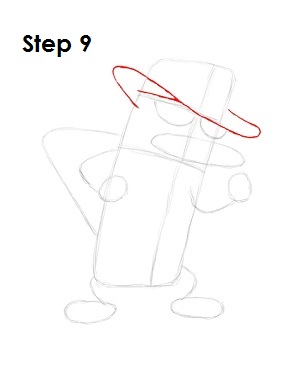
Step 9: Now learn how to draw this Phineas and Ferb character's hat. The hat is a bit tricky, so this section about how to draw Perry the Platypus's hat is divided into two parts. Draw the rim of the hat using the top horizontal construction line as a guide. From the left, draw the bill up and to the left, and then bring it down to the right. End the curved line by drawing the curve back up and to the left to finish Perry the Platypus's brim. Draw a short horizontal line inside of the first curve on the right.
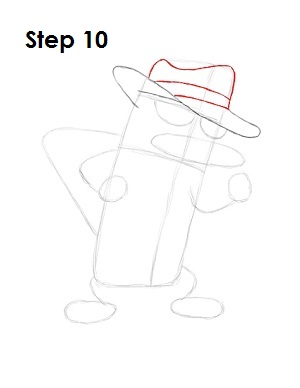
Step 10: Draw the top part of Perry the Platypus's hat using the initial rectangle shape as a guide. Dip the top part of the hat and draw two curved horizontal lines inside the shape as the hatband.
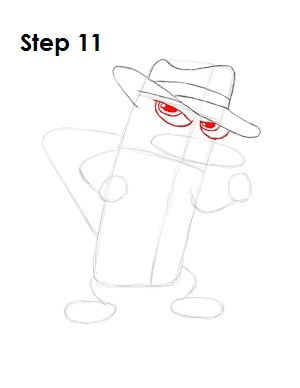
Step 11: Tighten the shape of this Disney cartoon character's eyes. Make his eyelids look closed by drawing his eyelids slightly below the original eye guides. Inside the eye, draw a half circle for his iris, another half circle inside of it for his pupil. Shade it in and draw a tiny circle for glare.
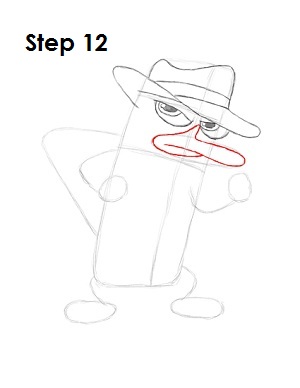
Step 12: Now learn how to draw this Phineas and Ferb character's beak. Draw Perry the Platypus's beak by using the oval as a guide. Draw the bottom part of the beak so it comes inside the oval, and the top part extends upward toward the middle of his eyes.
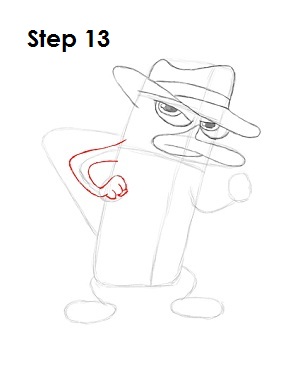
Step 13: Now learn how to draw this Phineas and Ferb character's arms. Using the initial line as a guide, draw in the left arm by making the line thicker. Use the circle at the end as a guide to draw his fist. Draw a couple of lines to indicate Perry the Platypus's knuckles and thumb.
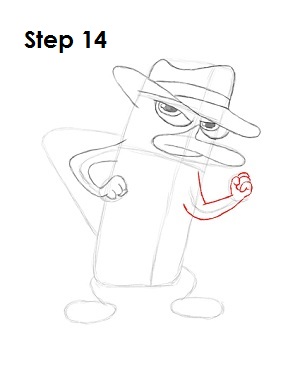
Step 14: Draw the right arm the same way you did the left. Thicken the line a bit and draw the fist. Add a few more curves to indicate Perry the Platypus's fingers and thumb. Use the image above for reference when drawing Perry the Platypus's arm.
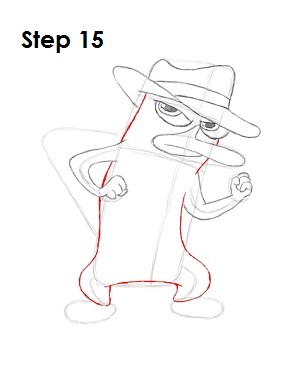
Step 15: Use the initial rectangle shape and the lines for his legs as guides to draw Perry the Platypus's body. Curve his torso to give him a dynamic pose. Draw his legs at the end of his body, which end as curves above the ovals of his feet.
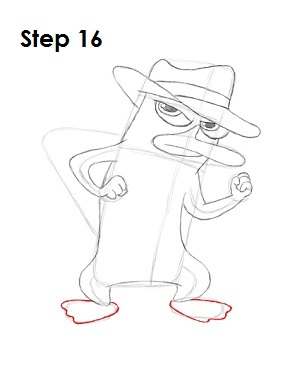
Step 16: Draw in Perry the Platypus's duck-like feet and draw wavy lines at the ends of them to represent his webbed toes.
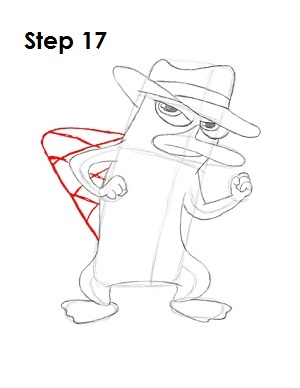
Step 17: Now learn how to draw this Phineas and Ferb character's tail. Darken the shape of Perry the Platypus's tail and draw a few lines within it that resemble crosses as extra detail.
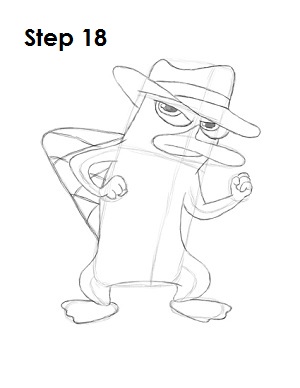
Step 18: That's it! You now have a nice sketch of the Phineas and Ferb character Perry the Platypus. You can stop at this quick drawing for a rough, sketchy look or go for a more finished look by continuing to the step below.
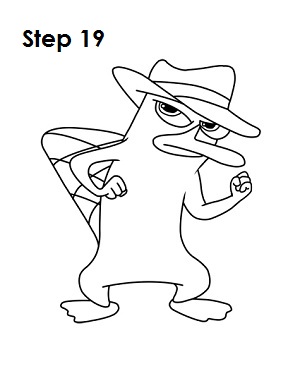
Step 19: For a more finished, inked look, carefully draw over the final sketch lines with a pen or marker. Wait for the ink to dry, and then get rid of every pencil mark with an eraser. You now have a finished inked drawing of Perry the Platypus (Agent P)! You can stop here or go to the final step to complete learning how to draw the Phineas and Ferb character Perry the Platypus.
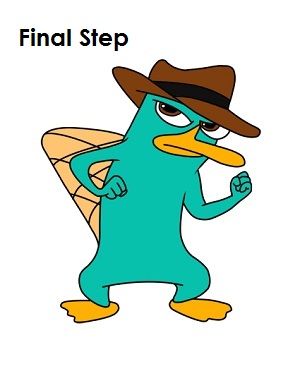
Final Step: For a completely finished Perry the Platypus drawing, you have to color it. You can use markers, color pencils or even crayons! Color Perry the Platypus's hat and eyes brown. The headband on his hat is black. His beak and feet are yellow-orange. Perry the Platypus's tail is light brown, and his body is a greenish/aqua color. Experiment with your colors to get it right! That's it! You have now learned how to draw the Phineas and Ferb character Perry the Platypus (Agent P).
RELATED TUTORIALS
 |
 |
 |
 |
 |


