How to Draw Goku (Full Body) with Step-by-Step Pictures
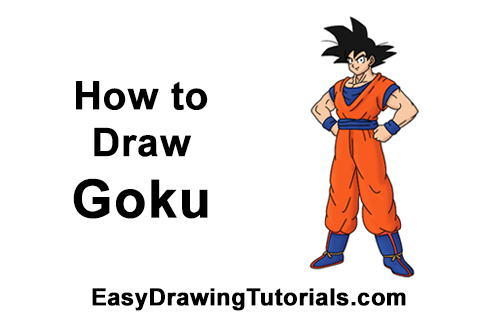
Use the step-by-step drawing instructions below to learn how to draw Goku (full body) from Dragon Ball Z. Stay tooned for more drawing tutorials!
Stay tooned for more free drawing lessons by:
- Liking us on Facebook>>
- Subscribing on YouTube.com>>
- Visit How2DrawAnimals.com for free animal drawing tutorials>>
All of the free art lessons on EasyDrawingTutorials.com are good drawing tutorials for beginners and experienced artists. The online tutorials are easy to follow; they teach you the how to draw basics while showing you how to draw fun characters step by step. Each character's drawing tutorial has step-by-step photos and written text to follow along with as you draw.
RELATED TUTORIALS
 |
 |
To draw Dragon Ball's Goku step by step, follow the drawings below. The new lines in each step are shown in red, and each step is explained in the text below the photo, so you'll know exactly what to draw in each step. Take your time and draw at your own pace.
Intro: Start off with a pencil sketch. In the beginning stages, don’t press down too hard. Use light, smooth strokes for sketching.

Step 1: Draw a small circle near the top of the page as a guide for Goku's head. If you're struggling to draw the circle, just trace the outer rim of a small, circular object like a coin or a lid.
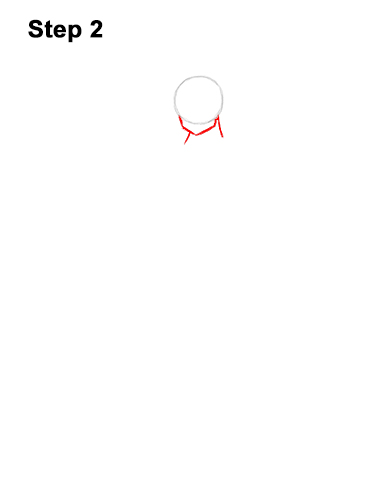
Step 2: Under the circle, draw an angled line that's similar to the letter V as a guide for Goku's jaw and chin. Below the angled line, on either side, draw a short line for this Dragon Ball Z character's neck.
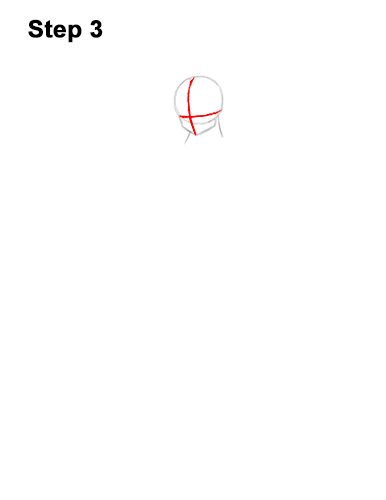
Step 3: Draw two intersecting lines across the entire head as construction guides to help you place Goku's facial features later. The lines should curve to contour to the shape of the head. The vertical line should be close to the left side. The horizontal line should be near the middle.
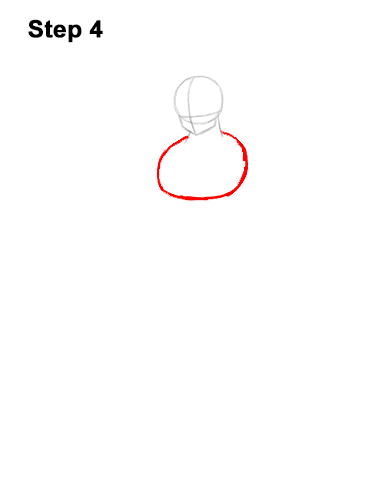
Step 4: Below the head, draw a big shape similar to a big oval as a guide for Goku's chest. Pay attention to the size of this shape in relation to the head.
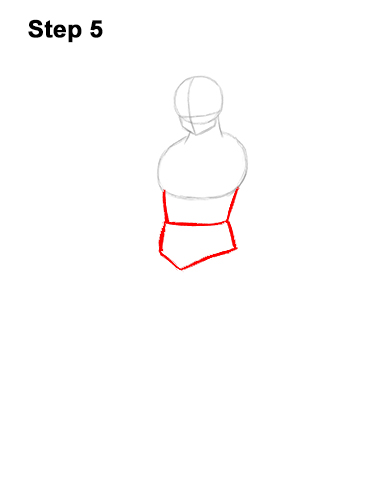
Step 5: Below the chest, draw a shape similar to the bottom half of a square as a guide for Goku's mid-section. Below that, draw a pentagonal shape as a guide for the lower torso. As before, pay attention to the size of these shapes in relation to Goku's chest.
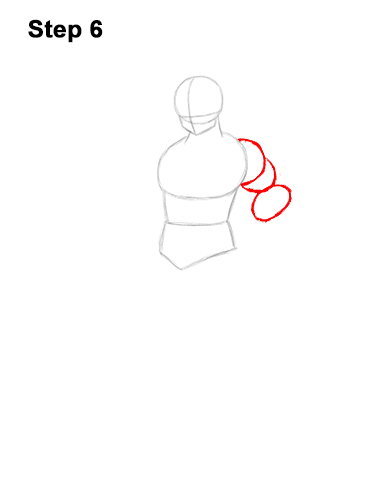
Step 6: On the top, right of the chest, draw a small, half-circle as a guide for Goku's first shoulder. Below that, draw a smaller half-circle as a guide for the bicep. Below the bicep, draw a small oval as a guide for the forearm.
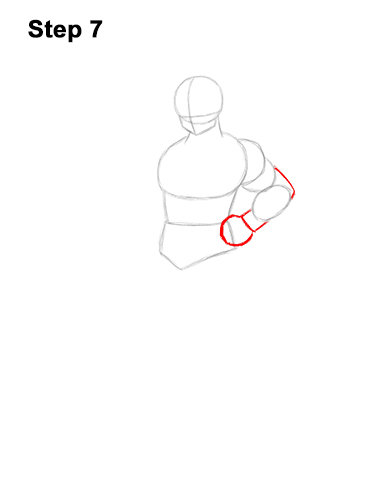
Step 7: Draw a line that connects the bicep to the forearm as a guide for this Dragon Ball Z character's elbow. On the right side of the small forearm oval, draw a square-like shape for the wrist. At the end of the wrist, draw a small circle for Goku's fist that's resting on his hip.
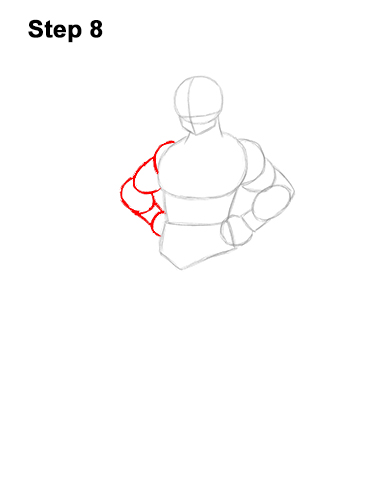
Step 8: On the left side of the body, draw a series of similar shapes as guides for Goku's other arm. The shapes should start at the top and then angle outward to create the elbow joint. Then the shapes should curve inward again and end with a small circle for the fist that rests on the hip.

Step 9: On the lower, right side of the torso, draw a very long, rectangular shape as a guide for the right side of the pants on this Dragon Ball Z character. The length of this shape should be a little longer than Goku's entire torso combined.
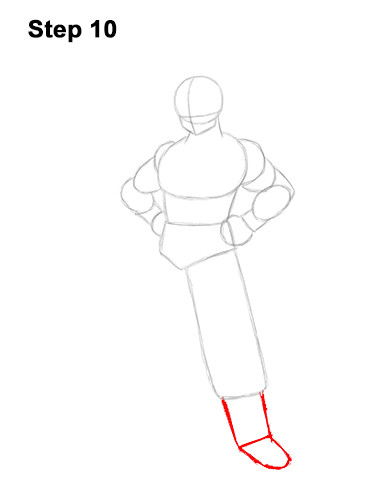
Step 10: At the bottom of the pant leg, draw a smaller, rectangular shape as a guide for the top part of Goku's boot. Below this shape, draw a curved line that's similar to the letter U on its side as a guide for the bottom half of the boot.
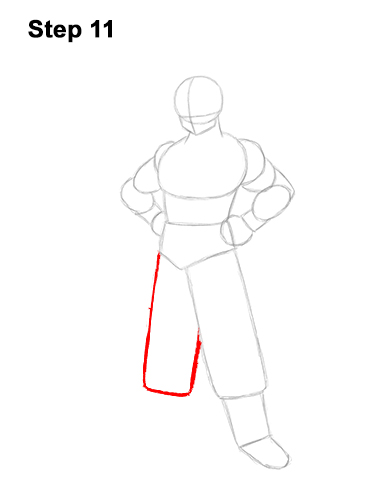
Step 11: On the left side, draw another rectangular shape as a guide for Goku's other pant leg. The top part of this pant leg should be slightly hidden behind the first pant leg.
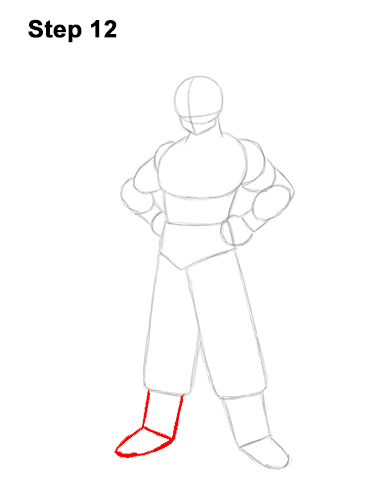
Step 12: At the bottom, draw a shape that's similar to the shape on the right as a guide for Goku's other boot. The top half should be similar to a rectangle, and the bottom half should be similar to the letter U pointing to the left.
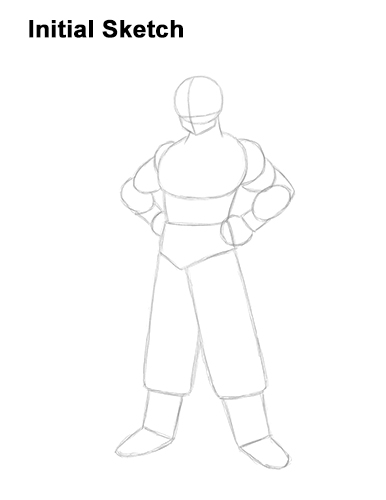
That's it for the guides you need to draw Goku from Dragon Ball Z! For the next steps, use darker lines for a more defined Goku drawing.
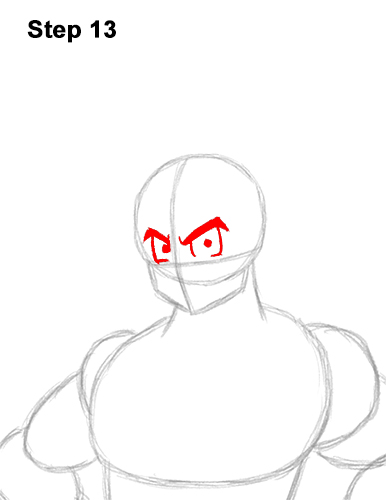
Step 13: Draw Goku's eyebrows and eyes inside the head and use the initial construction lines as guides for the size and position. The eyebrows should be similar to thick check marks. Place them high above the horizontal construction line and on either side of the vertical construction line. Between the eyebrows and the horizontal construction line, draw two square-like shapes for this Dragon Ball Z character's eyes. Inside each eye, draw a small dot for the pupils.
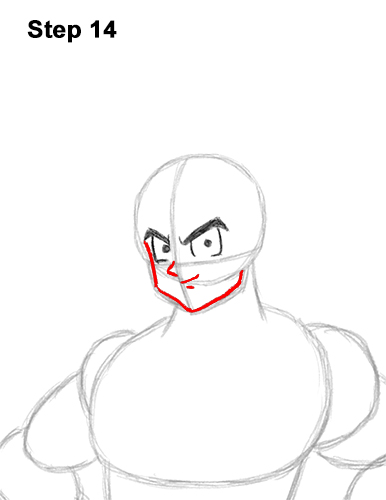
Step 14: Darken the guide for the jaw and chin but make the line a bit more angular. Below the eye on the left, draw a small line that's similar to a less-than sign (<) for Goku's nose. Below the nose, draw two small horizontal lines for the mouth.
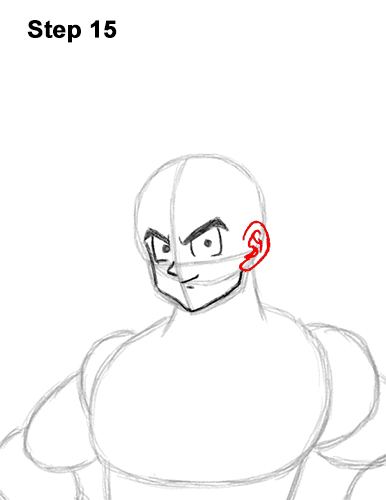
Step 15: On the right side of the head, draw a curved line for Goku's ear. Inside the shape, draw a series of small, curved lines for the ear's structure.
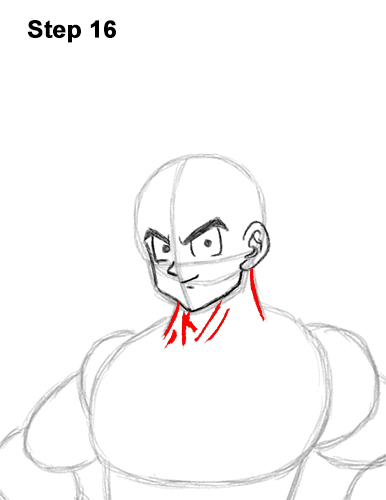
Step 16: Darken the lines under the head on the sides for the neck. Below the chin, draw a couple of short, sloping lines for the detail on Goku's neck.
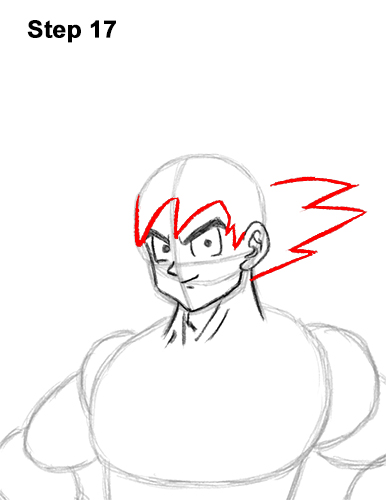
Step 17: Above the eyes, draw two angled lines that are similar to the letter V for the front part of Goku's hair. To the left of the head, draw an angled line to complete the front of the hair. To the right of the head, draw a big, angled line for the second part of this Dragon Ball Z character's hair. The line should basically be a big zigzag with three spikes.
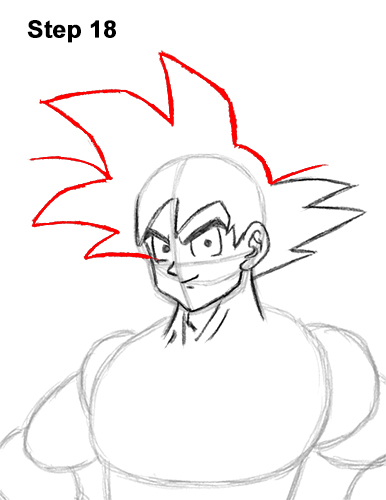
Step 18: Now draw the rest of Goku's hair. Start with a small spike to the left of the eyes. Above that, draw a bigger spike. On the top, left side of the head draw the biggest, widest, angled spike. At the top of this Dragon Ball Z character's head, draw a final big spike. To the right, close off the shape with a short, curved lines. Add a couple of lines on either side for lose hair strands.
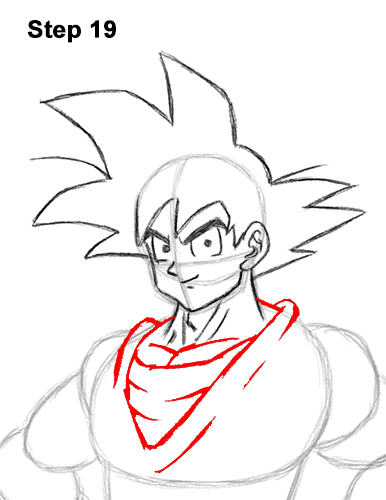
Step 19: Below the neck, draw the detail on Goku's chest. Start with the big, V-shaped opening on the gi. On the outer sides, draw a few lines for wrinkles. Inside the V, draw a couple of curved lines for the inner shirt and wrinkles. At the top, right below Goku's throat, draw two short, curved, horizontal lines for the top of his pectoral muscles.
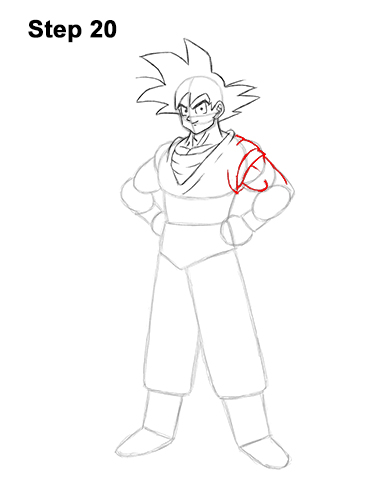
Step 20: Draw a series of curved lines on the top, right side of the body for the gi's short sleeves. Below that, darken the outer section of the guides to create the top part of Goku's arm. Add a couple of short lines inside the arm to emphasize the bicep on this Dragon Ball Z character.
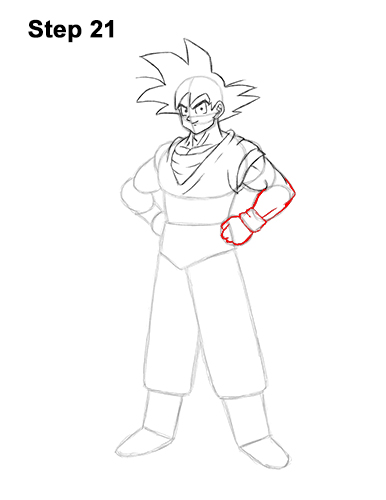
Step 21: Darken the outer edges of the initial guide to finish the rest of Goku's arm. Using a couple of short lines, draw a wrist warmer. As you darken the circle for the fist, make the shape more angular. Add a short line at the top for Goku's thumb.
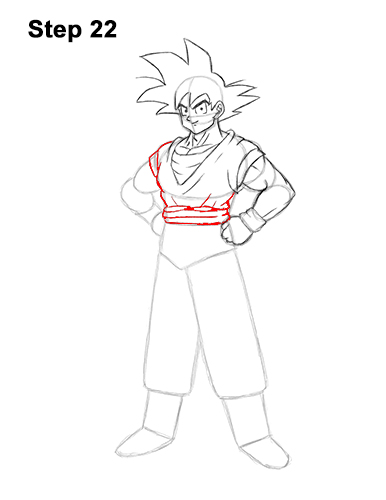
Step 22: Draw a series of lines across the midsection for this Dragon Ball Z character's belt. Darken the left side of the guides for the torso but make the lines more angular. At the top, draw Goku's short sleeves using a series of curved lines.
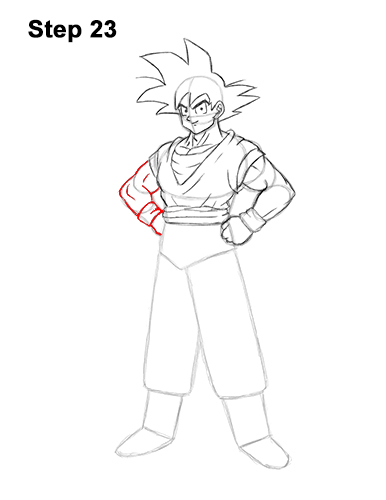
Step 23: Use the shapes to the left of Goku's torso as guides to draw the arm on the left the same way. Darken the outer edges of the guide and add some lines inside to emphasize the muscles. Draw a sleeve warmer using short, curved lines. Goku's fist will be hidden by his pants, so only draw a small portion of it.
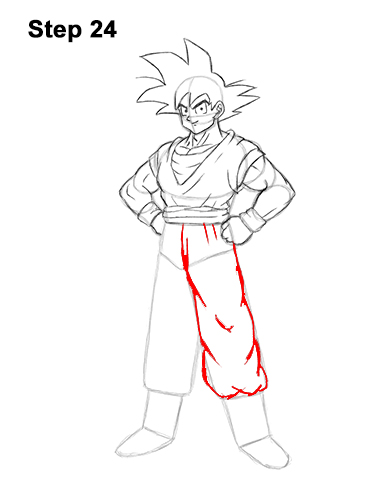
Step 24: Use the long, rectangular shape on the lower, right side as a guide to draw Goku's first pant leg. Darken the path of the guide but make the edges more curved so that they resemble wrinkles on the cloth. The bottom edge should consist of curved lines to represent the pant cuff tucked into Goku's boot.

Step 25: Darken the outer edges of the guide at the bottom to create the shape of Goku's boot. Inside the shape, draw a series of lines for the boot's design and for the bit of rope across the middle that tightens the boot.

Step 26: Use the rectangular shape on the left as a guide to draw Goku's other pant leg the same way. Darken the outer edges but make the lines curvier for the wrinkles on the cloth of this Dragon Ball Z character's clothing.
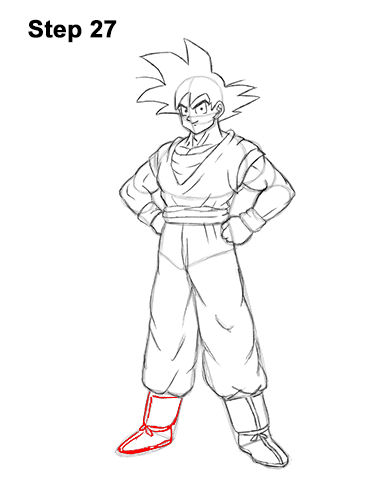
Step 27: Darken the outer edges of the guides at the bottom to create Goku's other boot. Like before, add a few lines inside for the boot's detail and rope.

Step 28: For a more finished-looking Goku from Dragon Ball Z, carefully go over the final sketch lines with a pen or marker.

Step 29: After you're finished inking Goku, get rid of every pencil mark with an eraser.
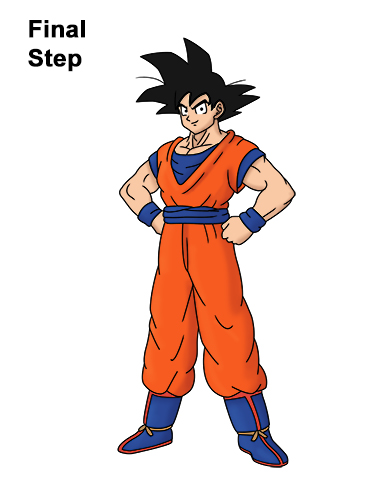
Final Step: Color your Goku drawing using color pencils, markers or crayons! Use black for Goku's hair and peach for his skin. If you don't have peach, use light brown or yellow-orange. Use orange for the main part of the gi. Use blue for the undershirt, wrist warmers, belt and main part of the boots. Color the detail on Goku's boots red and the rope on the boots light brown. Now you have a completed drawing of Goku from Dragon Ball Z!
Thanks for visiting! Subscribe to the EasyDrawingTutorials YouTube Channel for video drawing tutorials.
To learn how to draw animals, visit How2DrawAnimals.com.
RELATED TUTORIALS
 |
 |
sZ8cyvS956


