How to Draw Sailor Moon

Use the video and step-by-step drawing instructions below to learn how to draw Sailor Moon (aka Serena Tsukino) from the Sailor Moon anime cartoon. A new drawing tutorial is uploaded every week, so stay tooned!
Intro: Start off with a pencil sketch. In the beginning stages, don’t press down too hard. Use light, smooth strokes for sketching.
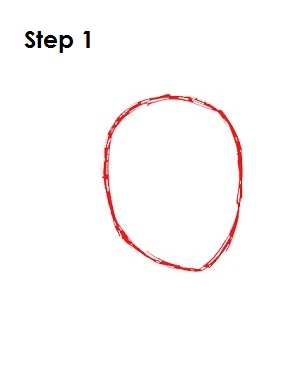
Step 1: Start with a shape similar to an oval with a slight point at the bottom. The oval doesn’t have to be perfect. It’s just a basic guide for Sailor Moon's head.
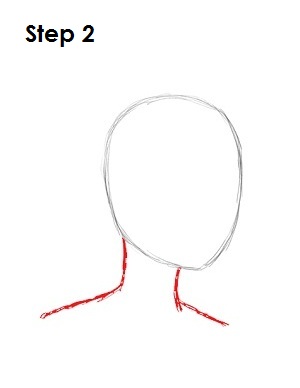
Step 2: Under the oval, draw two curved lines as guides for Sailor Moon’s neck and shoulders.
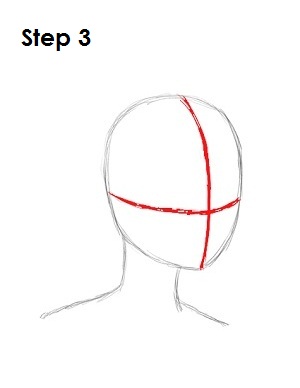
Step 3: Next, draw two intersecting lines across the oval, one vertical and one horizontal. Bend the lines so they follow the contour of the shape. These will be construction lines that will help you place Sailor Mooon’s facial features later on.
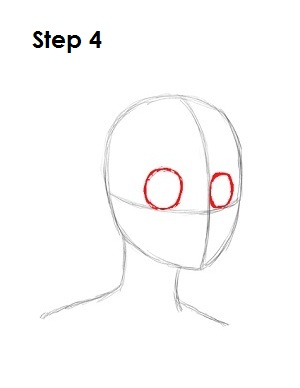
Step 4: On either side of the vertical construction line, draw two circles sitting on top of the horizontal construction line. These will be guides for Sailor Moon's eyes. The circle on the right should be smaller and narrower because of perspective.
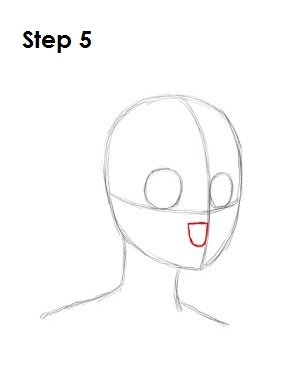
Step 5: Under the horizontal construction line and on the left side of the vertical construction line, draw a guide for Sailor Moon's mouth. The shape of the guide is similar to the letter U with a line over it or a sideways letter D.
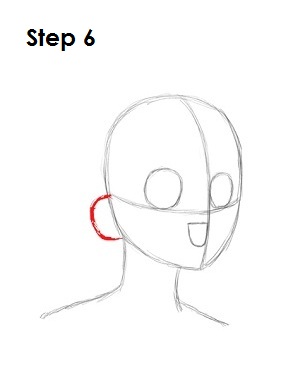
Step 6: Draw a curved line similar to a letter C on the left side of Sailor Moon's head as a guide for her ear.
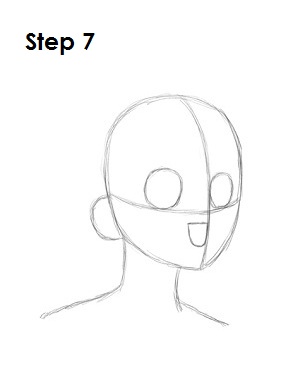
Step 7: That's it for the initial sketch! You have the basic shape for Sailor Moon. Now go in and tighten your drawing. From this point on, press harder with your pencil in order to get darker lines and a more defined sketch.
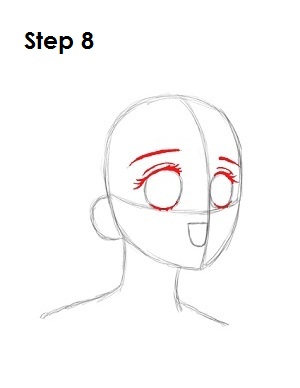
Step 8: Use the initial circles as guides to draw Sailor Moon's eyes. Darken the top and bottom part of each circle, and make the lines thick. Draw a few small lines on the top and bottom for Sailor Moon's eyelashes. Right above each eye, draw a thin curved line for her eyelids. Higher up on each eye, draw a thicker, curved line for her eyebrows.
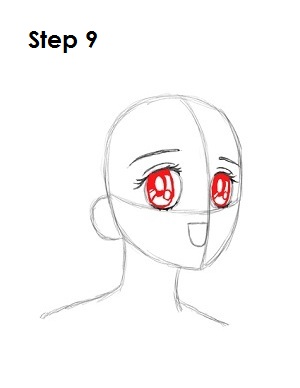
Step 9: Inside each of Sailor Moon's eyes draw two ovals to represent glare. On the left side of each eye, draw a couple of lines to represent reflection. Darken the area that surrounds the main oval and the top part of the eyeball.
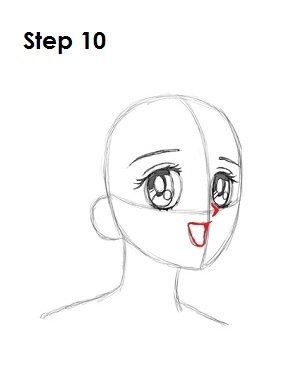
Step 10: On the right side of the vertical construction line and below the right eye, draw a small angled line similar to a greater-than sign (>) for Sailor Moon's nose. Use the U shape at the bottom as a guide to draw her mouth. Make the shape narrower and draw a curved line inside for the tongue.
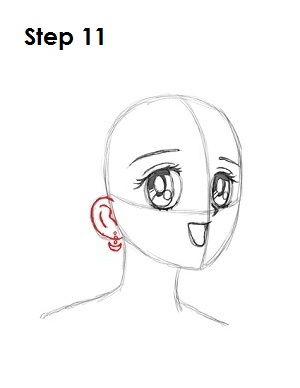
Step 11: Draw Sailor Moon's ear on the left side of the head by using the C-shaped line as a guide. Draw a few curved lines inside the shape to give the ear structure. Draw three tiny circles and a crescent moon shape on her earlobe for her earring.
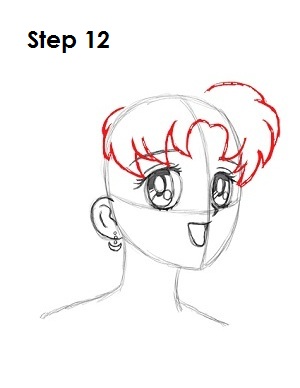
Step 12: Sailor Moon's hair is a bit tricky, so it's split into four parts. Draw her bangs first on the top part of Sailor Moon's head. The bangs are made up of many curved lines and arcs that overlap her eyebrows. Use the image above for further reference.
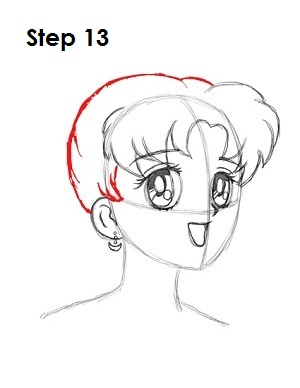
Step 13: Now draw the back part of Sailor Moon's head as a curved line that extends from the left side of her ear to the top of her bangs. Draw a few curved lines above her ear too.
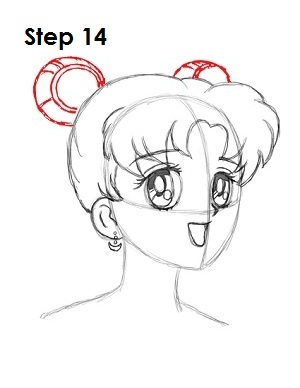
Step 14: On top of Sailor Moon's head, draw two circles for her buns, which are also called "odango." Draw a couple more circles inside her buns for Sailor Moon's jewels and a few lines in the odango to simulate hair.
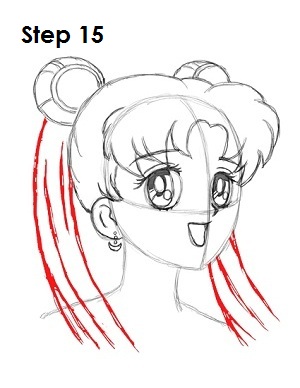
Step 15: Finish Sailor Moon's hair by drawing long lines on the left side of her head to represent the pigtail portion of her odango. Draw some lines on the right side of her head as well, but make them shorter because the top portion will be hidden by Sailor Moon her face.
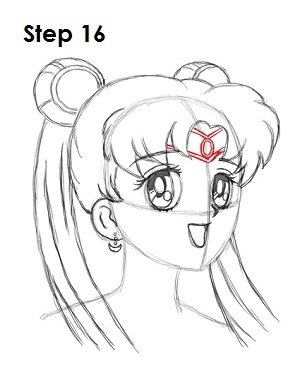
Step 16: Draw Sailor Moon's tiara on her forehead in between her eyebrows. Draw a few V-shaped lines for the main part of the tiara and draw a couple of ovals for the jewel in the middle.
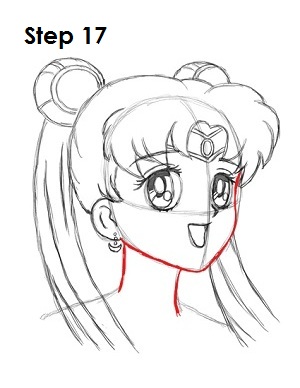
Step 17: Use the initial oval and lines as guides to draw Sailor Moon's face and neck. As you draw the line for her face, make sure you dip in the line toward the right eye to create her cheekbone.
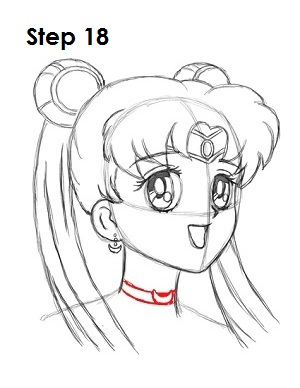
Step 18: Draw a couple of curved lines on Sailor Moon's neck to create her choker necklace. Draw a small crescent moon inside the bands.
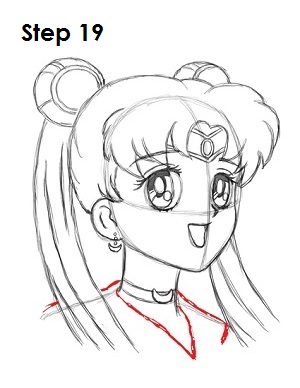
Step 19: Use the initial lines to draw Sailor Moon's shoulders. Draw a V-shaped line for the V-neck on the top part of her uniform.
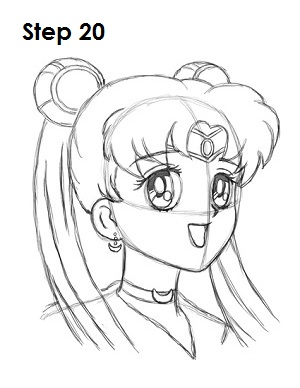
Step 20: That’s it! You now have a nice sketch of Sailor Moon, aka Serena Tsukino. You can stop at this quick drawing for a rough, sketchy look or go for a more finished look by continuing to the step below.
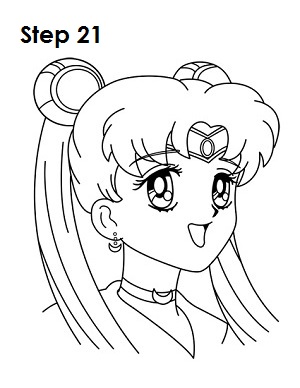
Step 21: For a more finished, inked look, carefully draw over the final sketch lines with a pen or marker. Wait for the ink to dry, and then get rid of every pencil mark with an eraser. You now have a finished inked drawing of Sailor Moon! You can stop here or go to the final step to complete your Sailor Moon drawing.
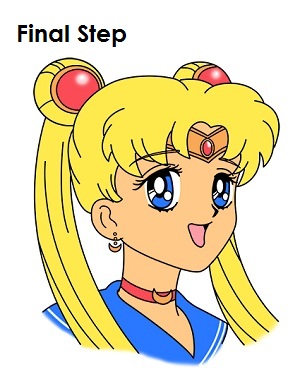
Final Step: For a completely finished Sailor Moon drawing, you have to color it. You can use markers, color pencils or even crayons! Sailor Moon's hair is blond, so color it yellow. The jewels on her odango and and tiara, along with her choker, are red. Sailor Moon's tiara, earrings, eyebrows and crescent moon on her choker necklace are dark yellow. Her eyes and uniform are blue. Leave a couple of lines on her uniform white for detail. Sailor Moon's tongue is pink, and her skin is peach. If you don't have peach, improvise and use orange or light brown! That’s it! You now have a completed drawing of Serena Tsukino from Sailor Moon.


