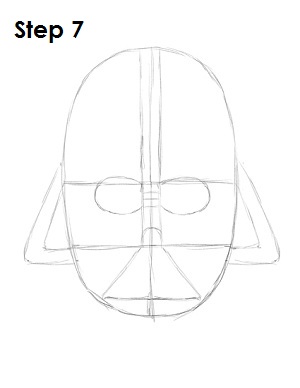
Step 6: On the outside of the main oval, draw two tilted L shapes that start and end just outside of the two horizontal construction lines. Draw one L shape smaller and inside of the larger one. Draw that same shape again on the right side. Extend the lines of his nose to the top of his head. These lines will make up this Star Wars character's helmet.

Step 7: That's it for the initial sketch of Darth Vader from Star Wars! You have the basic Darth Vader shape, so now you will go in and tighten your drawing. From this point on, press harder with your pencil in order to get darker lines and a more defined sketch.

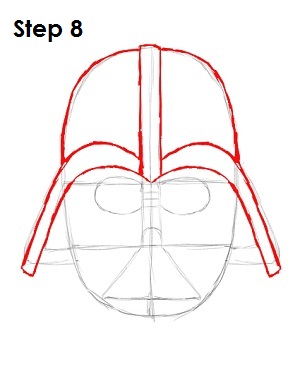
Step 8: Darken in Darth Vader's helmet by drawing a curved line that starts where the construction lines cross in between his eyes. Draw this line so it follows the small L shape outside his head, and end just below the L shape. Draw the same thing on the other side. Now darken in the middle portion of his helmet (the lines extending up from his nose). Start above the curved line you drew earlier in this step and follow the outside L shape. Connect the two lines at the end with a slightly tilted horizontal line. Finish drawing Darth Vader's helmet by darkening the top part of the main oval.

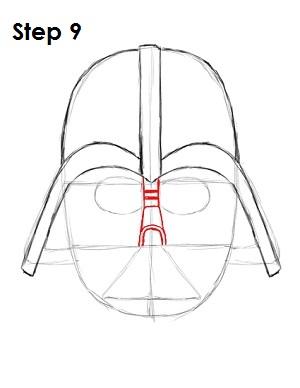
Step 9: Tighten Darth Vader's nose shape by drawing another arc on top of the original arc you drew at the bottom of his nose. Connect the bottom half of his nose with the top half using slightly tilted vertical lines. Darken the remaining lines on the top half of this Star Wars character's nose.

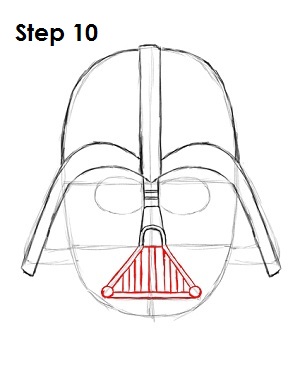
Step 10: To tighten Vader's mouth, draw two small circles on the bottom corners of his mouthpiece. Draw an outline around his mouth that connects with the nose piece. Draw 10 vertical lines inside his mouthpiece that are evenly spaced.


