Step 10: Inside Frosty's head, draw a small oval where the guide lines intersect for the nose. Sketch lightly at first and only darken the line when you get the shape right. Add curved line inside for extra detail.

Step 11: Draw two long ovals on top of the horizontal guide line for Frosty the Snowman's eyes. The eyes should be on either side of the vertical guide line. The eye on the left should be a bit smaller. Inside each eye, near the bottom, right side, draw a tiny oval and shade it in for the pupils.

Step 12: Below Frosty's nose, draw a long, curved, horizontal line for the mouth. The ends of the mouth should almost touch the horizontal guide line. Add a short smile line at each end. Under the mouth, draw a curved line that's similar to the letter U for the open mouth.

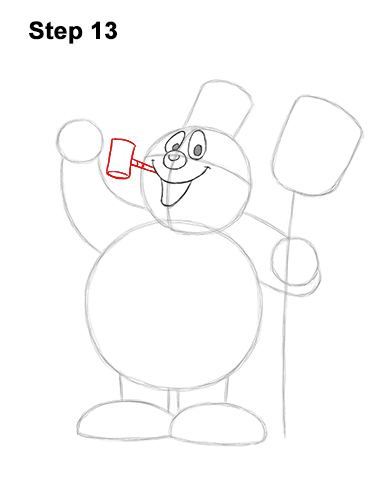
Step 13: On the left side of the mouth, draw two short lines for the pipe's thin stem. At the end of the stem, draw a curved cylindrical shape for the pipe's corncob chamber. Sketch the pipe lightly at first so that's easy to erase if you make a mistake. When you get the shape right, darken the lines.

Step 14: Use the initial circle at the top as a guide to draw Frosty the Snowman's head. Darken the edge of the initial circle but make the bottom part a bit wider. Don't darken the bottom edge of the circle so that the shape connects to the body.


