Create Hopping Rabbit Animations!
Rabbit Animations are the furry version of the classic bouncing ball. Hop - Hop - Hop!

Start by Animating the Body
To animate a jumping bunny, I find it easy to start with a bouncing ball that has legs.
- Lock and hide all the layers except the Body and Legs:
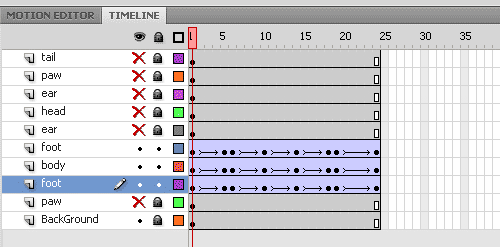
Create the keyframes for the rabbit animation as you would for a bouncing ball:
- Ease out on the way up,
- Ease in on the way down.
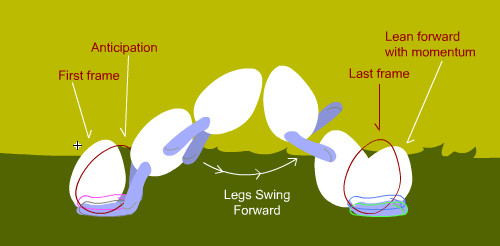
Add anticipation before the jump - the rabbit leans forward, preparing to leap.
At first the legs push the body off the ground, stretching backwards, then they swing forward, going ahead of the body for the landing.
On the contact frame, only the tip of the legs touches - the whole body is stretched down.
Squash the body for the impact on the very next frame, then ease out to the original position.
Secondary Action - Head, Paws and Tail
Once you have the movement for the BIG MASS of the body figured out, it's easy to add the rest of the rabbit parts animations.
It's best to do them one by one - First the Head:
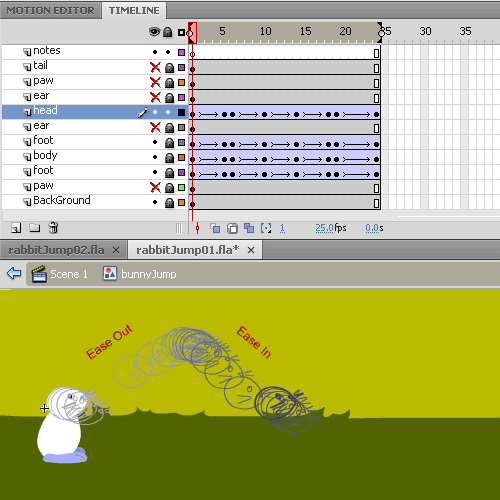
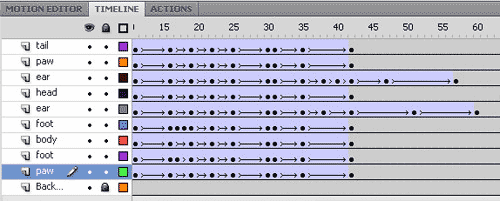
Unlock and Show the Head layer. Go to each keyframe of the body, and create a matching head keyframe for it. Make sure you match the Eases as well, or the head will lag behind or speed ahead of the body!
Do the same for the front paws and the tail.
The Ears come last in Rabbit Animations
Rabbit ears are like hair, cloths long tails and so on - the part of the animated character that are basically dragged along.
The ears are attached to the head.
Let's mark the points where they connect:
- Inside the Head symbol, create a new layer, and mark the spots. This is just for your convenience.
Convert this layer to a Guide Layer when you finish animating, so that these marks won't show on the final animation.
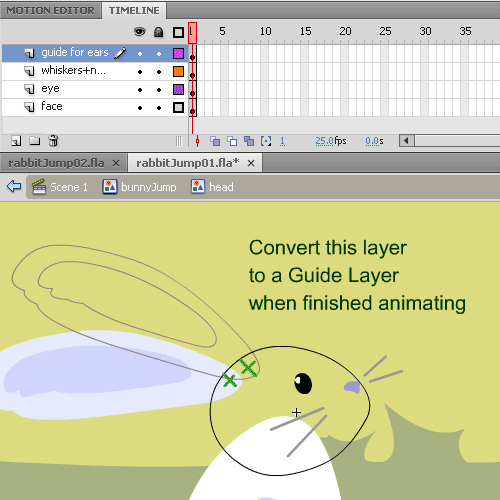
Back to the ears - place the pivots (registration points) at the roots of the ears, and align them with the marks on the head.
- (Set the pivots on the first frame of the animation. To do this, select the object with the Free Transform tool, and drag the white dot - the pivot - to where you want it to be. DO NOT CHANGE IT AGAIN while you animate this object. For further explanation about the transformation point, click here.)
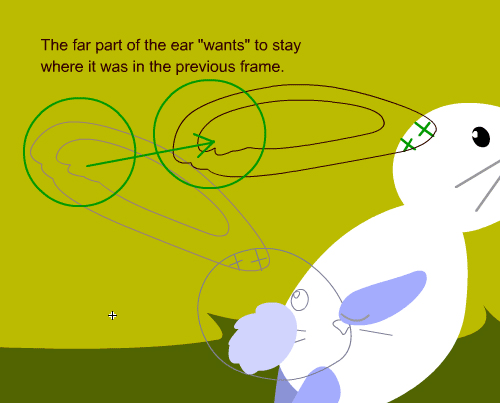
Now we can do the rabbit ear animations:
- Just let them drag behind the head! At each keyframe for the head add a key frame for the ears.
- Again, be sure to match the Ease Ins and Outs.
Starting from a resting position, the ears get dragged along, moving up and down. - The ear animation continues for a few frames after the rest of the rabbit animation ends.
At the end of the jump, when the rabbit lands, they have gathered a lot of momentum, so as the rabbit stops, the ears continue forward.
Have them bounce back, then settle back into their original position.
I find it looks best with an Ease-Out at the end.
That's it!!
Give yourself a nice carrot for a job well done.
You can try different rabbit animations:
Either copy these frames or save the file under a different name, and use these very same keframes to:
- Change the height of the jump, or how far the rabbit skips, and how fast.
- Try High Bounding Gallops,
- Try Cute Shallow Hops
The BIG SECRET is:
Animate The Body First
With rabbit animations, as with any animation what-so-ever -
always animate the BIG MASS first.
The big mass is usually the body.
In this tutorial I first animated the body and the legs that push it, and only then added the rest of the limbs, one at a time.
You can, of course, create the keyframes for the entire figure from the start, it's very easy with Flash, BUT -
I often see my students hesitate to move the the major body mass.
New animators tend to play with the arms and legs, and not dare touch the body and the head.
This really needs to be the other way around!
START WITH THE BIG MASS!!
Trust me.
Animate the body first, then the head.
Get the spacing - the Ease-Ins and Outs - right, and the rest will follow.
Happy Hopping!
Other Flash Tutorials:
Check out the Butterfly Animation tutorial
and here you can learn How to Draw a Cat
Home > Learn Flash > Rabbit Animation
Flash Tutorials
mask tutorial
the transformation point (why does the pivot jump?)
Drawing in Flash - How to draw a cat
Part 1 - body
Part 2 - face
Flash 101 Series:
Flash Symbol Explained part 1 and part 2
Flash 101 series main page
Exercise 1: Create a new Flash Symbol
Exercise 2: Convert to Symbol + Break Apart
Exercise 3: Create Multiple Instances + Distribute to Layers
Exercise 4: Transform instances + color effects
Exercise 5: Edit Symbol + Navigate in and out of symbols
Exercise 6: Nested symbols: Sun animation
Exercise 7: Duplicate + Swap
Flash Cut Out Animation Tuts
Butterfly Animation Tutorial:
Part 1, Part 2, Part 3
Rabbit Animations Tutorial
Download the source files for these tutorials!

